Are you looking for a fun and practical project that adds charm to your home and keeps your child's toys organized? Building your own toy chest is easier than you think, especially with the right woodworking plans.
Imagine having a sturdy, custom-made chest that fits perfectly in your space and matches your style. You’ll find simple, step-by-step DIY toy chest woodworking plans designed just for you. Whether you’re a beginner or have some experience, these plans will guide you through creating a beautiful, functional piece that lasts for years.
Keep reading to discover how you can turn a few pieces of wood into a treasured storage solution your whole family will love.
Choosing The Right Wood
Choosing the right wood is important for your DIY toy chest project. The wood affects how strong and safe the chest will be.
Good wood also makes the chest look nice and last a long time. Think about cost, durability, and finish before buying wood.
Affordable Wood Options
You can build a toy chest with wood that fits your budget. Some woods cost less but still work well for furniture.
Softwoods are usually cheaper and easier to work with. Pine and fir are common choices for DIY projects.
- Pine: Light, easy to cut, and affordable.
- Fir: Stronger than pine and still budget-friendly.
- Poplar: Smooth surface, good for painting.
Durability And Safety
Durable wood keeps the toy chest safe for kids. Hardwoods like oak and maple last longer and resist dents.
Make sure the wood has no splinters or cracks. Smooth wood prevents injuries and keeps the chest strong.
- Hardwoods are more durable but cost more.
- Check wood for knots or defects before buying.
- Sand all surfaces to avoid splinters.
Wood Finishes And Treatments
Finishes protect wood and make the toy chest look good. Choose safe finishes that do not harm children.
Non-toxic paints and sealants keep the chest safe. Finishes also help the wood resist stains and water damage.
- Use water-based, non-toxic paints or stains.
- Apply sealant to protect against spills.
- Let finishes dry fully before use.

Credit: www.ana-white.com
Essential Tools And Materials
Building a DIY toy chest needs certain tools and materials. These help make the project safe and easy.
This guide covers basic woodworking tools, safety gear, and extra supplies needed for the job.
Basic Woodworking Tools
You need some basic tools to cut, shape, and assemble wood for the toy chest.
- Measuring tape or ruler for accurate dimensions
- Handsaw or circular saw for cutting wood
- Hammer for driving nails
- Screwdriver or drill for screws
- Clamps to hold pieces together
- Sandpaper or electric sander to smooth surfaces
- Square tool to check right angles
Safety Gear
Safety gear protects you from injuries during woodworking. Always wear the correct equipment.
| Safety Item | Purpose |
| Safety glasses | Protect eyes from dust and wood chips |
| Ear protection | Reduce noise from power tools |
| Dust mask | Prevent inhaling sawdust |
| Gloves | Protect hands from splinters and cuts |
Additional Supplies
Besides tools and safety gear, you will need some extra materials to complete the toy chest.
- Wood boards, such as pine or plywood
- Wood glue for strong joints
- Wood screws or nails
- Wood filler to fix small holes
- Paint or wood finish for protection and look
- Brushes or rags for applying finish
Simple Toy Chest Designs
Building a toy chest can be a fun and useful woodworking project. Simple designs make it easy for beginners to create a strong and attractive chest.
These toy chests help keep toys organized and can last for years. Choose a design that fits your space and skill level.
Basic Box Chest
The basic box chest is the simplest design. It is a plain box with a hinged lid for easy access.
This design uses straight cuts and simple joinery. It is a great choice for those new to woodworking.
- Simple rectangular shape
- Flat bottom and sides
- Hinged top lid
- Can be painted or stained
Storage Bench Combo
The storage bench combo adds seating to your toy chest. It works as both a bench and a storage box.
This design is practical for small rooms. Kids can sit on it while playing or reading.
- Strong bench top for sitting
- Storage space inside
- Simple frame construction
- Can include handles for easy moving
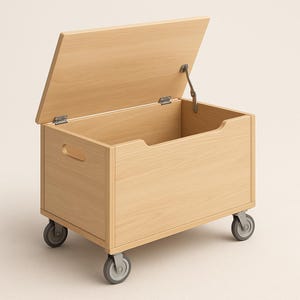
Open Lid Chest
The open lid chest features a lid that stays open by itself. It helps prevent accidents when children use it.
This design often uses special hinges or supports. It is safer and more convenient for daily use.
- Self-supporting lid
- Easy access to toys
- Can be made with soft-close hinges
- Good for safety-conscious homes
Credit: www.etsy.com
Stylish Features To Add
Building a DIY toy chest can be fun and useful. Adding stylish features makes it unique and attractive.
Simple details can turn a plain chest into a beautiful piece of furniture kids will love.
Decorative Trim And Molding
Trim and molding add shape and depth to your toy chest. They make the edges look neat and finished.
Use crown molding on top or baseboard trim at the bottom for a classic look. Beveled edges give a soft, smooth feel.
- Attach corner blocks for a traditional style
- Add raised panels for extra texture
- Use rope molding for a playful design
Paint And Stain Ideas
Paint and stain change how the wood looks and protects it from wear. Choose colors that fit your room.
Bright colors make the toy chest fun. Natural stains show the wood grain and give a warm feel.
- Use chalk paint for a matte, vintage look
- Try two-tone paint with a bright lid and neutral body
- Apply clear varnish over stain for shine and protection
Custom Handles And Hinges
Handles and hinges are both practical and decorative. Custom choices add personality to your chest.
Pick handles that are easy for kids to use. Choose hinges that keep the lid safe and secure.
- Use wooden knobs painted to match the chest
- Install metal handles shaped like animals or stars
- Choose soft-close hinges to avoid slamming lids
Step-by-step Building Process
Building a toy chest is a fun woodworking project anyone can try. This guide shows you how to make a strong and safe toy chest for kids. Follow each step carefully for best results.
We will cover measuring and cutting wood, assembling the frame, and adding finishing touches. Each part is important to create a sturdy and attractive chest.
Measuring And Cutting Wood
Start by measuring all wood pieces needed for the toy chest. Accurate measurements help everything fit well. Use a tape measure and pencil for marking.
- Measure the base and sides according to your design.
- Mark the wood pieces clearly before cutting.
- Use a saw to cut along the marked lines.
- Sand the edges smooth to avoid splinters.
Assembling The Frame
Next, put the frame together by joining the cut wood pieces. A tight frame keeps the chest strong and safe for kids.
| Part | Tools Needed | Tips |
|---|---|---|
| Base | Screwdriver, clamps | Ensure it is square and level |
| Sides | Wood glue, screws | Use clamps to hold pieces before screwing |
| Back | Nails, hammer | Check alignment with sides and base |
Use wood glue and screws to join parts firmly. Clamp pieces while glue dries. Check for square corners with a carpenter's square.
Finishing Touches
After the frame is done, add details like sanding, painting, and installing the lid. These make the toy chest safe and nice to look at.
- Sand all surfaces well to remove rough spots.
- Apply child-safe paint or wood finish.
- Attach hinges to the lid and frame carefully.
- Add handles or knobs for easy opening.
- Check that the lid opens smoothly and stays open safely.
Budget-friendly Tips
Building a toy chest can be fun and affordable. Using budget-friendly tips can save you money and resources.
Here are some ideas to help you create a toy chest without spending too much. Let’s explore some smart ways to make your project cost-effective.
Using Reclaimed Wood
Reclaimed wood is a great option for your toy chest. It is environmentally friendly and often cheaper than new wood.
Look for old furniture or pallets. These can be sources of reclaimed wood for your project.
- Check local thrift stores for old furniture
- Ask friends or family for unwanted wood
- Search online marketplaces for free or cheap pallets
Sourcing Discounted Materials
Finding materials at a discount can lower your project cost. Many places offer affordable options.
Visit local hardware stores or clearance sections. You might find great deals on wood and tools.
- Look for sales or coupons at hardware stores
- Buy in bulk to reduce costs
- Check online for discount codes
Maximizing Material Usage
Make sure to use all your materials wisely. Planning your cuts can help reduce waste.
Measure carefully and create a detailed plan. This will ensure you use every piece of wood efficiently.
- Draw a cutting diagram before starting
- Use scraps for small parts or decorations
- Double-check measurements to avoid mistakes
Safety Considerations
Building a toy chest involves careful planning. Safety is a key factor. Parents want a safe space for their children's toys.
Ensuring that the toy chest is safe requires thinking about construction, finishes, and lid mechanisms.
Child-safe Construction
Use smooth edges to prevent injuries. Rounded corners are safer than sharp ones.
Choose sturdy wood that won't easily break. This adds to the safety of the toy chest.
- Sand all surfaces to remove splinters
- Ensure joints are secure and stable
- Use screws instead of nails for stronger holds
Non-toxic Finishes
Children often touch and mouth objects. Non-toxic finishes prevent harmful exposure.
Opt for water-based paints and sealants. They are safer for kids.
- Look for labels that say "child-safe"
- Avoid finishes with strong odors
- Test on a small area before full application
Secure Lid Mechanisms
Lids can be heavy and dangerous. A safe lid mechanism protects little fingers.
Consider using soft-close hinges. They prevent the lid from slamming shut.
- Install lid supports to hold it open
- Ensure the lid fits securely to avoid shifting
- Check the mechanism regularly for wear
Maintenance And Care
Keeping your DIY toy chest in good shape takes regular care. Simple steps can protect the wood and keep it looking nice.
Understanding how to clean, fix, and preserve the toy chest helps it last for years. This guide covers easy ways to maintain your woodworking project.
Cleaning Tips
Cleaning your toy chest often stops dirt and dust from damaging the wood. Use soft cloths and mild cleaners to avoid scratches.
- Dust the chest with a dry, soft cloth weekly.
- Wipe spills immediately to avoid stains.
- Use a damp cloth with mild soap for deeper cleaning.
- Dry the surface fully after cleaning to prevent moisture damage.
- Avoid harsh chemicals that can strip the wood finish.
Repairing Common Issues
Small problems can turn into big damage. Fix scratches, loose hinges, and cracks early to keep the chest strong.
| Issue | Cause | Repair Tip |
| Scratches | Sharp objects or rough use | Use wood filler or a touch-up marker |
| Loose hinges | Wear from opening and closing | Tighten screws or replace hinges if needed |
| Cracks | Dry wood or impact | Fill with wood glue or filler and sand smooth |
| Sticking lid | Swelling from moisture | Sand edges lightly and apply a sealant |
Extending Toy Chest Lifespan
Good care goes beyond cleaning and repair. Follow these tips to keep your toy chest useful for a long time.
- Place the chest away from direct sunlight to prevent fading.
- Keep it in a dry area to avoid wood warping.
- Apply wood polish or wax every few months to protect the finish.
- Use liners inside the chest to protect the wood from spills and stains.
- Check hardware regularly and replace parts that wear out.

Credit: www.youtube.com
Frequently Asked Questions
What Materials Are Needed For Diy Toy Chest Woodworking Plans?
You need plywood, wood screws, wood glue, sandpaper, and paint or stain. Basic woodworking tools like a saw and drill are also essential.
How Long Does It Take To Build A Toy Chest?
Building a toy chest typically takes 4 to 6 hours. This depends on your skill level and the complexity of the design.
Are These Toy Chest Plans Suitable For Beginners?
Yes, the plans are beginner-friendly. They include clear instructions and simple cuts to make the process easy.
Can I Customize The Toy Chest Size?
Absolutely. You can adjust dimensions in the plans to fit your space or specific storage needs.
Conclusion
Building a toy chest is a fun and useful project. These woodworking plans guide you step-by-step. You can create a sturdy chest to keep toys neat. It saves money compared to buying one. Plus, you get to customize the size and style.
Woodworking helps improve your skills with tools. Enjoy the pride of making something with your hands. Start small and follow the easy instructions carefully. Soon, your home will have a neat, handmade toy chest. A simple project that brings order and joy.