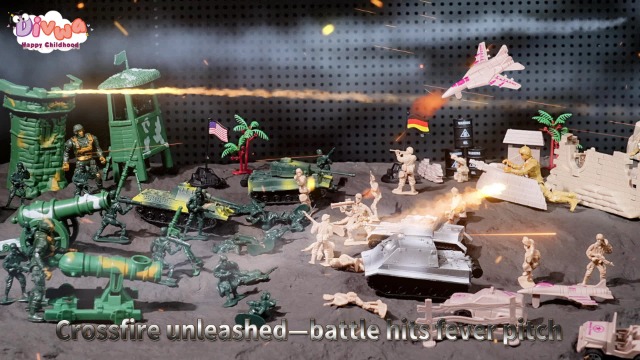
Are you ready to bring your toy soldiers to life and create an epic battlefield right in your own space? Imagine the thrill of setting up your very own DIY toy soldier battlefield, where every detail sparks excitement and imagination.
Whether you want a fun project to enjoy on your own or a way to impress friends and family, this guide will show you how to build a setup that feels real and unforgettable. Keep reading to discover simple tips and creative ideas that will transform your toys into a powerful army ready for action.
Your ultimate battlefield adventure starts here!
Credit: www.amazon.com
Choosing The Right Materials
Creating a DIY toy soldier battlefield is fun and needs the right materials. Picking good supplies helps build a strong and realistic setup.
Using the correct items makes the project easier and the final result better. Choose materials that last and look good.
Best Toy Soldiers For Play
Pick toy soldiers that are the right size and made from safe materials. Small, detailed figures work best for battle scenes.
Plastic soldiers are light and cheap. Metal soldiers last longer but can be heavy and expensive.
- Plastic figures are easy to paint and move
- Metal figures have good detail and weight
- Check for non-toxic paint and materials
- Choose sizes between 1:32 and 1:72 scale
Selecting Base Materials
The base is the ground for your battlefield. Use materials that are sturdy and easy to shape.
Common base materials include foam boards, cardboard, and wood. Each has benefits depending on your design.
- Foam boards are light and easy to cut
- Cardboard is cheap and widely available
- Wood provides a strong and durable base
- Use textured paper or sand for realistic terrain
Essential Crafting Tools
Good tools make building your battlefield faster and neater. Basic tools work well for most setups.
Some tools help cut, glue, and paint your materials. Keep safety in mind while crafting.
- Sharp scissors or craft knives for cutting
- Glue guns or strong adhesives for sticking parts
- Paintbrushes and acrylic paints for details
- Rulers and pencils to measure and mark
Designing The Battlefield Layout
Creating a toy soldier battlefield is fun and creative. You need to plan how the battlefield will look. The layout affects how the game plays.
Good design makes the game fair and interesting. Focus on terrain, obstacles, and play balance for the best setup.
Planning Terrain Features
Think about different land types like hills, rivers, and forests. They add excitement and challenge for players. Terrain can slow down or speed up toy soldiers.
- Use small hills made from foam or paper
- Add blue cloth or paper for water areas
- Make forests with small model trees or bushes
- Create roads using sandpaper or cardboard strips
Incorporating Obstacles And Cover
Obstacles block movement and give cover to soldiers. They make the game more strategic. Use walls, ruins, and barriers to add cover spots.
| Obstacle Type | Effect |
| Stone Wall | Blocks line of sight |
| Wooden Fence | Slows movement |
| Ruined Building | Offers full cover |
| Barrel Stack | Partial cover |
Balancing Play Areas
Make sure both sides have equal chances to win. Spread out terrain and obstacles evenly. Keep play areas open and closed in a fair way.
- Place key cover spots near both starting areas
- Balance open spaces and cluttered spots
- Check that no side has easier routes
- Adjust terrain to keep fights fair and fun
Building Terrain Elements
Creating a toy soldier battlefield needs good terrain elements. Terrain adds realism and fun to your setup.
You can build hills, rivers, and trees using simple materials. Each element helps bring the battlefield to life.
Creating Hills And Mountains
Start with a base of cardboard or foam. Shape it into hills by stacking and carving layers. Use papier-mâché to cover the forms. Let it dry fully before painting.
- Use foam sheets to build different heights
- Cover with plaster or papier-mâché for texture
- Paint with earth tones like brown and green
- Add sand or small stones for rough surfaces
Crafting Rivers And Water Features
Rivers add movement and interest to your battlefield. Use clear resin or glue to create water effects. Paint the base blue or green before adding the resin.
| Material | Use |
| Clear epoxy resin | Create shiny water surface |
| Blue and green paint | Color river base |
| Small rocks | Line river edges |
| Gloss varnish | Add wet look to water |
Adding Trees And Vegetation
Trees make your battlefield feel alive. Use model tree kits or make your own with wire and foam. Add static grass or moss for ground cover.
Here are common materials for vegetation:
- Wire armature for tree trunks
- Foam clumps for leaves
- Static grass for grass patches
- Moss or lichen for bushes
- Paint for color details

Credit: ww2pts.blogspot.com
Painting And Detailing Soldiers
Painting and detailing toy soldiers makes your battlefield come alive. It adds personality and realism to each figure.
Careful painting helps show uniforms, weapons, and faces clearly. Small details make a big difference in the overall look.
Choosing Color Schemes
Pick colors that fit the army or time period you want. Think about uniform colors and environment colors for the battlefield.
Use colors that contrast well. This helps soldiers stand out and look good from far away or close up.
- Use dark colors for shadows and light colors for highlights
- Match colors to the soldier’s nation or team
- Include earth tones for natural camo effects
Techniques For Realistic Finishes
Thin your paint to avoid clumps and keep details sharp. Use small brushes for fine parts like faces and buttons.
Dry brushing adds highlights by lightly brushing raised areas. Washing adds shadows by putting thin paint in crevices.
- Apply base coat evenly
- Use washes for depth in folds and creases
- Dry brush to highlight raised textures
- Seal with matte varnish to protect paint
Adding Unique Markings
Markings like badges, stripes, or numbers give each soldier a unique look. They show rank or unit details.
Use a fine-tipped brush or paint pens for small details. Stickers or decals can also add precise shapes and symbols.
- Paint small stripes on sleeves or helmets
- Add unit insignia on shoulders or chests
- Use dots or lines for camouflage patterns
- Personalize each soldier with different marks
Setting Up Strategic Zones
Creating a toy soldier battlefield needs careful planning. Strategic zones help make play more exciting and organized.
Dividing the battlefield into zones guides how soldiers move and where battles happen. Use these ideas to set up your zones.
Designing Command Centers
Command centers act as the main base for your toy soldiers. Place them in strong positions with good views of the battlefield.
- Choose high ground or protected areas for defense.
- Keep command centers away from open fields to avoid quick attacks.
- Use small boxes or blocks to mark the center on the field.
- Allow space around the center for reinforcements and supplies.
Establishing Supply Points
Supply points keep your soldiers ready with ammo and food. Place these spots near key routes but not too close to the enemy.
| Supply Point Location | Purpose | Distance from Command Center |
| Forest Edge | Cover and concealment | 20 inches |
| Near River | Water access and defense | 15 inches |
| Hill Base | Easy supply movement | 10 inches |
Marking Victory Areas
Victory areas show where players score points or win the game. Mark these zones clearly to avoid confusion.
- Use different colored flags or tokens.
- Place areas near the center or edges to encourage movement.
- Keep areas small but visible for quick recognition.

Credit: lairofthelagomorph.com
Incorporating Accessories And Props
Creating a toy soldier battlefield is exciting. Accessories and props make it look real. They add depth and detail to the scene.
You can use different items to enhance your setup. Think about what makes a battlefield look authentic and lively.
Building Miniature Buildings
Miniature buildings are important for a battlefield. They provide cover and structure. You can make them from cardboard or use model kits.
Paint them in colors that blend with the environment. This helps make your battlefield look more realistic and engaging.
- Cardboard houses for urban scenes
- Bunkers for military bases
- Tents for field camps
Adding Vehicles And Equipment
Vehicles add movement to the scene. Tanks, jeeps, and planes are popular choices. They make the battlefield dynamic.
Place equipment around to show activity. Radios, weapons, and crates add to the setup's detail.
- Place tanks for offensive power
- Jeeps for quick movement
- Crates for supply areas
Using Lighting Effects
Lighting changes the mood of your battlefield. It highlights action areas. Use small LED lights for specific effects.
Try different lighting colors. Red can show a battle scene. Blue can create a night effect.
- Use spotlights for key areas
- LEDs for day and night scenes
- Shadow effects for depth
Rules For Epic Play
Setting up a toy soldier battlefield can be exciting. Simple rules make play epic and fun. Let's dive into the basics.
Each player commands their own army of toy soldiers. Fair play and creativity are key to epic battles.
Basic Gameplay Mechanics
Gameplay mechanics form the foundation of your battlefield. Every player needs to understand these rules.
- Players take turns to move their soldiers.
- Each soldier can move one step per turn.
- Soldiers can attack only if in range.
- Use dice to determine attack success.
Customizing Battle Rules
Custom rules add unique twists to your game. Modify them to fit your group's style and preferences.
Consider adding special abilities for certain soldiers. For example, snipers can hit targets from two steps away.
Tips For Engaging Scenarios
Scenarios make battles thrilling. Plan them to keep everyone engaged and excited.
| Scenario | Objective |
| Capture the Flag | Seize the enemy's flag and return it to base |
| Defend the Base | Protect your base for 10 turns |
| Rescue Mission | Save the captured soldier within 5 turns |
Maintaining And Storing Your Setup
Keeping your DIY toy soldier battlefield clean and safe helps it last longer. Proper care stops damage and keeps it looking good.
Good storage and small repairs save you time and money. You can enjoy your setup for years with simple steps.
Cleaning And Repairs
Dust and dirt can build up on your toy soldiers and battlefield pieces. Clean them gently using a soft brush or cloth.
Fix broken parts quickly to avoid more damage. Use glue for small breaks and repaint if paint chips.
- Use a soft brush to remove dust
- Wipe surfaces with a damp cloth
- Apply glue for small cracks or breaks
- Touch up paint with matching colors
- Check pieces regularly for damage
Safe Storage Solutions
Store your setup in a dry, dust-free place to avoid damage. Keep pieces separate to stop them from rubbing or breaking.
Use containers with compartments or soft padding for fragile parts. Label boxes so you can find pieces fast.
- Choose a dry, cool storage area
- Use plastic boxes with dividers
- Wrap delicate parts in soft cloth
- Label boxes with contents
- Keep the setup away from direct sunlight
Upgrading Over Time
Improve your battlefield by adding new pieces or changing layouts. Upgrades keep the setup fresh and fun.
Replace worn parts and paint new details. Small changes can make a big difference in how it looks and feels.
- Add new toy soldiers or vehicles
- Change terrain pieces for variety
- Repaint faded or chipped areas
- Try different battle scenarios
- Keep notes on upgrades and changes
Frequently Asked Questions
How Do I Start A Diy Toy Soldier Battlefield Setup?
Begin by gathering toy soldiers, crafting materials, and a base like cardboard. Plan your layout, then create terrain features using paint and small props. Arrange soldiers strategically to simulate a realistic battle scene.
What Materials Are Best For Diy Toy Soldier Terrain?
Use materials like foam, cardboard, paint, and natural items such as twigs and sand. These provide texture and realism. Lightweight and easy-to-shape materials work best for creating hills, trenches, and obstacles.
How Can I Make My Toy Soldier Battlefield More Realistic?
Add varied terrain features like hills, rivers, and bunkers. Use detailed painting and weathering effects. Position soldiers in dynamic poses to simulate action and strategy, enhancing authenticity.
What Tools Do I Need For Creating Toy Soldier Setups?
Basic tools include scissors, glue, paintbrushes, and craft knives. Tweezers help with small parts. These tools make cutting, assembling, and detailing easier and more precise.
Conclusion
Creating a DIY toy soldier battlefield brings fun and learning together. It lets you use your imagination and craft skills. Each piece adds to the story you want to tell. This project is perfect for kids and adults alike. It gives hours of play and creativity.
Try different designs and see what works best. Your battlefield can grow and change over time. Enjoy the process and share your creation with friends. Small steps lead to great results. Start building your toy soldier world today!