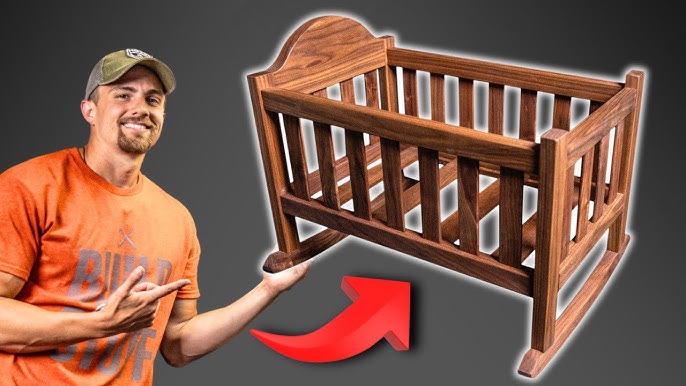
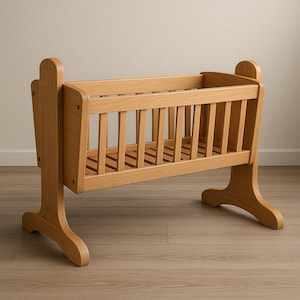
Are you looking for a special project that brings warmth and charm to your home? Building your own wooden toy cradle is a wonderful way to create something meaningful with your own hands.
Imagine crafting a beautiful, sturdy cradle that becomes a favorite toy for your child or a thoughtful gift for someone special. You’ll discover simple steps and handy tips to make a DIY wooden toy cradle that stands out. Get ready to turn basic materials into a timeless treasure you and your loved ones will cherish.
Keep reading to find out how easy and rewarding this project can be!
Choosing The Right Wood
Picking the right wood is key to building a sturdy toy cradle. It affects safety, look, and how long it lasts.
Some woods work better than others. This guide helps you choose wood that is safe and strong for your project.
Types Of Wood For Toy Cradles
Softwoods and hardwoods both can make good toy cradles. Knowing the difference helps pick the best one.
- Pine:A softwood that is light and easy to work with. It is affordable but can dent easily.
- Maple:A hardwood that is strong and smooth. It resists dents and looks nice.
- Birch:A hardwood with a fine grain. It is durable and sands well.
- Cedar:A softwood with a pleasant smell. It resists decay and insects.
- Beech:A hardwood that is tough and has a tight grain. It holds paint well.
Safety Considerations
| Safety Factor | What to Check | Why It Matters |
| Non-Toxic Wood | Use wood without harmful chemicals or treatments | Prevents exposure to poisons for children |
| Smooth Finish | Sand all surfaces to remove splinters | Reduces injury risk from rough edges |
| Strong Joints | Use quality glue and screws for assembly | Keeps cradle stable and safe to use |
| Free of Cracks | Inspect wood for splits or defects | Prevents breaking during use |
| Safe Paint and Sealant | Choose child-safe, non-toxic finishes | Protects wood and child’s health |
Essential Tools And Materials
Building a wooden toy cradle needs some basic tools and materials. Having the right tools makes the work safer and easier.
Choosing good finishes and paints helps protect the cradle and makes it look nice. Let’s explore what you need to get started.
Basic Carpentry Tools
You need a few simple tools to build the cradle. These tools help cut, shape, and join the wood properly.
- Measuring tape to get accurate sizes
- Hand saw or jigsaw for cutting wood pieces
- Hammer for driving nails
- Screwdriver for screws
- Wood clamps to hold pieces steady
- Sandpaper to smooth edges
- Wood glue for strong joints
Finishes And Paints
Finishes and paints protect the cradle wood from damage. They also make it safe and pretty for children.
| Finish Type | Description | Use |
| Non-toxic Paint | Safe for kids, comes in many colors | Decorate and protect wood |
| Clear Varnish | Shows natural wood grain | Protects wood without color |
| Natural Oil | Penetrates wood for moisture protection | Keeps wood smooth and safe |
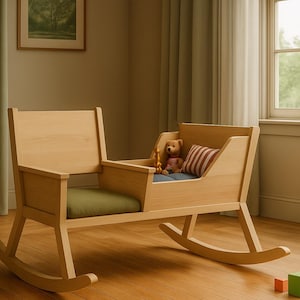
Designing Your Toy Cradle
Designing a wooden toy cradle is a fun and creative project. It lets you build a safe and lovely toy for children.
Good design makes the cradle both strong and comfortable for small dolls or toys.
Simple Patterns For Beginners
Start with basic shapes like rectangles and arches. These shapes are easy to cut and join.
Simple patterns help you focus on building without complex cuts or joins.
- Use a rectangular base for stability
- Add curved sides for a classic look
- Keep the design open for easy cleaning
- Use rounded edges for safety
Customizing Size And Shape
Change the cradle’s size to fit different dolls or toys. Measure your toy before building.
Adjust shapes to match your style or skill level. Try taller sides or a wider base for variety.
- Small cradle fits tiny dolls or animals
- Larger cradle holds bigger toys or blankets
- Wider base adds extra support
- Higher sides keep toys from falling
Cutting And Shaping Wood Pieces
Cutting and shaping wood pieces is a key part of making a wooden toy cradle. You need to work carefully to get smooth and even parts. This will help the cradle look nice and be safe for children.
Using the right tools and following clear steps makes the process easier. This guide covers measuring, marking, cutting, and sanding wood for your cradle project.
Measuring And Marking
Start by measuring the wood pieces carefully. Use a ruler or tape measure to get exact lengths and widths. Accurate measurements help all parts fit together well.
Mark the cut lines clearly on the wood with a pencil. Draw straight lines and check twice before cutting. Clear marks guide your saw and keep cuts straight.
- Use a ruler to measure each piece
- Mark lines with a sharp pencil
- Double-check measurements before cutting
- Mark all parts before starting to cut
Using Saws And Sanders
Choose a saw that fits the size of your wood pieces. A hand saw works well for small cuts. Cut slowly along the marked lines to keep edges neat.
After cutting, use a sander or sandpaper to smooth rough edges. Sanding makes the wood safe to touch and prepares it for painting or finishing.
- Use a hand saw for small, precise cuts
- Follow your pencil lines carefully
- Sand all edges to remove splinters
- Use fine sandpaper for a smooth finish
Assembling The Cradle
Building a wooden toy cradle is fun and rewarding. You will need to carefully put all parts together.
Follow clear steps to make sure the cradle is strong and safe for play.
Joining Techniques
Use simple joining methods to connect the wooden pieces. Good joints keep the cradle solid.
Common techniques include using wood glue, nails, and screws. Each has a special use.
- Wood glue works well for small, flat surfaces.
- Nails hold parts quickly but need careful placement.
- Screws provide strong holds for moving parts.
- Wooden dowels add extra strength and hide fasteners.
Ensuring Stability
Check that all parts fit tight and do not wobble. Stability makes the cradle safe.
Test the cradle by pressing gently on different sides. Fix any loose joints before use.
- Use clamps to hold pieces while glue dries.
- Sand rough edges to avoid splinters.
- Add corner braces for extra support.
- Make sure the base is flat and even.
Credit: www.etsy.com
Sanding And Smoothing Surfaces
Creating a wooden toy cradle involves sanding and smoothing. This ensures a safe and beautiful finish.
Proper sanding removes rough spots and prepares the wood for staining or painting. It is an important step in crafting a toy cradle.
Preparing For Finish
Sanding is crucial before applying any finish. Begin with coarse sandpaper to remove bigger imperfections.
Move to finer grits gradually to achieve a smooth surface. This helps the finish adhere better and look smoother.
- Start with 80-grit sandpaper
- Progress to 120-grit for medium smoothing
- Finish with 220-grit for a fine surface
Avoiding Rough Edges
Rough edges can be unsafe for children. Sand all edges carefully to prevent splinters.
Use a sanding block or sponge for tight corners. This ensures all areas are smooth and safe.
| Tool | Purpose |
|---|---|
| Sanding Block | For flat surfaces |
| Sanding Sponge | For curved and tight areas |
Painting And Decorating
Painting and decorating your wooden toy cradle makes it special and safe. Use colors that are good for children and add your own style. This helps create a beautiful and personal toy.
Choosing the right paint and decorations keeps the cradle safe and fun. Let’s look at how to pick safe paints and add personal touches.
Choosing Non-toxic Paints
Always use paints that do not have harmful chemicals. Non-toxic paints keep children safe if they touch or put the cradle in their mouth. Look for water-based paints with low or no VOCs.
- Check the label for non-toxic certification
- Choose water-based or acrylic paints
- Avoid paints with lead or strong fumes
- Test paint on a small wood piece first
- Let the paint dry fully before use
Adding Personal Touches
Decorate the cradle with designs that fit your style. You can paint patterns, add small stickers, or use wood burning tools for detail. Personal touches make the toy unique and loved.
| Decoration Idea | Materials Needed | Tips |
| Simple Shapes | Paintbrush, stencil | Use bright colors and clean edges |
| Wood Burning | Wood burning tool | Practice on scrap wood first |
| Stickers | Child-safe stickers | Choose durable and non-toxic stickers |
| Hand-painted Names | Fine brush, paint | Write slowly and clearly |
Credit: www.etsy.com
Final Touches And Safety Checks
Completing your DIY wooden toy cradle requires attention to final details. Ensuring safety for your child is crucial.
Follow these steps to secure loose parts and ensure child safety. These checks will give you peace of mind.
Securing Loose Parts
Make sure all screws and nails are tight. Loose parts can cause accidents.
Inspect the cradle regularly. Check for any signs of wear or damage.
- Use a screwdriver to tighten screws
- Replace any damaged parts immediately
- Check joints and connections
Child Safety Tips
Ensure the cradle is stable before placing your child inside. Stability prevents tipping.
Keep the cradle away from windows and cords. These can pose risks to your child.
- Place the cradle on a flat surface
- Do not overload the cradle with toys
- Use non-toxic paint or finishes
Caring For Your Wooden Toy Cradle
Wooden toy cradles are special items that need gentle care. Taking care helps them last longer and look nice.
Regular care keeps the wood safe and keeps the cradle a fun toy for children.
Cleaning And Maintenance
Clean your wooden toy cradle with a soft cloth to remove dust. Avoid using water or harsh chemicals.
Check the cradle often for loose parts or cracks. Tighten screws gently and fix small problems early.
- Use a dry or slightly damp cloth for dust
- Do not soak the wood in water
- Look for loose screws or nails
- Repair small cracks with wood glue
Preserving The Finish
Protect the wood finish by avoiding direct sunlight. Sun can fade or dry out the wood over time.
Apply natural oils like beeswax or mineral oil to keep the wood smooth. Do this once every few months.
- Keep cradle away from sunlight and heat
- Use natural oils for wood care
- Apply oil with a soft cloth evenly
- Let the cradle dry fully after oiling
Credit: www.etsy.com
Frequently Asked Questions
What Materials Are Needed For A Diy Wooden Toy Cradle?
You need wood, nails, glue, sandpaper, and non-toxic paint. Choose lightweight, durable wood like pine for easy handling and safety.
How Long Does It Take To Build A Wooden Toy Cradle?
Building a wooden toy cradle usually takes 3 to 5 hours. It depends on your skill level and tools available.
Is A Diy Wooden Toy Cradle Safe For Children?
Yes, if made with smooth wood and non-toxic finishes. Sand edges well and avoid small detachable parts to ensure safety.
Can I Customize The Wooden Toy Cradle Design?
Absolutely, you can customize size, color, and decorations. Personal touches make the cradle unique and more special for your child.
Conclusion
Building a DIY wooden toy cradle brings joy and pride. It’s simple, fun, and perfect for beginners. Using basic tools, you create a safe, lovely toy for children. This project saves money and adds a personal touch to playtime. Enjoy crafting with care and watch smiles grow.
Try it today and feel the reward of making something special. A small effort creates lasting memories and happy moments.