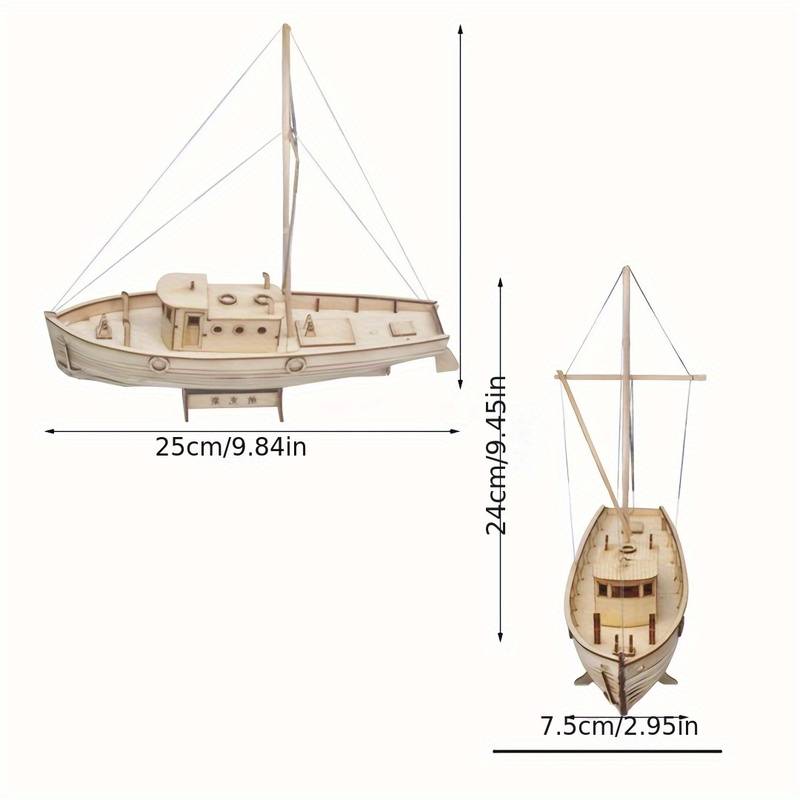
Have you ever wanted to create something simple, beautiful, and fun with your own hands? Carving a toy wooden boat is a perfect way to do just that.
It’s an easy project that lets you turn a small piece of wood into a charming little boat you can be proud of. Whether you're new to woodworking or looking for a relaxing hobby, this guide will walk you through every step.
By the end, you’ll have a unique toy that’s more than just wood—it’s your own creation. Ready to start carving? Let’s dive in!
Credit: theraleighbeergarden.com
Choosing The Right Wood
Carving a toy wooden boat needs the right wood. The wood should be easy to cut and safe to handle.
Picking the right type of wood helps you create a smooth and beautiful toy boat. It also makes carving fun and safe.
Best Wood Types For Carving
Some woods are better for carving than others. Softwoods and light hardwoods work well for toy boats.
- Basswood: Easy to carve and has a smooth texture.
- Pine: Soft and widely available, good for beginners.
- Cedar: Light, soft, and has a nice smell.
- Butternut: Soft hardwood with a fine grain.
- Poplar: Easy to carve and affordable.
Selecting A Safe And Soft Wood
Choose wood that is soft enough to carve with simple tools. Soft wood reduces the chance of slips and cuts.
Make sure the wood is safe for children. Avoid woods that cause allergies or have toxic oils.
- Soft woods are easier to shape and sand.
- Look for wood without knots or cracks.
- Check that the wood does not splinter easily.
- Use untreated and natural wood for safety.
Gathering Essential Tools
Carving a toy wooden boat is a fun project. To start, you need the right tools. Good tools make carving easier and safer.
Before you begin, collect all the items you will need. This helps you work smoothly and enjoy the process.
Basic Carving Tools Needed
Choose simple tools for carving wood. A few basic tools can help you shape your toy boat well.
- Carving knife with a sharp blade
- Gouges for scooping wood
- Chisels for straight cuts
- Wood rasp or file for smoothing edges
- Sandpaper for fine finishing
- Wood block to carve on
Make sure your tools are sharp and clean. Dull tools can make carving hard and unsafe.
Safety Gear For Carving
Safety is important when carving wood. Protect yourself with the right gear to avoid injuries.
- Cut-resistant gloves to protect your hands
- Safety glasses to shield your eyes from chips
- A dust mask to avoid breathing wood dust
- A carving apron to keep clothes safe
Work in a clean, well-lit area. Keep your tools and safety gear ready before starting.
Preparing The Wood Block
Preparing the wood block is the first step in carving a toy wooden boat. It helps you shape the wood safely and accurately.
Good preparation makes carving easier and keeps your tools sharp longer.
Measuring And Marking The Design
Start by measuring the wood block to fit the size of your boat design. Use a ruler or measuring tape for accuracy.
Mark the shape of the boat on the wood using a pencil. Draw clear lines to follow during cutting and carving.
- Measure the length, width, and height of your design
- Mark key points like the bow, stern, and deck
- Check all marks twice before cutting
Cutting The Rough Shape
Cut the wood block along your pencil marks to get the rough boat shape. Use a saw that fits the size of your block.
| Tool | Use |
| Hand saw | Best for small cuts and control |
| Jigsaw | Good for curved lines |
| Band saw | Useful for precise and fast cuts |
After cutting, smooth the edges with sandpaper. This prepares the block for detailed carving.

Credit: m.youtube.com
Carving The Boat Hull
Carving the hull of a wooden toy boat shapes its main body. This process gives the boat its form and style. Careful carving ensures the boat looks smooth and balanced.
Use sharp carving tools and work slowly. Small cuts help avoid mistakes and keep the wood from splitting. Patience is key to a nice hull shape.
Shaping The Body
Start by drawing the boat’s outline on the wood block. Use a pencil to mark where to carve. Remove large pieces outside the lines first. Then, carve the wood inside the outline to form the hull’s shape.
- Cut away excess wood along the sides and bottom
- Shape the bow and stern with gentle curves
- Keep checking the symmetry on both sides
- Use a carving knife or gouge for detailed shaping
- Work slowly to avoid deep cuts
Smoothing Edges And Surfaces
After shaping, smooth the hull to remove rough spots and sharp edges. Sandpaper works well for this step. Begin with coarse grit and finish with fine grit for a soft surface.
| Sandpaper Grit | Purpose |
| 80-100 | Remove large rough areas |
| 150-180 | Smooth general surface |
| 220-320 | Refine surface and edges |
| 400+ | Final polishing for smooth feel |
Adding Details And Features
Carving a toy wooden boat is a fun project. Adding details makes it special. Features like the deck, cabin, and windows add charm. Let's explore how to carve these parts.
These details make the boat look real and exciting. Pay attention to small touches for a better finish.
Carving The Deck And Cabin
The deck is where sailors stand on a real boat. Smooth the surface for a polished look. The cabin is the small house on the boat.
Use a sharp knife to carve the deck. A small chisel helps with the cabin. Keep your hands steady for clean lines.
- Plan the deck layout first
- Carve slowly to avoid mistakes
- Sand the deck for smoothness
Creating Windows And Other Elements
Windows make the boat look realistic. Carve small rectangles for windows. They can be on the cabin or deck.
Other elements like doors and railings add detail. Use small tools for precision. Patience is key to success.
- Sketch window positions before carving
- Use fine sandpaper for smooth edges
- Add tiny details for realism
Sanding And Finishing
Sanding and finishing are key steps in carving a toy wooden boat. These steps smooth the surface and protect the wood. They make the boat look nice and last longer.
Careful sanding removes rough spots and shapes the wood. Finishing adds color and seals the wood from water or dirt.
Choosing The Right Sandpaper
Start with coarse sandpaper to remove big rough parts. Then use finer sandpaper to smooth the surface. Use sandpaper with grit numbers like 80, 120, and 220.
Sand with the grain of the wood to avoid scratches. Change sandpaper if it wears out. Clean the wood between sanding steps to see your progress.
- 80 grit: removes rough spots and shapes wood
- 120 grit: smooths the surface after coarse sanding
- 220 grit: final sanding for a smooth finish
Applying Paint Or Varnish
Paint adds color and style to your wooden boat. Varnish protects the wood and shows its natural beauty. Choose one based on your design choice.
Apply thin coats with a small brush. Let each coat dry fully before the next. Lightly sand between coats for a smooth finish.
- Use water-based paint for easy cleaning
- Choose clear varnish to keep the wood’s natural look
- Apply 2-3 coats for good protection
- Dry in a dust-free area
Tips For Stunning Results
Carving a toy wooden boat can be a fun project. With some patience and creativity, you can create a beautiful toy boat.
Follow these tips to ensure your wooden boat looks great and sails smoothly.
Avoiding Common Mistakes
Many beginners make simple errors. These can affect the look and performance of the boat.
Pay attention to these points to avoid common mistakes.
- Check the wood grain direction before cutting.
- Use sharp tools for clean cuts.
- Sand the edges to prevent splinters.
Enhancing The Boat’s Appearance
A beautiful finish makes the boat more appealing. Add details that catch the eye.
Consider these enhancements for a stunning toy boat.
- Paint with bright, waterproof colors.
- Add small details like flags or sails.
- Use varnish for a shiny, protective coat.

Credit: www.youtube.com
Frequently Asked Questions
What Tools Do I Need To Carve A Toy Wooden Boat?
You need carving knives, sandpaper, a small saw, and wood glue. These tools help shape and smooth the boat easily. Safety gear like gloves is also recommended during carving for protection.
Which Wood Type Is Best For Toy Boats?
Basswood and pine are ideal for toy boats. They are soft, easy to carve, and durable. These woods hold details well and are safe for children’s toys.
How Long Does It Take To Carve A Wooden Boat?
Carving a simple toy boat takes about 2 to 4 hours. Complex designs may take longer depending on skill level and detail.
How Can I Finish And Protect The Wooden Boat?
Use non-toxic paint, varnish, or wood oil to finish. These finishes protect the wood and add color or shine, making the toy safe and attractive.
Conclusion
Carving a toy wooden boat is a fun and rewarding task. Start with simple shapes and take your time. Use the right tools and stay safe while carving. Sand the boat smooth to make it look nice. Paint or decorate it as you like.
This project helps improve your skills and creativity. Keep practicing to make better boats each time. Enjoy the process and be proud of your work. A handmade wooden boat makes a great gift or keepsake. Try carving with friends or family for more fun.