Imagine holding a wooden sword you made with your own hands—smooth, sturdy, and just the right size. You can create that!
Carving wooden toy swords is a fun and rewarding way to bring your creativity to life. Whether you want a special gift, a cool decoration, or a new hobby, this guide will show you exactly how to do it step by step.
Ready to turn a simple piece of wood into something amazing? Let’s get started!
Choosing The Right Wood
Carving wooden toy swords starts with picking the best wood. The right wood makes carving easier and safer.
Wood type affects the sword's weight, strength, and smoothness. Choose wood that fits your skills and tools.
Best Wood Types For Toy Swords
Softwoods are good for beginners because they carve easily. Hardwoods last longer but need more effort to carve.
- Pine: Soft, easy to carve, and widely available.
- Basswood: Light, smooth, and ideal for detailed work.
- Poplar: Medium soft, easy to shape, and affordable.
- Birch: Harder wood, strong and durable for longer use.
- Ash: Hard and tough, good for sturdy toy swords.
Wood Grain And Texture Considerations
Look for wood with straight grain. It is easier to carve and less likely to split.
Fine texture wood feels smooth and is better for painting or finishing your sword.
- Avoid wood with knots or uneven grain to prevent cracks.
- Choose wood that feels light but strong for easy handling.
- Check the wood surface for smoothness before carving.
Essential Tools And Safety Gear
Carving wooden toy swords needs the right tools and safety gear. Using proper equipment helps you work better and stay safe.
This guide covers the main carving knives and gouges you need. It also explains the protective equipment to keep you safe.
Carving Knives And Gouges
Choose knives and gouges with sharp, strong blades. They make cutting wood easier and cleaner. Use different shapes for detailed work.
- Detail knife for fine cuts and shapes
- Hook knife for hollowing and scooping wood
- Straight gouge for smooth, curved cuts
- V-gouge for sharp grooves and lines
Keep your tools sharp. Dull blades need more force and can slip. Always carve away from your body to avoid injury.
Protective Equipment
| Equipment | Purpose | Tips |
| Cut-resistant gloves | Protect hands from cuts | Wear on carving hand |
| Safety goggles | Shield eyes from chips | Use snug-fitting goggles |
| Dust mask | Prevent wood dust inhalation | Choose masks rated for fine dust |
| Apron | Protect clothes and body | Use thick, durable fabric |
Always wear your protective gear before starting to carve. This reduces the risk of injury and keeps you comfortable.
Designing Your Toy Sword
Designing a wooden toy sword is the first step in carving it. A clear design helps you carve safely and neatly.
Good designs fit your skill and the tools you have. Keep the shapes simple and fun to carve.
Simple Sword Shapes
Start with basic sword shapes that are easy to carve. Simple shapes reduce mistakes and make the sword safe for kids.
Common simple shapes include straight blades and rounded tips. Avoid sharp edges or complex curves.
- Straight blade with a rounded tip
- Short blade with a wide guard
- Thin blade with a simple handle
- Classic cross-guard shape
Drawing The Outline
Draw the sword outline on the wood before carving. This helps guide your cuts and keeps your design balanced.
Use a pencil to sketch your sword shape. Check the size and shape match your plan before cutting.
- Place the wood on a flat surface
- Use a ruler for straight lines
- Sketch lightly to erase if needed
- Mark the handle and blade clearly
Basic Carving Techniques
Carving wooden toy swords is a fun and creative project. It needs patience and simple tools. Learning basic carving techniques makes the process easier and safer.
This guide covers shaping the blade, carving the handle, and sanding for smoothness. Follow each step carefully for the best results.
Shaping The Blade
Start by drawing the blade shape on a soft wood block. Use a carving knife to remove wood along the outline. Work slowly to keep the shape even.
- Cut away large pieces first to form the rough shape.
- Carve the edges to create a pointed tip.
- Use a smaller knife for detail work along the blade.
- Keep the blade flat and straight by checking often.
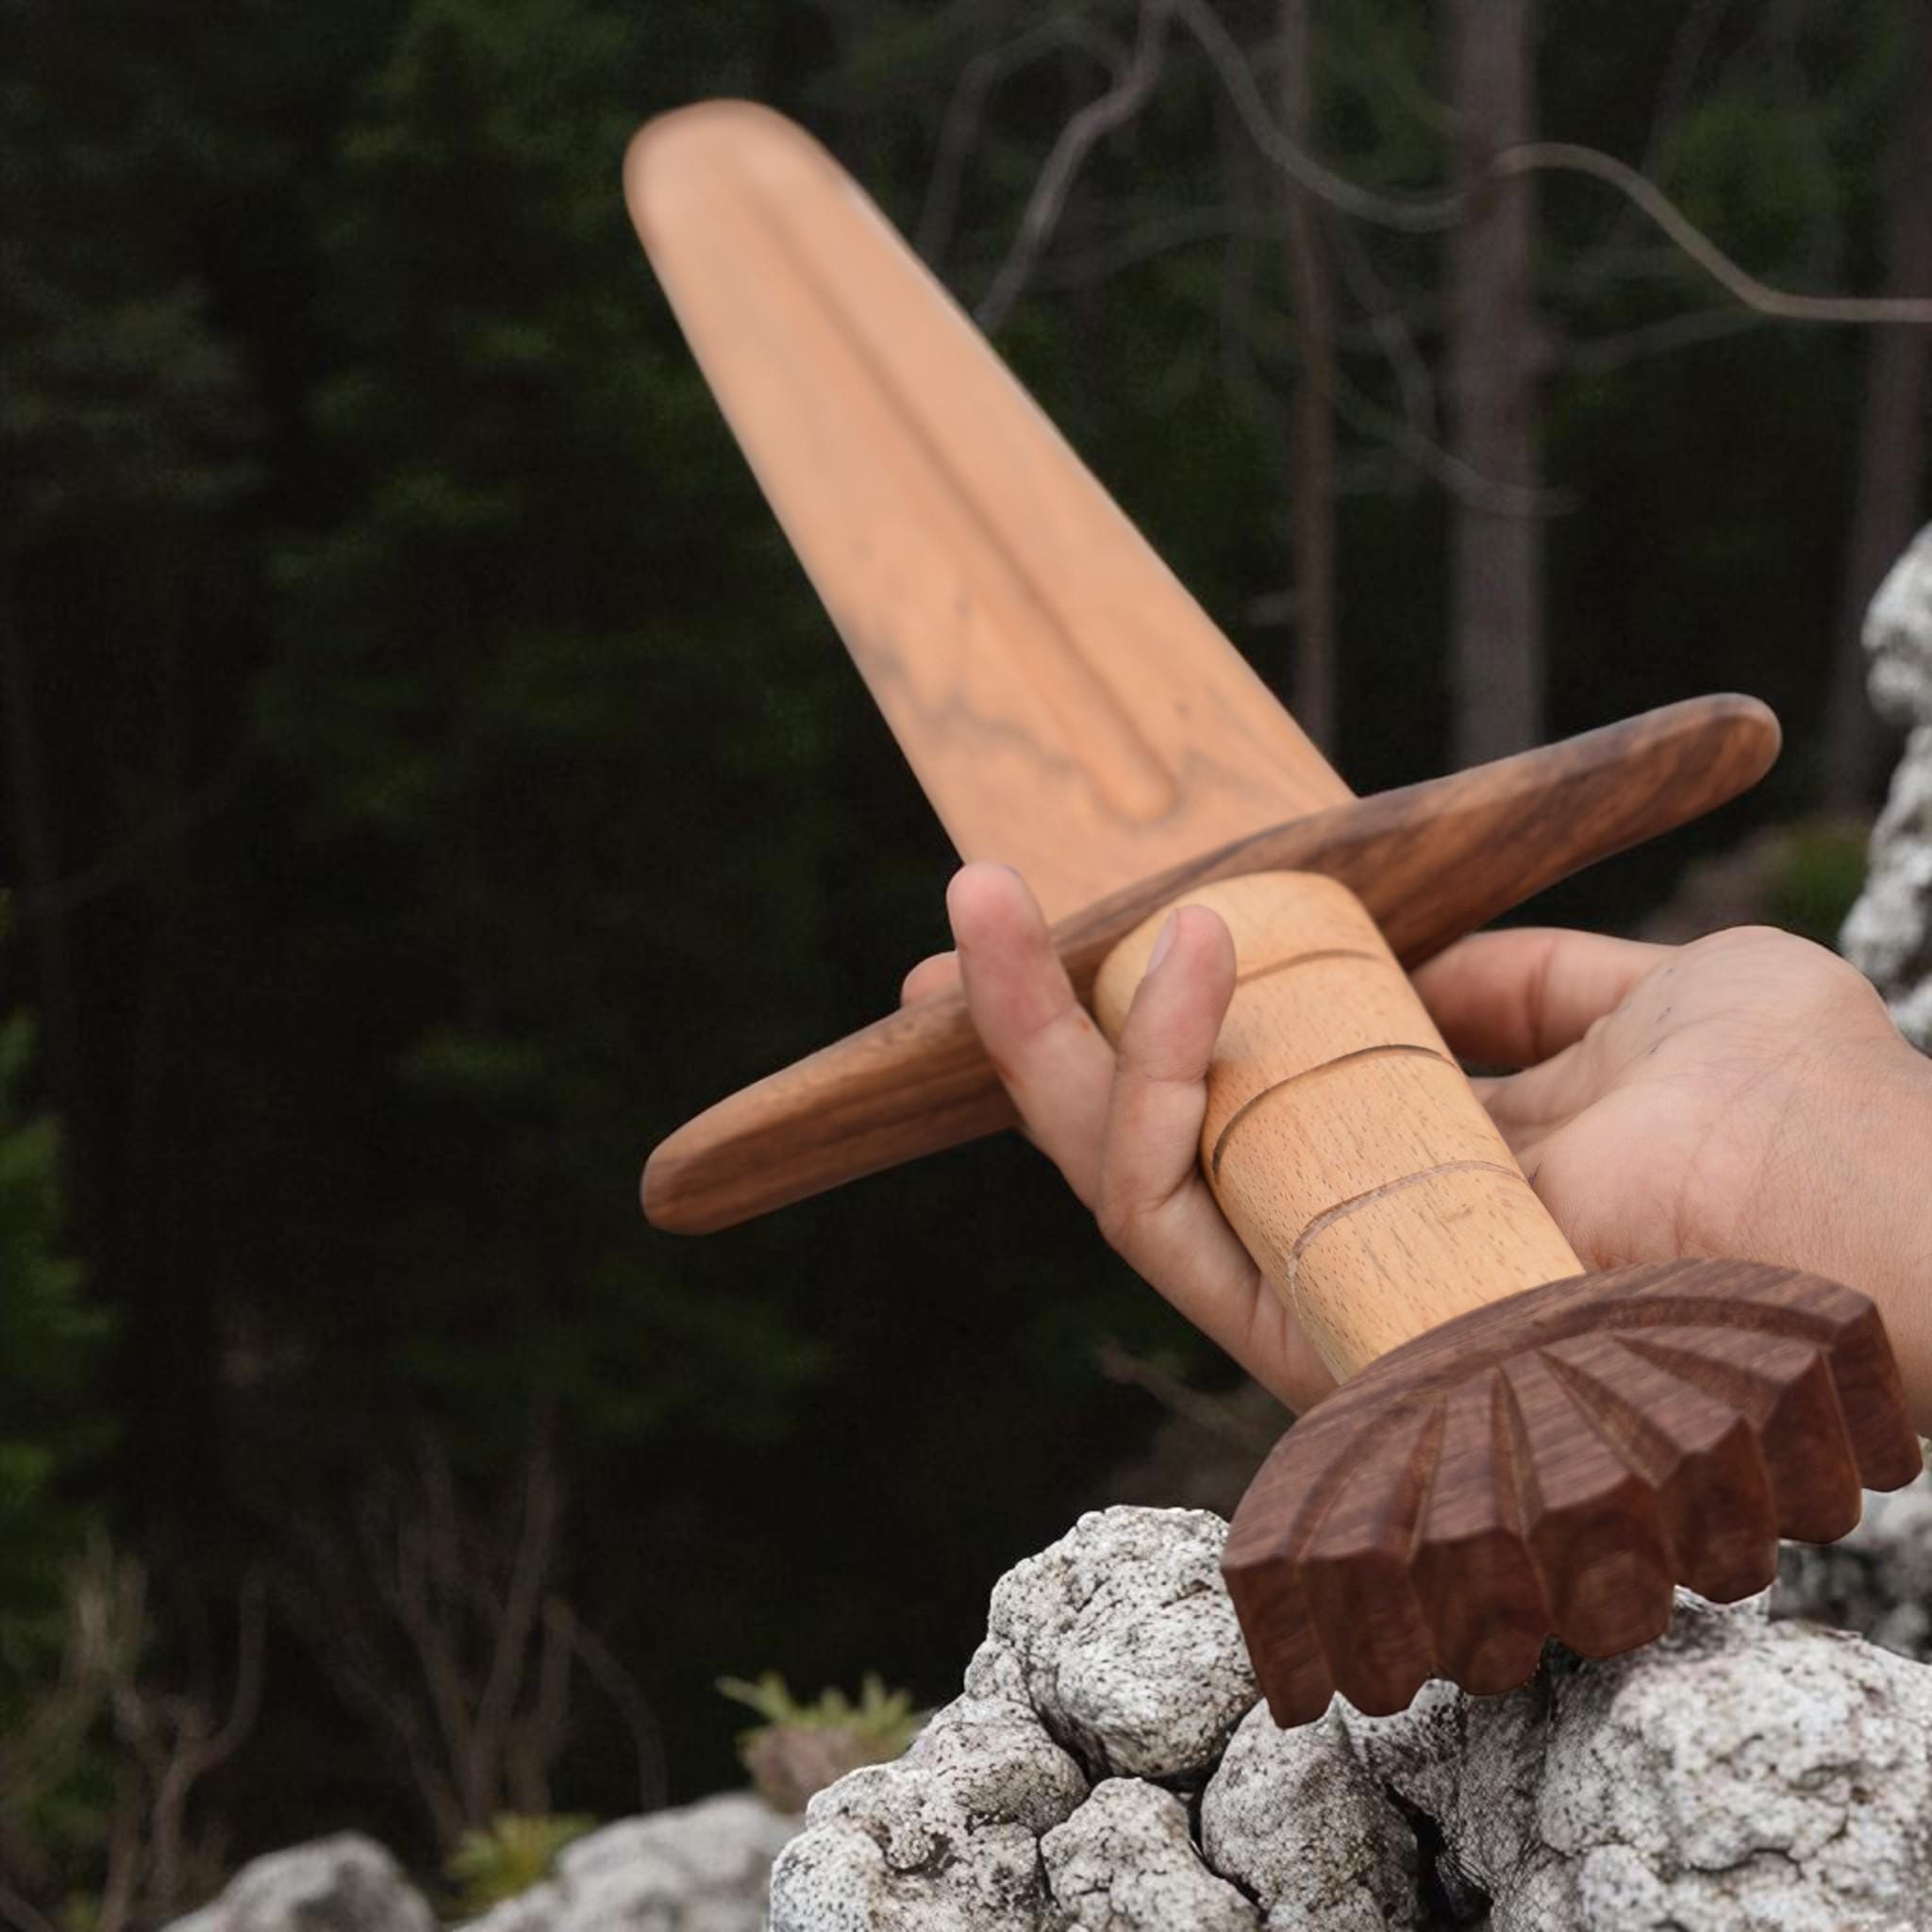
Carving The Handle
The handle should fit comfortably in your hand. Mark the handle area on the wood. Carve slowly to create a rounded grip.
| Handle Part | Carving Tip |
| Top End | Shape a smooth curve |
| Middle | Carve a slight indentation for fingers |
| Bottom End | Make a wider base for grip |
Sanding For Smoothness
Sanding removes rough spots and sharp edges. Use fine sandpaper and rub the sword evenly. Sand the blade and handle until smooth to the touch.
Follow these sanding tips:
- Start with medium grit sandpaper (around 120 grit).
- Finish with fine grit sandpaper (220 grit or higher).
- Sand along the grain of the wood for best results.
- Wipe the dust off after sanding each part.
Adding Decorative Details
Decorating wooden toy swords brings them to life. Small details make each sword unique and fun.
You can add patterns and textures to give your toy sword character and charm.
Engraving Patterns
Engraving is a great way to add patterns on the sword blade or handle. Use simple lines or shapes for a neat look.
- Draw your design lightly with a pencil before engraving.
- Use a wood carving knife or a small chisel to follow the lines.
- Try geometric shapes like triangles or diamonds for a classic look.
- Swirls and waves add a softer, magical feel.
- Keep your cuts shallow to avoid weakening the wood.
Creating Textures
Textures give your sword a realistic or worn look. You can create rough or smooth surfaces using different tools.
| Tool | Texture Effect | Usage Tip |
|---|---|---|
| Wire brush | Rough, weathered wood | Brush along the grain gently |
| Sandpaper (coarse) | Uneven, rustic feel | Rub lightly on edges or flat areas |
| Wood burning pen | Fine dotted or lined texture | Draw small patterns or marks carefully |
| Carving gouge | Indented grooves | Make shallow, curved cuts |
Credit: www.etsy.com
Finishing Touches
After carving your wooden toy sword, the finishing touches are important. These steps improve the sword's look and durability.
Applying paint or stain and sealing the wood will protect the surface. This makes the toy safe and long-lasting.
Applying Paint Or Stain
Choose between paint and stain based on your preference. Paint provides a solid color, while stain highlights wood grain.
- Use a brush or cloth to apply paint or stain evenly.
- Allow the first coat to dry completely before adding another.
- For a richer color, apply multiple coats.
Sealing And Protecting The Wood
Sealing the wood adds a layer of protection. This step is crucial to prevent damage and wear over time.
Consider these popular sealants:
- Polyurethane: Offers strong protection and a glossy finish.
- Wax: Provides a soft finish and is easy to apply.
- Linseed Oil: Enhances the wood's natural color and is eco-friendly.
Apply the sealant with a clean brush or cloth. Let it dry as per the instructions on the product label. This ensures the best protection for your wooden toy sword.
Tips For Safe Play And Maintenance
Wooden toy swords are fun and creative toys for kids. They encourage imaginative play and are a great alternative to plastic toys.
To ensure safe play, you must maintain these toys properly. Regular checks and proper storage are key.
Checking For Splinters
Splinters can hurt when kids play with wooden swords. It's important to check for them regularly.
Run your hand gently along the sword's surface. Feel for any rough spots or sharp edges.
- Inspect the blade and handle weekly.
- Use sandpaper to smooth rough areas.
- Seal the wood with a non-toxic finish.
Storing Your Toy Sword
Proper storage keeps wooden swords in good condition. It also prevents damage and extends the toy's life.
Store the sword in a cool, dry place. Avoid direct sunlight to prevent warping or fading.
- Hang swords on a wall rack.
- Place them in a toy box with other wooden toys.
- Keep away from damp areas.

Credit: www.youtube.com

Credit: www.reddit.com
Frequently Asked Questions
What Tools Do I Need To Carve Wooden Toy Swords?
You need basic woodworking tools like a carving knife, sandpaper, clamps, and a small saw. Safety gear is essential. These tools help shape and smooth the wood for a safe, fun toy sword.
Which Type Of Wood Is Best For Toy Sword Carving?
Softwoods like pine or basswood are ideal. They are easy to carve, lightweight, and safe for children. Avoid hardwoods as they are harder to shape and may splinter easily.
How Can I Make Wooden Toy Swords Safe For Kids?
Sand all edges smoothly to avoid splinters. Use non-toxic paint or finish for coating. Ensure the sword has no sharp points or loose parts to keep it child-friendly.
How Long Does It Take To Carve A Wooden Toy Sword?
Carving a wooden toy sword typically takes 2 to 4 hours. Time varies depending on complexity and skill level. Finishing and drying time may add extra hours.
Conclusion
Carving wooden toy swords takes time and patience. Start with simple shapes and work carefully. Use safe tools and smooth edges for safety. Enjoy the process and learn with each try. Kids love playing with handmade wooden swords. Keep practicing to improve your skills.
Making toy swords can be a fun family activity. Remember, safety always comes first in every step. Happy carving!