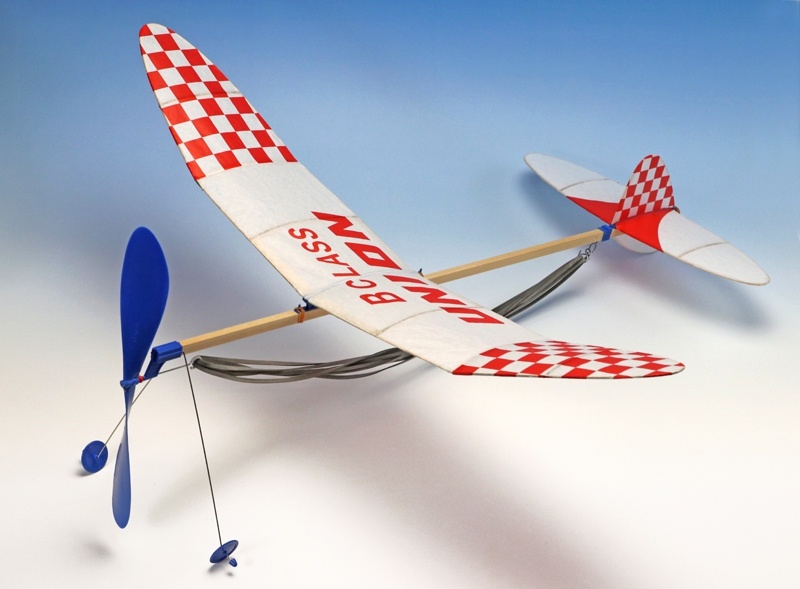
Imagine holding a simple toy that can soar through the air, powered just by a twist of a rubber band. Sounds fun, right?
A rubber band powered flying toy plane is not just a toy—it’s a little machine that lets you explore the magic of flight with your own hands. You’ll discover how easy it is to make it fly far and high, and how this simple gadget can spark your curiosity and creativity.
Ready to learn how to bring your toy plane to life and enjoy hours of entertaining flight? Let’s dive in!
Choosing The Right Materials
Building a rubber band powered flying toy plane needs careful material choice. The right materials help the plane fly better and last longer.
Lightweight and strong parts make the toy easy to launch and keep it in the air longer. Choosing good rubber bands and body parts is important.
Best Rubber Bands For Power
Strong rubber bands give the plane the power to fly far. Look for rubber bands that stretch well but do not break easily.
Thicker bands can store more energy but may be harder to wind. Thin bands stretch easily but might snap quickly.
- Choose natural rubber for good stretch and strength
- Pick medium thickness for balance of power and durability
- Avoid old or dry rubber bands as they break easily
- Test bands by stretching them before use
Lightweight Body Materials
The plane’s body should be light to stay in the air longer. Materials like balsa wood or foam work well for this purpose.
These materials are easy to shape and strong enough to hold the plane parts together. Avoid heavy wood or metal parts.
- Balsa wood is light and easy to cut
- Foam sheets offer good lightness and are soft
- Thin plastic parts can be used for wings
- Use glue that works well with your chosen materials
Essential Tools And Supplies
You need simple tools to build and assemble the toy plane. Having the right tools makes the work easier and more precise.
Basic supplies include cutting tools, glue, and measuring devices. These help create a clean, well-fitted toy plane.
- Sharp hobby knife or scissors for cutting materials
- Wood glue or craft glue for strong bonds
- Ruler or measuring tape to keep parts accurate
- Sandpaper to smooth rough edges
- Clamps or clips to hold parts while glue dries

Credit: www.walmart.com
Building The Frame
Building the frame of a rubber band powered flying toy plane is a fun and careful process. The frame must be light but strong.
Each part of the frame works together to help the plane fly smoothly. Let’s look at how to make the wings, fuselage, tail, and rudder.
Cutting And Shaping The Wings
Start by choosing a light wood or foam for the wings. Use a ruler and pencil to mark the wing shape on the material.
- Cut along the marked lines with a sharp knife or small saw.
- Shape the edges with sandpaper to make them smooth.
- Check that both wings are the same size and shape.
- Make small holes for attaching the wings to the fuselage later.
Crafting The Fuselage
The fuselage is the main body of the plane. It holds the wings and tail in place.
| Material | Length (inches) | Notes |
| Balsa Wood | 10 | Light and easy to cut |
| Foam Board | 10 | Strong but slightly heavier |
| Plastic Rod | 10 | Flexible but less common |
Cut the fuselage material to size. Smooth the edges and make holes for the wings and rubber band.
Attaching The Tail And Rudder
The tail and rudder keep the plane balanced and help it steer during flight.
- Cut the tail wing and rudder from thin wood or foam.
- Sand the edges to remove rough spots.
- Attach the tail wing horizontally at the back of the fuselage.
- Fix the rudder vertically behind the tail wing.
- Use glue or tape to secure both parts firmly.
Assembling The Propeller Mechanism
The propeller mechanism is key to making your rubber band powered plane fly. It stores energy and pushes the plane forward.
This guide covers choosing the right propeller, fitting the rubber band motor, and balancing the parts for smooth spinning.
Selecting The Propeller Type
Pick a propeller that fits your plane’s size and weight. The shape and size affect how well it spins and pushes air.
- Large blades create more thrust but need stronger rubber bands.
- Small blades spin faster but may give less power.
- Wooden propellers are sturdy but heavier.
- Plastic propellers are light but can break easily.
Installing The Rubber Band Motor
Attach the rubber band to the propeller shaft and the plane’s frame. The band stores energy when twisted.
| Step | Action | Tip |
| 1 | Hook one end of the rubber band to the propeller shaft. | Use a small notch to hold it tight. |
| 2 | Stretch the rubber band along the fuselage. | Keep it straight to avoid twists. |
| 3 | Secure the other end to a hook on the rear frame. | Make sure it is firm but not too tight. |
| 4 | Test by winding the propeller several turns. | Check that the rubber band moves freely. |
Balancing For Smooth Rotation
Balance keeps the propeller turning steady and prevents wobbling. A wobble wastes energy and can break parts.
- Hold the propeller by its center and check if it spins evenly.
- If one side is heavier, add a small piece of tape to the lighter blade.
- Make sure the propeller shaft fits tightly and does not shake.
- Test the motor by turning the propeller slowly before flying.
Balancing And Weight Distribution
Balancing a rubber band powered flying toy plane is key to smooth flight. Proper weight distribution helps the plane glide better and fly farther.
Small changes in weight can affect how the plane moves in the air. Understanding how to adjust balance will improve your toy plane's performance.
Adjusting Center Of Gravity
The center of gravity is the point where the plane balances. If it is too far forward, the plane may dive. If too far back, it may stall.
Move the rubber band, wings, or tail slightly to find the best balance point. Test by balancing the plane on a finger or thin stick.
- Place the plane on your finger under the wings
- Shift parts forward or backward
- Find the spot where the plane stays level
- Mark this point for future reference
Adding Weight For Stability
Adding small amounts of weight can help balance the plane and keep it stable. Use light materials like small clay balls or tape.
| Weight Location | Effect on Flight |
| Front Nose | Prevents stalling, helps dive |
| Rear Tail | Can cause stall, less stable |
| Wings | Improves side balance |
| Under Belly | Increases overall weight, steady flight |
Testing Flight Balance
Test flights show if the plane is balanced. Watch how it glides and lands. Adjust weight or parts as needed after each flight.
- Fly the plane in a calm area
- Observe if it dives, stalls, or turns
- Note which side dips or rises
- Make small changes to weight or position
- Repeat tests until flight is smooth
Launching Techniques
Flying a rubber band powered toy plane is fun and needs practice. Launching your plane the right way helps it fly far and smooth.
This guide shares simple tips for better launches. Follow them to see longer and steadier flights.
Proper Wind-up Methods
Wind the rubber band slowly and evenly to avoid damage. Use your fingers to turn it in the same direction each time.
Stop winding when you feel resistance. Over-winding can snap the band or make the plane unstable.
- Hold the plane steady while winding
- Turn the rubber band with gentle force
- Count your turns to keep them consistent
- Stop if the band feels too tight
Optimal Launch Angles
Launch the plane at a slight upward angle for the best flight. Aim between 10 to 20 degrees above the ground.
Too steep an angle makes the plane climb then stall. Too low makes it hit the ground quickly.
- Hold the plane level in your hand
- Lift the nose slightly before releasing
- Practice different angles to find what works
Tips For Longer Flights
Release the plane smoothly without jerking your hand. A steady push helps it glide further.
Fly in calm weather to avoid wind disturbances. Also, keep the plane clean and balanced for better flight.
- Use gentle, consistent force when launching
- Choose open spaces with little wind
- Check the plane’s wings and tail for damage
- Adjust the rubber band tension for longer runs
Troubleshooting Flight Issues
Flying rubber band powered toy planes is fun. Sometimes, they don't fly as expected. Let's look at common issues and how to fix them.
Understanding these issues will help you enjoy a smooth flying experience. Read on to learn how to troubleshoot and solve them.
Fixing Propeller Slips
If the propeller slips, the plane won't fly well. Check the connection between the propeller and the rubber band.
Make sure it's tight. A loose propeller affects flight performance. You can use a small piece of tape to secure it.
- Tighten the propeller connection
- Use tape for extra security
- Check for any damage on the propeller
Correcting Flight Path
If your plane veers off course, adjust the wings. Make sure they are even on both sides.
Sometimes, a small tweak can correct the path. Check for any bends or twists in the wings.
- Adjust wings for balance
- Ensure wings are straight
- Check for bends in the wings
Maintaining Rubber Band Performance
The rubber band is key to flight. Stretch it gently before use. This helps it perform better.
Replace the rubber band if it shows signs of wear. A fresh band ensures longer flight times.
- Stretch the rubber band before use
- Replace worn-out bands
- Store in a cool, dry place
Customizing Your Flying Toy
Rubber band powered flying toy planes are fun. Customizing them makes them unique. You can add colors, lights, and improve their flight.
Here are some ideas to make your flying toy stand out. Let's explore how you can customize your plane.
Painting And Decorating Ideas
Painting your toy plane can be exciting. Use bright colors to make it visible in the sky. You can add patterns and stickers too.
- Use non-toxic paint for safety
- Try stripes or polka dots for fun designs
- Apply a clear coat to protect the paint
Adding Lights And Sounds
Lights and sounds make your toy plane more exciting. They help you see and hear the plane, even at night.
Upgrading For Better Flight
Improving the flight of your toy plane is possible. Try changing parts or adjusting the design for better performance.
| Upgrade | Benefit |
| Longer rubber bands | Increased flight time |
| Adjust wing angle | Better lift and stability |
| Lightweight materials | Higher efficiency |

Credit: www.youtube.com
Safety Tips And Precautions
Rubber band powered flying toy planes are fun to build and use. Safety is very important to avoid accidents. Follow these tips to keep playtime safe for everyone.
Knowing how to handle rubber bands and launch the plane safely helps prevent injuries. Always watch children closely when they build and play with these toys.
Safe Handling Of Rubber Bands
Rubber bands can snap and cause pain or eye injury. Handle them carefully to avoid harm. Stretch rubber bands only as much as needed.
- Do not overstretch rubber bands
- Keep rubber bands away from your face
- Check for cracks or damage before use
- Throw away broken or worn rubber bands
- Store rubber bands out of reach of small children
Avoiding Injury During Launch
Launching the toy plane requires care to avoid hurting yourself or others. Make sure the area is clear before you launch the plane.
| Safety Tip | Reason |
| Launch away from people and pets | Prevents accidental hits |
| Hold the plane firmly before release | Avoids slipping and unexpected launch |
| Do not aim at faces or eyes | Protects from eye injuries |
| Launch in open spaces only | Reduces risk of damage or injury |
Supervising Young Builders
Young children need help and supervision while building and using flying toy planes. Adults should watch and guide them to stay safe.
- Help with stretching and attaching rubber bands
- Explain safe launch areas and directions
- Keep small parts away from very young children
- Watch for signs of frustration or unsafe actions
- Encourage gentle play and respect for others
Credit: www.hlj.com
Frequently Asked Questions
What Is A Rubber Band Powered Flying Toy Plane?
A rubber band powered flying toy plane uses twisted rubber bands to generate flight energy. It’s eco-friendly, simple, and fun for all ages.
How Do Rubber Band Planes Achieve Flight?
The twisted rubber band stores potential energy. When released, it spins the propeller, creating thrust to lift the plane into the air.
Are Rubber Band Powered Planes Safe For Children?
Yes, these planes are safe when used properly. They have no sharp parts and use non-toxic materials, making them child-friendly toys.
Can Rubber Band Planes Be Customized Or Modified?
Absolutely! You can adjust wing shapes, rubber band size, and propeller design to improve flight performance and personalize your toy plane.
Conclusion
Building a rubber band powered flying toy plane is fun and simple. It teaches basic science and makes learning playful. Kids and adults can enjoy launching these planes outdoors. The design uses just a few materials anyone can find. Watching the plane soar brings smiles and sparks curiosity.
Try making one yourself and see how high it flies. This small project offers big joy and learning. Perfect for family time or school activities. Easy to build, fun to fly, and great for all ages. Give it a go and enjoy the flight!