Looking for a fun, creative project that brings joy to your home? Building your own DIY cardboard puppet theater is the perfect way to spark imagination and hours of entertainment for you and your family.
Imagine the excitement of putting on your own puppet shows, right from the comfort of your living room. This simple, budget-friendly craft lets you transform ordinary cardboard into a magical stage where stories come alive. Ready to dive in and create something special?
Keep reading, and you’ll discover easy steps and clever tips to make your very own puppet theater today.
Credit: www.gltc.co.uk
Materials Needed
Building a DIY cardboard puppet theater is a fun project for kids and adults. You will need some basic materials to create a sturdy and colorful theater.
This guide will help you gather the right materials to make your puppet theater look great and last long.
Choosing The Right Cardboard
Good cardboard is the base of your puppet theater. It must be strong and easy to cut. Look for large sheets to make a nice-sized theater.
Corrugated cardboard is best because it is sturdy and light. Avoid thin or soft cardboard that bends easily.
- Large corrugated cardboard sheets
- Flat and unbent pieces
- Free of tears or holes
- Size around 24 x 36 inches or bigger
Essential Craft Supplies
You will need simple craft supplies to cut, glue, and decorate your theater. These tools help you build and customize your project easily.
- Scissors or craft knife
- Glue stick or white glue
- Masking tape or packing tape
- Ruler and pencil for measurements
- Paintbrushes for decorating
Optional Decorative Items
You can add fun decorations to make your puppet theater more colorful and inviting. These items are optional but add charm.
- Colorful markers or crayons
- Colored paper or wrapping paper
- Stickers or stamps
- Glitter or sequins
- Fabric scraps for curtains
Designing Your Theater
Creating a cardboard puppet theater starts with a solid design plan. This helps make sure your theater is fun and fits your space.
Focus on the size, shape, and details like doors and windows. These parts make your theater easy to use and look great.
Determining Size And Shape
Think about where you will place the puppet theater. Choose a size that fits well and lets you move puppets easily.
Decide if you want a tall or wide theater. Consider how many puppets will play at once and who will watch.
- Measure the available space in your room.
- Make sure the theater is stable and easy to move.
- Choose a shape that matches your style, like rectangle or square.
- Leave enough room for puppet movement behind the stage.
Sketching The Layout
Draw a simple picture of your theater before building. This helps plan where each part goes.
Include the stage area, puppet opening, and any shelves or storage spots.
| Part | Description | Size Suggestion |
| Stage Opening | Where puppets appear | 20 inches wide, 15 inches high |
| Back Panel | Supports theater structure | 30 inches wide, 30 inches high |
| Side Panels | Hold up front and back | 15 inches wide, 30 inches high |
| Storage Shelf | Holds puppets and props | 15 inches wide, 10 inches deep |
Adding Doors And Windows
Doors and windows make your theater look real and add fun ways to play. Plan their size and position on your sketch.
Consider these tips for doors and windows:
- Make the puppet door large enough for easy puppet movement.
- Use clear plastic or mesh for windows to see inside.
- Add curtains or flaps for hiding puppets when not in use.
- Decorate with paint or paper to match your theme.
Building The Frame
Building the frame is the first step to make your cardboard puppet theater. It gives the theater its shape and strength. A strong frame helps the theater stand well and hold the puppets.
You will need some cardboard, a cutting tool, and glue or tape. Follow each step carefully to build a sturdy frame.
Cutting Cardboard Pieces
Start by cutting the cardboard into the pieces you need for the frame. Make sure the pieces are straight and even. Use a ruler and pencil to mark the lines before cutting.
- Cut two large rectangles for the front and back walls
- Cut two long strips for the sides
- Cut a smaller rectangle for the stage floor
- Cut a strip for the top frame
Assembling The Structure
Put the pieces together to form the shape of the theater. Attach the sides to the front and back pieces. Then add the stage floor and top frame.
- Use glue or tape to join the edges
- Hold pieces in place until the glue dries
- Make sure corners are square and aligned
- Check that the frame stands upright
Reinforcing For Stability
Strengthen the frame by adding extra support inside. This will keep the theater from bending or falling. Use smaller cardboard strips inside the corners and along the edges.
- Glue strips vertically in each corner
- Add horizontal strips under the stage floor
- Reinforce the top frame with extra layers
- Check for any weak spots and add more support

Credit: sanboxkids.medium.com
Decorating The Theater
Decorating your DIY cardboard puppet theater makes it more fun and special. Use simple art supplies to bring it to life. You can add colors, fabric, and fun items to make it unique.
This guide will help you add paint, curtains, and stickers to create a beautiful puppet stage. Each part helps make the theater ready for your puppet shows.
Painting And Coloring
Use bright colors to paint your puppet theater. You can use acrylic paint or markers. Let the paint dry before adding other decorations. Paint the frame, sides, and front to make it look lively.
- Choose your favorite colors or themes
- Use brushes of different sizes for details
- Paint fun shapes or patterns
- Allow each layer of paint to dry well
Adding Curtains And Backdrops
Curtains and backdrops make the theater look real. Use fabric scraps or colored paper. Attach them to the top and back of the theater frame. You can change these for different shows.
| Material | Use | Tips |
| Fabric scraps | Curtains | Use glue or tape to attach |
| Colored paper | Backdrop | Draw or paint scenes on it |
| Ribbon or string | Hold curtains | Use to tie curtains open |
Personalizing With Stickers And Props
Stickers and props add personality to your theater. You can use store-bought stickers or make your own. Small props like toy furniture or paper puppets fit well on stage.
Ideas for Props:
- Paper trees or houses
- Mini chairs or tables
- Animal or character cutouts
- Small lights for stage effects
Creating Puppets
Making puppets is a fun part of building your cardboard puppet theater. Puppets bring stories to life and spark imagination. You can create many types using simple materials.
This guide helps you learn about different puppets, what materials to use, and easy ways to make them.
Types Of Puppets To Make
Puppets come in many styles. Choose the type that fits your story and skills. Simple puppets work well for beginners.
- Hand Puppets: Fit over your hand and move with your fingers.
- Stick Puppets: Use sticks to hold and move the puppet.
- Finger Puppets: Small puppets that fit on your fingers.
- Shadow Puppets: Flat shapes held against a light source.
Materials For Puppets
Use materials that are easy to find and safe for kids. Cardboard works well for puppet bases. Add fabric, paper, and glue for details.
- Cardboard pieces or thick paper
- Colored paper and markers
- Glue or tape
- Scissors
- Fabric scraps or felt
- Googly eyes, buttons, or beads
- Wooden sticks or straws for handles
Simple Puppet Crafting Techniques
Start with easy methods to build your puppets. Cut shapes from cardboard and decorate them. Attach sticks or use your hand to move them.
- Cut out puppet shapes from cardboard or paper.
- Draw faces and clothes with markers or crayons.
- Glue fabric or paper for clothes and hair.
- Attach sticks at the bottom for stick puppets.
- Use tape to fix parts securely.
- Try folding cardboard for moving arms or legs.
Setting Up The Show
Creating a DIY cardboard puppet theater is fun and easy. Setting up the show is an important part of the process.
Let's explore how to set the stage with lighting, sound, and a well-organized script.
Lighting Tips
Good lighting makes your puppet show come alive. It highlights the characters and sets the mood.
- Use small LED lights for focused lighting
- Try colored bulbs to change the atmosphere
- Ensure lights are not too bright to avoid glaring
Sound Effects And Music
Sound effects and music add depth to your puppet theater. They make the performance more engaging.
Organizing A Script
A clear script keeps your show flowing smoothly. Make sure each puppet has a role and lines to say.
| Character | Role | Lines |
| Puppet A | Hero | "Let's save the day!" |
| Puppet B | Villain | "I will stop you!" |
| Puppet C | Sidekick | "I'm here to help." |
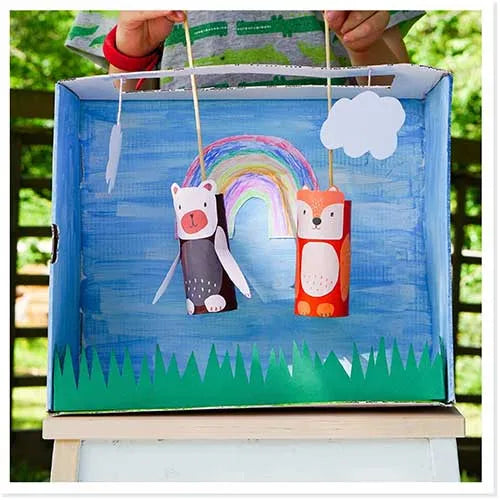
Engaging Your Audience
Creating a cardboard puppet theater is a fun project. It can engage both kids and adults. By inviting family and friends, you make the experience more enjoyable.
With interactive storytelling, your audience becomes part of the show. Encourage participation to keep everyone entertained and involved.
Inviting Family And Friends
Invite family and friends to join your puppet theater event. This makes the performance more exciting.
Having a larger audience creates a lively atmosphere. It encourages more laughter and applause.
- Send out invitations a week before the event
- Include details about the time and place
- Ask guests to bring snacks or drinks
Interactive Storytelling Ideas
Interactive stories make puppet shows special. Let the audience suggest story twists or character actions.
Create stories where viewers choose what happens next. This keeps them engaged and curious.
- Ask the audience to pick a character's next move
- Include a mystery that guests can help solve
- Use props that viewers can interact with
Encouraging Audience Participation
Audience participation makes the show more fun. Encourage guests to clap, cheer, and even perform.
Invite children to join you on stage. They can help move puppets or add their voices to the show.
- Teach simple puppet moves to the audience
- Include songs that everyone can sing together
- Ask questions and let the audience shout answers

Credit: www.youtube.com
Maintaining Your Theater
Keeping your DIY cardboard puppet theater in good shape helps it last longer. Regular care makes playtime more fun and safe.
Simple maintenance saves you time and money. It also keeps your theater looking nice for every show.
Storage Tips
Store your puppet theater in a dry place. Avoid damp areas to stop the cardboard from getting soft or moldy.
Keep the theater flat or standing upright to prevent bending. Cover it with a cloth or plastic sheet to protect from dust.
- Use a large box or bag for small parts
- Keep away from direct sunlight to avoid fading
- Store in a cool, dry spot
Repairing Common Damages
Fix tears with clear tape or glue made for paper. Small holes can be patched with extra cardboard pieces.
Replace broken parts like puppet rods or curtains to keep the theater working well. Check for loose joints and tighten or glue them.
- Use non-toxic glue for safety
- Trim rough edges after repair
- Check repairs before each use
Updating Designs Over Time
Change the look of your theater by adding new paint or decorations. This keeps it fresh and exciting for kids.
Add seasonal or themed decorations to match holidays or special events. Update curtains, signs, or backgrounds as needed.
- Use washable paint for easy changes
- Attach decorations with removable tape
- Keep old designs safe for reuse
Frequently Asked Questions
What Materials Are Needed For A Diy Cardboard Puppet Theater?
You need cardboard boxes, scissors, glue, paint, markers, and fabric. These basic materials help build a sturdy, colorful puppet theater. Optional decorations include stickers or glitter to personalize your theater.
How Do I Assemble A Cardboard Puppet Theater?
Cut the cardboard to create a front frame and side panels. Glue or tape the pieces securely. Paint and decorate before attaching fabric curtains. Let everything dry fully before use.
Can Children Safely Build A Cardboard Puppet Theater?
Yes, with adult supervision, children can safely build it. Use child-friendly scissors and non-toxic glue or paint. Supervise cutting and assembly to avoid accidents.
How Can I Decorate My Cardboard Puppet Theater Creatively?
Use bright paints, stickers, and fabric to add color. Draw themed designs or characters on the theater. Adding curtains and lights enhances the look and play experience.
Conclusion
Building a cardboard puppet theater is fun and simple. It brings joy to children and sparks creativity. You can use materials found at home. This project helps develop storytelling and crafting skills. Plus, it offers hours of entertainment. Try different designs and decorations to make it unique.
Share the theater with family and friends. It creates great memories and encourages imagination. Start your DIY puppet theater today and enjoy the fun!