Are you looking for a fun and creative project that you can do right at home? Building a DIY cardboard toy bridge is a perfect way to challenge your imagination and skills.
Not only will you enjoy making something with your own hands, but you'll also have a cool toy to play with or show off. This project is simple, affordable, and great for all ages. Ready to discover how easy and exciting it can be?
Keep reading, and you'll find step-by-step instructions, helpful tips, and ideas to make your cardboard bridge strong and unique. Your next favorite craft is just a few clicks away!
Materials Needed
Building a toy bridge from cardboard is a fun and easy project. You only need a few simple materials to start. These items help you create a strong and creative bridge.
Choosing the right materials makes your project better. Let’s look at what you need and how to pick the best supplies.
Choosing The Right Cardboard
Cardboard is the main material for your toy bridge. Pick cardboard that is thick and sturdy. This will help your bridge hold its shape and support weight.
Avoid thin or soft cardboard. Corrugated cardboard with a wavy middle layer works best. It is strong and easy to cut.
- Use double or triple wall cardboard for strength
- Look for clean, flat pieces without damage
- Recycle old boxes from appliances or shipping
- Avoid glossy or coated cardboard that is hard to glue
Additional Supplies
Besides cardboard, you need some tools and extra items. These supplies help you cut, stick, and decorate your bridge.
- Scissors or a craft knife for cutting cardboard
- Glue or tape to join pieces together
- Ruler and pencil for measuring and marking
- Paint or markers to add color and designs
- Optional: string or small sticks for extra support

Credit: www.youtube.com
Designing Your Bridge
Building a cardboard toy bridge starts with a good design. You need to think about the shape and size first. This helps make a strong and fun bridge.
Planning your design carefully saves time and materials. It also makes your bridge safer and more stable.
Simple Bridge Shapes
There are basic shapes that work well for toy bridges. Each shape has its own strength and style. Choose the one that fits your idea best.
- Beam Bridge: A straight and simple shape.
- Arch Bridge: Curves that spread weight evenly.
- Truss Bridge: Triangles add extra support.
- Suspension Bridge: Cables hold the deck from above.
Measuring And Planning
Good measurements make sure your bridge fits where you want it. Planning helps you use the right amount of cardboard and tape.
| Item | Measurement Needed | Notes |
| Bridge Length | Measure the gap to cross | Keep extra length for supports |
| Bridge Width | Decide how wide the bridge deck will be | Wide enough for toy cars or figures |
| Support Height | Height of legs or arches | Must keep bridge stable |
| Cardboard Pieces | Calculate pieces needed | Plan for extra in case of mistakes |
Cutting And Shaping
Cutting and shaping cardboard is a key part of building your toy bridge. It helps create the right parts for strong support.
Use careful cutting to avoid mistakes. Shaping pieces correctly makes your bridge look better and hold weight well.
Safe Cutting Techniques
Always cut on a flat, stable surface to stay safe. Use a sharp craft knife for clean cuts, not scissors.
Keep your fingers away from the blade. Cut slowly and follow your lines carefully to avoid slips.
- Use a cutting mat or thick cardboard underneath
- Hold the blade firmly and cut in one smooth motion
- Wear safety gloves if needed to protect your hands
- Keep your work area well-lit and tidy
Creating Support Structures
Support structures keep your bridge strong and balanced. Use triangles and beams made from folded or layered cardboard.
Cut cardboard strips to build these shapes. Glue or tape them firmly to the main parts of the bridge.
- Fold cardboard edges to add strength
- Make triangle shapes for good weight distribution
- Layer pieces for extra support where needed
- Attach supports under and along the bridge deck
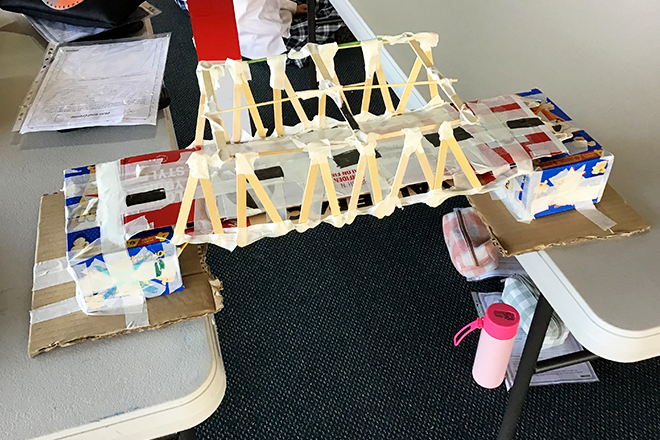
Credit: spw.sa.edu.au
Assembling The Bridge
Building your cardboard toy bridge is fun and easy. Careful assembly helps the bridge hold strong.
Follow simple steps to put the pieces together. Use the right tools for better results.
Gluing And Taping Tips
Use strong glue to join cardboard parts firmly. Apply glue evenly for a better bond.
Reinforce edges with tape to stop pieces from moving. Clear tape works well for neatness.
- Spread glue thinly but fully on surfaces
- Press pieces together and hold for a minute
- Use masking tape to hold parts while glue dries
- Cover joints with tape for extra strength
Ensuring Stability
Make sure all parts fit tightly without gaps. Loose parts can make the bridge weak.
Add extra support by doubling cardboard layers under the bridge deck. Check balance often.
- Align all pieces carefully before gluing
- Use small cardboard strips as braces
- Test stability by pressing gently on the bridge
- Fix any wobbling parts with tape or glue
Decorating Ideas
Decorating your DIY cardboard toy bridge makes it more fun and exciting. You can use simple materials to add color and details.
Creative decoration also helps the bridge look realistic and unique. Let’s explore some easy ways to decorate it.
Painting And Coloring
Painting your cardboard bridge gives it a strong and lively look. Use bright colors or natural tones to fit your style.
Water-based paints work well on cardboard and dry quickly. You can also use markers or colored pencils for smaller parts.
- Apply a base coat for better paint coverage
- Use tape to create clean lines and shapes
- Try blending colors for a faded effect
- Let each layer dry before adding another
Adding Details
Small details make your bridge more interesting. You can add windows, signs, or textures using simple materials.
Use paper, glue, and markers to create these details. Adding textures with cotton or fabric pieces can make the bridge feel real.
- Draw bricks or wood patterns with markers
- Glue small paper cutouts for signs or lights
- Add cotton for clouds or smoke effects
- Use string or yarn to mimic ropes or cables
Playing With Your Bridge
A cardboard toy bridge can spark creativity and fun. Kids will enjoy playing with it in many ways. Let's explore how your bridge can be used for exciting playtime.
Children can learn and have fun at the same time. This bridge project makes imaginative play easy. Discover some ideas to get started.
Toy Car Compatibility
Not all toy cars will fit on your bridge. It's important to check which cars work best. This ensures smooth play and prevents frustration.
- Check the width of the bridge
- Match the size of toy cars
- Use lightweight cars for stability
Creative Play Suggestions
Encourage children to come up with their own stories. The bridge can be part of many adventures. Here are some ideas to inspire them.
- Host a car race over the bridge
- Create a city scene with the bridge as a centerpiece
- Use the bridge in a toy train set
These suggestions help boost imagination and creativity. Kids will enjoy countless hours of fun with their cardboard bridge.
Troubleshooting
Building a cardboard toy bridge can be fun and educational. Sometimes, issues arise during construction.
This guide will help you address common problems and reinforce your bridge's structure.
Common Issues
Many builders face challenges while constructing their cardboard toy bridges. Let's explore some frequent issues.
- Cardboard bending under weight
- Glue not holding parts together
- Bridge not stable on flat surfaces
Fixing Weak Spots
Weak spots can make your bridge collapse. Strengthen these areas to ensure durability.
| Problem | Solution |
| Weak joints | Use stronger adhesive or tape |
| Cardboard sagging | Reinforce with extra layers |
| Unstable legs | Adjust length or add supports |

Credit: www.youtube.com
Frequently Asked Questions
What Materials Are Needed For A Cardboard Toy Bridge?
You need sturdy cardboard, scissors, glue, a ruler, and markers. Optional items include tape and paint for decoration. These materials are affordable and easy to find at home or craft stores.
How Do I Make A Strong Cardboard Toy Bridge?
Use multiple cardboard layers and reinforce joints with glue or tape. Design triangular supports for stability. Let glue dry fully before testing the bridge’s strength to ensure durability.
Can Kids Safely Build This Cardboard Bridge Project?
Yes, with adult supervision, kids can safely cut and assemble cardboard. Use child-safe scissors and non-toxic glue. The project encourages creativity and basic engineering skills in a fun way.
How Long Does The Cardboard Toy Bridge Project Take?
The project usually takes 1 to 2 hours, depending on complexity. Drying time for glue may add extra time. It’s perfect for a weekend craft activity or classroom project.
Conclusion
Building a cardboard toy bridge is fun and easy. It teaches kids about shapes and strength. You only need simple materials at home. This project sparks creativity and teamwork. It also helps improve fine motor skills. Kids feel proud when their bridge stands strong.
Try different designs to see what works best. Enjoy the process and learn by doing. This activity makes playtime both fun and educational. Give it a try and watch imagination grow.