Looking for a fun and creative way to keep your kids entertained? Building a DIY cardboard toy garage could be just what you need.
Imagine turning simple cardboard boxes into a colorful, sturdy play space where your child’s toy cars can zoom and park all day long. Not only is this project easy on your wallet, but it also sparks your child’s imagination and gives you a chance to bond over something special.
Ready to see how you can make this exciting toy garage at home? Keep reading, because we’re about to share simple steps and clever tips that will make your DIY project a huge success.
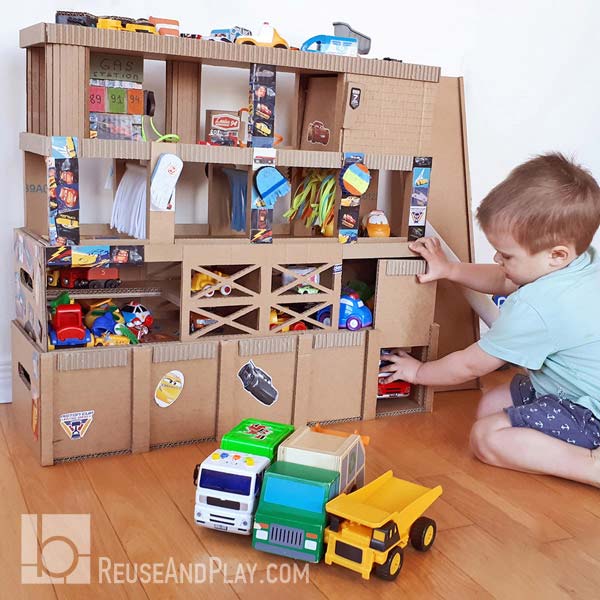
Credit: reuseandplay.com
Materials Needed
Building a cardboard toy garage is fun and easy. You only need a few basic materials. Picking the right supplies helps your project last longer.
This guide covers the cardboard choice and the tools you need. These materials keep your work neat and safe.
Choosing The Right Cardboard
Good cardboard must be strong and smooth. It holds the garage shape well. Avoid thin or torn cardboard to keep the toy stable.
- Look for double-layered or corrugated cardboard.
- Choose pieces without dents or holes.
- Use clean and dry cardboard for easy cutting.
- Check that the size fits your garage design.
Essential Tools And Supplies
Gathering the right tools makes building faster. These items help you cut, glue, and decorate the garage safely.
| Tool or Supply | Purpose |
| Box cutter or craft knife | Cut cardboard cleanly |
| Ruler or measuring tape | Measure parts accurately |
| Glue gun or strong adhesive | Stick parts firmly |
| Marker or pencil | Mark cutting lines |
| Cutting mat | Protect work surface |
| Paint or markers | Decorate the garage |
Designing Your Toy Garage
Creating a cardboard toy garage is a fun project for kids and adults. Good design makes your garage strong and easy to use.
Start by thinking about how you want your garage to look and work. This helps you build it step by step.
Planning The Layout
Decide how many parking spaces your garage will have. Think about the size of the cars your kids play with.
Also, plan for ramps, doors, and extra features like car wash spots or repair areas.
- Count the number of toy cars to fit
- Choose space for ramps and doors
- Include fun areas like car wash or repair
- Leave room for easy access to cars
Sketching Your Garage
Draw a simple sketch of your garage on paper. Use basic shapes to show parking spots and ramps.
This sketch helps you see how everything fits together and shows what parts you need to cut from cardboard.
- Draw rectangles for parking spaces
- Mark where ramps and doors go
- Label each part for easy building
- Check sizes to fit your toy cars
Cutting And Preparing Cardboard
Building a DIY cardboard toy garage starts with cutting and preparing the cardboard. This step is important for a neat and strong garage structure.
Take your time to measure and cut the cardboard carefully. This helps avoid mistakes and waste.
Measuring And Marking
Use a ruler or measuring tape to get exact sizes for your cardboard pieces. Mark the lines clearly with a pencil for easy cutting.
Marking helps you cut straight edges and fit the pieces together well. Double-check your measurements before cutting.
- Measure twice for accuracy
- Use a light pencil mark for easy removal later
- Mark all edges clearly before cutting
Safe Cutting Techniques
Cut cardboard on a flat, stable surface to stay safe. Use a sharp craft knife or box cutter for clean cuts.
Cut slowly along the marked lines. Keep your fingers away from the blade to avoid injuries.
- Use a cutting mat to protect your table
- Hold the cardboard firmly while cutting
- Always cut away from your body
- Wear safety gloves if needed
Assembling The Garage Structure
Building a cardboard toy garage is fun and rewarding. You will create a strong structure step by step.
This guide focuses on putting together the base, walls, and roof of the garage.
Building The Base
Start by cutting a large piece of cardboard for the base. Make sure it is flat and sturdy to hold the garage.
- Measure the size of the garage you want.
- Cut the cardboard to these dimensions.
- Reinforce the bottom with extra layers if needed.
- Mark where walls will attach.
Constructing Walls And Roof
Next, cut pieces for the walls and roof. Use strong cardboard to keep the shape.
| Part | Size Guide | Notes |
| Front Wall | Same width as base, 12 inches tall | Cut window and door openings |
| Side Walls | 12 inches tall, 8 inches deep | Attach to front and back walls |
| Back Wall | Same size as front wall | Solid piece for stability |
| Roof | Cut two pieces 9 by 12 inches | Attach at an angle |
Use glue or tape to fix the walls to the base. Then connect the walls together. Finally, place the roof on top.
Adding Functional Features
Making a DIY cardboard toy garage is fun. Adding features makes it more useful and fun to play with.
Simple changes can make the garage look real and work well for toy cars.
Creating Parking Slots
Parking slots help organize the toy cars inside the garage. You can make slots by cutting shapes on the cardboard.
Use markers or paint to draw lines that show where each car should park.
- Cut rectangular shapes for each slot
- Space slots to fit the size of toy cars
- Label slots with numbers or letters
- Draw lines around slots for clear parking areas
Installing Ramps And Doors
Ramps let cars move in and out of the garage easily. Make ramps with folded cardboard pieces.
Doors add realism and can open or close. Use small cardboard flaps or hinges made from tape.
- Cut a cardboard piece at an angle for a ramp
- Attach the ramp with tape or glue
- Make door flaps that open outward or slide
- Use tape as hinges to make doors move smoothly

Credit: www.youtube.com
Decorating Your Garage
Decorating your cardboard toy garage makes it more fun and unique. You can add colors, stickers, and other details to show your style.
Simple decorations can make your garage look more real and exciting for playtime.
Painting And Coloring Tips
Use bright colors to make your garage stand out. Paint the doors, windows, and walls with different shades.
Try water-based paints or markers for easy coloring. Let each layer dry before adding more colors to avoid smudges.
- Choose colors that match real garages like red, blue, or gray
- Use tape to create clean lines and shapes
- Paint small details like roof tiles or bricks for realism
- Let the paint dry completely before touching the garage
Adding Stickers And Details
Stickers add fun details to your toy garage. Look for car or tool stickers to place on the walls or doors.
You can also draw small signs or labels to make the garage look busy and real.
- Use clear stickers to avoid covering paint
- Place stickers on flat surfaces for best results
- Add small paper signs with names or numbers
- Glue on tiny cardboard tools or accessories for extra fun
Ensuring Durability
A DIY cardboard toy garage can be a fun and creative project for kids, but it's essential to ensure it's durable enough to withstand regular use. A sturdy garage will keep toys organized and prevent damage to the surrounding area.
Reinforcing Weak Spots
Cardboard can be fragile, so it's crucial to reinforce weak spots to prevent damage. One way to do this is by adding extra layers of cardboard or using a thicker cardboard material.
- Add extra layers of cardboard to make the garage stronger
- Use a hot glue gun to attach the layers together
- Let the glue dry completely before handling the garage
Protective Coatings
Protective coatings can help extend the life of your DIY cardboard toy garage. A waterproof coating will prevent moisture from seeping in and causing damage.
Some popular options for protective coatings include:
- Clear acrylic spray
- Waterproof varnish
- Non-toxic sealant
Apply the coating according to the manufacturer's instructions and let it dry completely before using the garage.
Credit: www.youtube.com
Safe Play Tips
Building and playing with a cardboard toy garage is fun for kids. Safety is very important to keep playtime happy. Follow some tips to make sure children are safe while playing.
Parents and caregivers should watch children and keep the toy garage in good shape. This helps prevent accidents and keeps the toy fun for a long time.
Supervision Guidelines
Always keep an eye on children when they play with the cardboard garage. This helps stop them from using it in unsafe ways or getting hurt.
- Make sure the play area is clean and free of sharp objects.
- Check that children do not put small parts in their mouths.
- Help younger kids understand how to use the garage safely.
- Stop play if the cardboard looks weak or torn.
- Keep the garage away from water to avoid damage.
Maintenance And Repairs
Fix the toy garage quickly if it gets damaged. This keeps the toy strong and safe for children to use.
| Issue | How to Fix | Check Often |
| Ripped cardboard | Use strong tape or glue to repair tears | Weekly |
| Loose parts | Secure parts with tape or replace if broken | Before each use |
| Wet or soggy areas | Dry completely or replace affected sections | After any spills |
| Sharp edges | Cover edges with soft tape or trim carefully | Monthly |
Creative Play Ideas
Making a cardboard toy garage is a fun way to encourage kids to play creatively. Kids can use their imagination to build stories and games around the garage.
Playing with a cardboard garage helps children develop skills like problem-solving and role-playing. It also gives them a chance to explore different ideas and scenarios.
Role-playing Scenarios
Kids can pretend to be mechanics fixing cars or owners running their own garage. This kind of play builds social skills and creativity.
They can create stories about car races, repairs, or customers visiting the garage. Role-playing helps children understand everyday jobs and teamwork.
Expanding The Garage
Adding new parts to the cardboard garage keeps playtime fresh. Kids can build extra rooms, ramps, or parking spaces using more cardboard.
Expanding the garage allows children to design their own play space. This helps improve their planning and building skills.
- Attach a car wash section
- Create a waiting room for customers
- Build a fuel station nearby
- Add ramps for cars to drive up and down
- Make parking spots with numbered spaces
Frequently Asked Questions
What Materials Are Needed For A Diy Cardboard Toy Garage?
You need sturdy cardboard, scissors, glue, markers, and tape. Optional items include paint and stickers for decoration. These materials are affordable and easy to find at home or craft stores.
How Do I Make A Cardboard Toy Garage Durable?
Use thick cardboard and reinforce joints with strong glue or tape. Adding extra layers at stress points improves durability. Avoid using too much water-based paint to prevent weakening the cardboard.
Can Children Safely Build A Cardboard Toy Garage?
Yes, with adult supervision, children can safely build it. Use child-friendly scissors and non-toxic glue. This project encourages creativity and fine motor skills in a fun, safe way.
How Long Does It Take To Build A Cardboard Toy Garage?
Building time varies but usually takes 1-2 hours. It depends on complexity and decoration level. Breaking the task into steps helps manage time efficiently.
Conclusion
Building a DIY cardboard toy garage brings fun and learning together. Kids enjoy creating and playing with their own garage. It uses simple materials anyone can find at home. The project helps improve creativity and fine motor skills. Plus, it saves money and reduces waste by recycling cardboard.
Try different designs and add personal touches. This garage can keep toy cars organized and ready to race. A small effort makes a big difference in playtime. Give it a try and watch imagination grow!