Have you ever wanted to create something fun and unique with your own hands? DIY cardboard toy masks are the perfect way to bring your imagination to life.
Whether you’re crafting for a party, playtime, or just a creative afternoon, these masks are easy to make and full of exciting possibilities. In this guide, you’ll discover simple steps and clever tips to turn ordinary cardboard into amazing wearable art.
Ready to surprise yourself with what you can create? Let’s dive in and start making your very own cardboard toy masks!
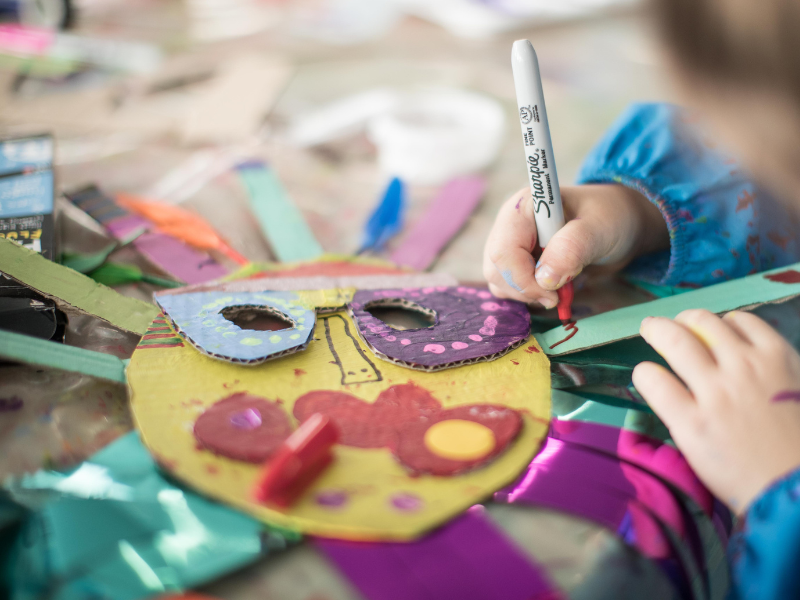
Credit: artfulparent.com
Materials Needed
Creating cardboard toy masks is fun and easy. You only need simple materials found at home or craft stores.
This guide lists the types of cardboard and supplies you need to start your project.
Types Of Cardboard
Choose the right cardboard for your mask. The thickness and texture affect the mask's look and strength.
- Corrugated cardboard: Strong and good for sturdy masks
- Cardstock: Thinner and easier to cut for detailed shapes
- Recycled cardboard: Eco-friendly and easy to find
- Box cardboard: Often smooth, good for painting
Basic Craft Supplies
You need these basic supplies to cut, shape, and assemble your mask.
| Supply | Purpose |
|---|---|
| Scissors | Cut cardboard and decorative items |
| Glue or tape | Attach parts together |
| Markers or paint | Add color and details |
| Pencil | Draw shapes before cutting |
| Ruler | Measure and draw straight lines |
| Elastic string or ribbon | Hold the mask on your head |
Optional Decorative Items
Decorate your mask to make it fun and unique. Use some of these extras if you want.
- Glitter for sparkle
- Feathers to add texture
- Colored paper for layering
- Stickers for easy decoration
- Buttons or beads for eyes or accents
- Yarn or string for hair or details
Simple Mask Designs
Making cardboard toy masks is fun and easy. You can create many designs with simple shapes.
These masks are perfect for kids to play and use their imagination at home or school.
Animal Faces
Animal face masks use basic shapes to show different animals. You can use circles, triangles, and ovals.
- Cut out a circle for the face
- Add triangle ears on top
- Draw eyes and nose with markers
- Use colored paper for fur or feathers
Superhero Styles
Superhero masks often have bold shapes and bright colors. They are easy to make with cardboard and paint.
| Superhero | Mask Shape | Colors |
| Speedster | Oval with sharp edges | Red and yellow |
| Shadow | Rectangle with eye slits | Black and grey |
| Star | Star-shaped around eyes | Blue and white |
Fantasy Characters
Fantasy masks show magical creatures like fairies or dragons. Use glitter, feathers, and bright colors for effect.
Simple Fantasy Mask Tips
- Use cut-out shapes like wings or horns
- Glue on shiny paper or foil
- Add glitter for sparkle
- Use elastic bands to wear
Cutting And Shaping Techniques
Making cardboard toy masks is a fun craft. Cutting and shaping the cardboard well helps create great designs.
This guide shares safe ways to cut, how to add 3D effects, and ideas for movable parts on your mask.
Safe Cutting Tips
Always be careful when cutting cardboard. Use the right tools and follow safety rules.
- Use a sharp craft knife for clean cuts.
- Cut on a cutting mat to protect your surface.
- Keep your fingers away from the blade path.
- Work slowly and do not rush the cutting process.
- Wear safety gloves if you feel uncomfortable handling knives.
Creating 3d Effects
3D effects make your mask look more interesting and lifelike. Use layers and shapes to add depth.
| Technique | How to Do It |
| Layering | Cut small shapes and glue them on top of the base mask. |
| Folding | Fold cardboard edges to create raised parts like nose or ears. |
| Curving | Bend thin cardboard gently to add rounded shapes. |
Adding Movable Parts
Movable parts make your mask fun to play with. Hinges or strings can help parts move.
Try these ideas for movable parts:
- Attach eyes with paper fasteners so they can open and close.
- Use string to connect a mouth flap that moves when pulled.
- Create ears on small hinges to make them wiggle.
Make sure all parts are secure but easy to move.

Credit: www.youtube.com
Painting And Decorating
Painting and decorating cardboard toy masks makes them fun and unique. This step lets kids express creativity and add personality.
Choose colors and designs that fit the character or theme of the mask. Use simple tools and materials for best results.
Choosing Paints And Markers
Pick paints and markers that work well on cardboard. Acrylic paints dry fast and stick firmly to the surface.
Markers are great for adding fine details and outlines. Use water-based markers to avoid smudging and make cleanup easy.
- Acrylic paints for bold colors
- Water-based markers for detail
- Non-toxic materials for safety
- Brushes of different sizes for variety
Using Textures And Patterns
Textures and patterns add depth to the mask design. Use sponges, stamps, or cloth to create interesting effects.
Try painting dots, stripes, or zigzags to make the mask eye-catching. Mixing smooth and rough textures gives a creative look.
- Use sponges to dab paint for a textured look
- Stamp shapes with leaves or foam pieces
- Draw stripes or dots with markers
- Glue tissue paper for added texture
Adding Accessories
Accessories make masks more fun and realistic. Add feathers, yarn, or buttons for extra detail and color.
Glue small items carefully so they stay attached. Use string or elastic bands to wear the mask comfortably.
- Feathers for a wild look
- Yarn for hair or whiskers
- Buttons for eyes or decorations
- Elastic bands to hold the mask on
Assembly And Wearing
Making your own cardboard toy mask is fun and easy. You only need a few supplies to get started. After cutting out the mask shape, the next step is to assemble and wear it correctly.
This guide will help you attach the straps, adjust the fit, and ensure comfort while wearing your mask.
Attaching Straps
Straps hold the mask in place on your head. Use elastic bands or string for a secure fit. Attach the straps on each side of the mask with glue or tape.
- Measure the strap length before attaching.
- Use strong glue or tape for better hold.
- Make two small holes on the mask edges for threading straps.
- Secure knots tightly to avoid slipping.
Adjusting Fit
You can change strap length to fit your head better. Try the mask on and see if it feels loose or tight. Adjust straps by tightening or loosening knots or using a slider.
| Fit Issue | Adjustment Tip |
| Mask slips down | Tighten straps or add extra grip pads |
| Mask feels too tight | Loosen straps slightly |
| Mask tilts to one side | Adjust strap length evenly on both sides |
Comfort Tips
Wearing a cardboard mask can sometimes cause discomfort. These tips help you stay comfortable while enjoying your creation.
- Add soft felt or foam padding inside the mask around the edges.
- Take breaks if your face feels warm or sweaty.
- Use light materials to keep the mask from feeling heavy.
- Keep the mask clean by wiping it gently with a damp cloth.
Creative Activity Ideas
Making DIY cardboard toy masks is a fun and creative activity. Kids can enjoy crafting and playing with these masks.
These masks can be used for various activities, from group crafts to themed parties. Let's explore some exciting ideas!
Group Craft Sessions
Group craft sessions are a fantastic way for kids to work together. Creating masks in a group builds teamwork and creativity.
- Share materials like cardboard, scissors, and glue.
- Encourage kids to design their own unique masks.
- Organize a small show to display the crafted masks.
Themed Parties
DIY masks can add excitement to themed parties. Let each child create a mask that matches the party theme.
Try themes like:
- Animals
- Superheroes
- Fantasy Characters
These themes spark imagination and are easy to craft with simple materials.
Storytelling With Masks
Masks can enhance storytelling by bringing characters to life. Children can wear masks to act out their favorite stories.
| Story | Character |
| The Three Little Pigs | Pig |
| Cinderella | Fairy Godmother |
| Peter Pan | Captain Hook |
Benefits Of Making Masks
Creating DIY cardboard toy masks is a fun activity for kids. It offers several benefits that aid in their development and learning.
From sparking creativity to enhancing motor skills, making masks engages children in many positive ways.
Encouraging Creativity
Crafting masks allows children to express themselves. They can design masks in any style or color they choose.
- Children imagine new characters
- They mix and match colors
- They explore different materials
Improving Motor Skills
Making masks helps improve hand-eye coordination. Kids use scissors and glue, which requires precise movements.
| Activity | Skill Developed |
| Cutting Shapes | Fine Motor Skills |
| Gluing Pieces | Hand-Eye Coordination |
| Drawing Designs | Dexterity |
Fostering Imaginative Play
Once the masks are made, they become tools for imaginative play. Children can act out stories and create fantasy worlds.
Troubleshooting Common Issues
Making DIY cardboard toy masks can be fun but sometimes you face problems. Fixing these issues helps your mask look better.
This guide covers common problems and easy ways to solve them. You will learn how to fix weak spots, avoid paint smudges, and adjust size mistakes.
Fixing Weak Spots
Cardboard can bend or tear in some areas. Weak spots make the mask less strong and less fun to wear.
Use extra cardboard pieces to support weak parts. Glue them carefully and let the glue dry well. Tape can also help hold fragile spots together.
- Cut small cardboard patches for weak areas
- Apply glue on patches and press firmly
- Use clear tape on inside for more strength
- Let glue dry fully before use
Preventing Paint Smudges
Paint smudges happen when wet paint touches other surfaces. Smudges can ruin your mask’s look.
Paint in thin layers and let each layer dry before adding more. Use a small brush for details. Avoid touching wet paint and keep masks in a safe spot while drying.
- Paint thin coats for faster drying
- Wait 10-15 minutes between layers
- Use small brushes for edges and details
- Place masks on newspaper or cardboard to dry
Adjusting Size Mistakes
Sometimes the mask is too big or too small. A wrong size makes it hard to wear comfortably.
Trim edges carefully if the mask is too large. Add extra cardboard strips inside if it is too small. Test fit often while you work to get the right size.
- Cut small amounts from edges to reduce size
- Glue cardboard strips inside to increase size
- Try mask on often during adjustments
- Make slow changes to avoid big mistakes
Upcycling And Sustainability
Making toy masks from cardboard is a fun way to help the planet. Using old materials reduces waste and saves resources.
Upcycling turns trash into treasure. It teaches kids to care for the Earth while creating something new.
Using Recycled Cardboard
Recycled cardboard is easy to find and perfect for toy masks. It is strong and safe for kids to use.
Instead of throwing boxes away, cut them into mask shapes. This lowers the need for new materials.
- Use old cereal or shipping boxes
- Flatten boxes before cutting
- Choose clean cardboard without plastic
- Layer pieces for extra strength
Eco-friendly Decorating
Decorate masks with natural or recycled materials. Paint with water-based colors that are safe for the environment.
Use leaves, fabric scraps, or paper bits to add texture. Avoid plastic glitters or toxic markers.
- Paint with vegetable-based or watercolors
- Glue on dried leaves or flower petals
- Use old magazines for colorful cutouts
- Decorate with yarn or fabric scraps
Repurposing Old Masks
Old toy masks can get a new life instead of being thrown away. Fix or change them to make new designs.
Use parts from broken masks like straps or decorations. This reduces waste and saves money.
- Cut off damaged areas and keep good parts
- Add new cardboard pieces for support
- Combine old masks to create new ones
- Use old straps or strings for new masks

Credit: www.youtube.com
Frequently Asked Questions
What Materials Are Needed For Diy Cardboard Toy Masks?
You need cardboard, scissors, glue, paint, and elastic bands. Optional items include markers, stickers, and craft paper for decoration. Using recycled cardboard makes the project eco-friendly. These materials are affordable and easy to find at home or craft stores.
How Do I Create A Basic Cardboard Mask Shape?
Start by tracing your face outline on cardboard. Cut the shape carefully with scissors. Cut out eye holes for visibility. Use sandpaper to smooth edges if needed. This forms the base for decorating your toy mask.
What Are Simple Decorating Ideas For Cardboard Masks?
Use paint, markers, and stickers to add color and detail. Glue on feathers, glitter, or craft paper for texture. Draw patterns or character features like eyes and mouths. Keep designs bold and bright to make masks fun and engaging.
How Can I Make Cardboard Masks Comfortable To Wear?
Attach soft elastic bands to fit around the head. Add foam or felt padding inside for comfort. Ensure eye holes align properly for clear vision. Make the mask lightweight by using thin cardboard to avoid discomfort.
Conclusion
Creating DIY cardboard toy masks brings fun and creativity together. Kids enjoy making their own designs with simple materials. These masks encourage imagination and hands-on learning. They also offer a great way to recycle old cardboard. Easy steps make this craft suitable for all ages.
Try different colors and shapes to keep it exciting. Crafting masks can turn any day into a playful adventure. Give it a go and watch creativity come alive. Simple, fun, and educational—all in one project.