Are you ready to turn heads at your next costume party or playtime adventure? Imagine creating your very own Transformer costume using just cardboard and a little creativity.
Not only will you save money, but you’ll also have a one-of-a-kind outfit that shows off your skills and personality. This DIY project is easier than you think, and by the end, you’ll have something cool, fun, and totally unique.
Stick with me, and I’ll guide you step-by-step to bring your Transformer costume to life!

Credit: makezine.com
Materials Needed
Making a cardboard toy transformer costume is fun and creative. You need the right materials to build a strong and cool costume. This guide will help you gather what you need.
Below are the main materials and tools that work best. Choose carefully to make your project easier and better.
Choosing Cardboard Types
Pick cardboard that is firm and easy to cut. Thick cardboard holds shape well but can be hard to bend. Thin cardboard is easier to fold but less strong.
- Corrugated cardboard: strong and good for structure
- Single-layer cardboard: easy to cut and shape
- Recycled cardboard: eco-friendly and affordable
Essential Tools
| Tool | Use |
| Box cutter or craft knife | Cut cardboard cleanly |
| Ruler or measuring tape | Measure pieces accurately |
| Hot glue gun | Join parts firmly |
| Pencil | Mark cutting lines |
| Cutting mat | Protect surface while cutting |
Additional Supplies
These extra supplies help finish your costume and add details. They make your project look neat and last longer.
- Paint and brushes for color
- Masking tape for temporary holds
- Elastic bands or straps for wearing
- Sandpaper to smooth edges
- Markers for drawing details
Design Planning
Creating a DIY cardboard toy transformer costume starts with good design planning. This helps you build a costume that fits well and looks great.
Careful planning saves time and materials. It also makes the building process easier and more fun.
Measuring For Fit
First, take your body measurements. Measure your height, chest, waist, and arm length. These numbers help create a costume that fits comfortably.
Write down each measurement. Check them twice to avoid mistakes. You can adjust the design if needed.
- Height: From head to feet
- Chest: Around the widest part
- Waist: Around the narrowest part
- Arm length: From shoulder to wrist
Sketching Your Transformer
Draw a rough sketch of your costume on paper. Include all the parts you want to build. This gives you a clear idea of the final look.
Label each part with its size and shape. This helps when cutting and assembling the cardboard pieces.
- Headpiece design
- Chest and back plates
- Arm and leg covers
- Details like wings or weapons
Selecting Colors And Details
Pick colors that match your chosen transformer character. Use markers, paint, or colored paper to add details. This makes your costume more real.
Focus on key parts like the chest symbol or helmet. Use simple shapes and bright colors for the best effect.
- Primary color for main body
- Secondary color for accents
- Black or gray for outlines
- Silver or gold for small details
Cutting And Shaping
Cutting and shaping cardboard is important for making a toy transformer costume. You need to make clean cuts and form the right shapes.
Good cutting and shaping help the costume look strong and fit well. Let’s explore safe cutting, 3D shaping, and edge reinforcement.
Safe Cutting Techniques
Use a sharp craft knife or box cutter to cut cardboard. Always cut on a flat, stable surface to avoid slips.
Cut away from your body and keep fingers clear of the blade. Take your time and make slow, steady cuts.
- Use a cutting mat to protect surfaces
- Score the cardboard lightly before cutting fully
- Wear protective gloves if needed
- Keep your workspace clean and free of clutter
Creating 3d Shapes
Make 3D shapes by bending and folding cardboard at scored lines. This forms parts like arms and legs for the costume.
Use tabs and slots to join pieces without glue. You can also layer cardboard to add thickness and strength.
- Score fold lines lightly for easy bending
- Use small tabs to connect parts securely
- Layer pieces for raised details
- Test fit shapes before final assembly
Reinforcing Edges
Edges of cardboard are weak and can bend or tear. Reinforce them to keep the costume sturdy.
Use extra strips of cardboard glued or taped along edges. This adds strength and helps the costume last longer.
- Glue thin cardboard strips on inside edges
- Use strong tape for extra support
- Sand rough edges for a smooth finish
- Check edges often and fix any damage
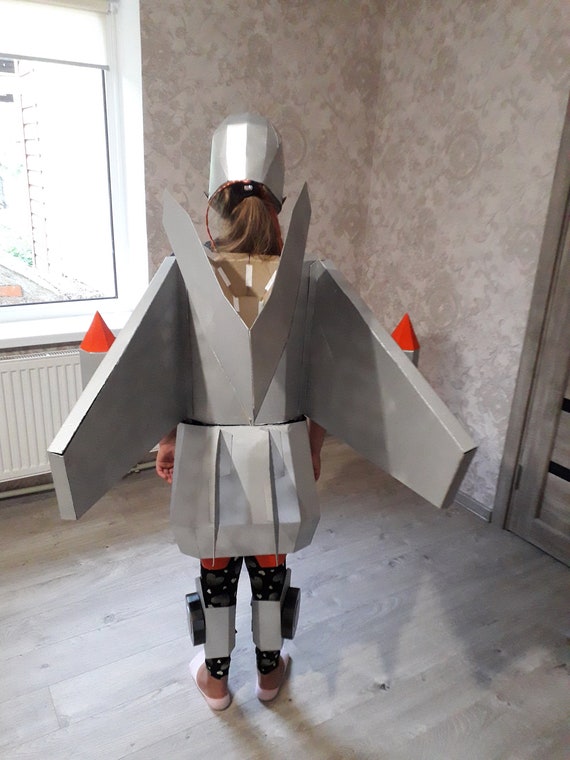
Credit: www.etsy.com
Assembly Steps
Building your cardboard toy transformer costume is fun and creative. Follow these steps to make sure it fits and works well.
Take your time to join the pieces, add moving parts, and make it wearable for a great experience.
Joining Pieces Securely
Use strong tape or glue to connect cardboard parts firmly. Check all joints to avoid loose sections.
- Cut edges cleanly for better fits
- Apply hot glue or duct tape on seams
- Press pieces together until dry or set
- Reinforce weak points with extra tape
- Test by gently pulling joined parts
Adding Moving Parts
Make the costume more fun with parts that move, like arms or doors. Use simple hinges or tabs.
| Moving Part | Material Needed | Assembly Tip |
|---|---|---|
| Arm joints | Paper fasteners, tape | Attach with fasteners for rotation |
| Doors or panels | Cardboard tabs, glue | Glue tabs on one side to act as hinges |
| Wheels | Cardboard circles, skewers | Use skewers as axles for spinning |
Ensuring Wearability
Make sure the costume fits well and is comfortable to wear. Check openings and support.
- Measure your body before cutting cardboard
- Leave holes for arms, legs, and head to move freely
- Add soft padding inside for comfort
- Use straps or belts to hold the costume in place
- Keep the weight balanced to avoid strain
Painting And Decorating
Painting and decorating your cardboard toy transformer costume makes it look more real. Bright colors and cool details catch the eye. It also hides any plain cardboard parts.
Use safe paints and seal your work to keep the colors fresh. Decorating takes time but is fun and rewarding.
Choosing Paint Types
Pick paints that stick well to cardboard and dry fast. Acrylic paints are a good choice. They come in many colors and clean up easily with water.
- Use water-based acrylic paints for easy use and safety.
- Spray paints give smooth coverage but use them outside.
- Markers or paint pens help add small designs and lines.
- Avoid oil-based paints as they take long to dry and smell strong.
Adding Details And Effects
Details make your costume stand out. Add shadows, highlights, and textures to show parts and shapes. Use tape or stencils to get clean edges.
Tips for Adding Effects:
- Dry brush with a small amount of paint for worn metal look.
- Use metallic colors like silver and gold for robot parts.
- Draw bolts and lines with a fine black marker.
- Layer colors for depth, like dark base and light top.
Sealing For Durability
Seal your painted costume to protect it from scratches and water. A clear coat finish keeps colors bright and safe.
| Sealer Type | Finish | Best Use |
| Matte Acrylic Sealer | Non-shiny | Natural look, hides fingerprints |
| Glossy Acrylic Sealer | Shiny | Bright colors, metal effect |
| Spray Varnish | Varies | Fast, covers large areas evenly |

Credit: www.youtube.com
Tips For Comfort
Creating a cardboard toy transformer costume is fun. Comfort is key for long play sessions. Here are some tips to make it more comfortable.
Consider weight distribution, breathability, and ease of putting it on and taking it off. These elements ensure a pleasant experience.
Weight Distribution
A balanced costume feels lighter. Distribute weight across the body evenly. This avoids strain on specific areas.
Use lightweight materials like foam with cardboard. This helps in reducing the overall weight of the costume.
- Place heavier parts on the back and shoulders
- Use straps to spread weight evenly
- Avoid bulky designs on the arms
Breathability Enhancements
Proper airflow keeps the wearer cool. Cut small vents in hidden parts of the costume. This improves breathability.
Choose breathable fabrics for areas in contact with the skin. This prevents overheating during play.
- Cut vents in the helmet and chest area
- Use mesh fabric for inner lining
- Avoid sealing edges too tightly
Easy On And Off
Make sure the costume is easy to put on and take off. This saves time and avoids frustration.
Use Velcro or simple fasteners for quick dressing. This allows the child to manage the costume independently.
- Install Velcro strips at key joints
- Use elastic bands for flexible fittings
- Design with large openings for easy access
Troubleshooting Common Issues
Creating a cardboard toy transformer costume can be fun. Sometimes, problems occur during the process. Here are some solutions to common issues you might face.
These tips help fix structural weaknesses, paint damage, and fit problems. Follow these steps to ensure your costume is ready for action.
Fixing Structural Weakness
Cardboard costumes can sometimes be flimsy. Reinforce weak spots to make your costume sturdier. Use extra cardboard pieces to add strength.
Glue and tape are your friends. Apply them generously to joints and seams. This helps keep everything secure.
- Use hot glue for a strong bond
- Reinforce edges with duct tape
- Add support beams inside large pieces
Repairing Paint Damage
Paint can chip or scratch easily. If this happens, retouch the damaged areas. Keep extra paint on hand for quick fixes.
Use small brushes for detailed areas. This ensures a clean and even coat. Let each layer dry completely before adding more.
- Sand lightly before repainting
- Apply thin layers of paint
- Seal with a clear spray for protection
Adjusting Fit Problems
A costume that fits poorly can be uncomfortable. Adjust straps and fasteners for a better fit. This makes wearing the costume more enjoyable.
Try it on frequently as you build. This helps you catch fit issues early. Make adjustments as needed for comfort and mobility.
- Use Velcro for easy adjustments
- Add padding for comfort
- Cut excess material carefully
Creative Customization Ideas
Making a cardboard toy transformer costume is a fun project. You can add many cool touches to make it unique. Simple changes can bring your costume to life and show your style.
Try different materials and effects to create a costume that stands out. These ideas help you add lights, sounds, and personal details.
Adding Lights And Sound
Lights and sounds make your transformer costume more exciting. Use small LED lights to brighten up parts of the costume. Add sound effects like robot noises or music to create a fun atmosphere.
- Use battery-powered LED strips for easy lighting.
- Place lights inside clear cardboard windows or openings.
- Attach a small speaker to play sound clips or music.
- Use a switch to turn lights and sounds on or off.
- Make sure wires are secure and hidden for safety.
Incorporating Other Materials
Mixing materials can make your costume stronger and more interesting. Use things like foam, fabric, and plastic to add details and comfort. These materials can also help with shape and durability.
| Material | Use | Tip |
| Foam Sheets | Build raised parts | Glue with hot glue |
| Fabric | Add flexible joints | Choose stretchy types |
| Plastic Sheets | Create shiny panels | Cut carefully with scissors |
| Pipe Cleaners | Make antennae or wires | Twist to shape |
Personalizing Your Transformer
Give your transformer a unique look with personal touches. Add your favorite colors, logos, or symbols. Use markers, paint, or stickers to decorate the costume. You can also name your transformer.
- Paint stripes or flames for style
- Add your initials or a cool logo
- Use glow-in-the-dark paint for night fun
- Attach small badges or patches
Frequently Asked Questions
What Materials Are Needed For A Cardboard Toy Transformer Costume?
You need sturdy cardboard, scissors, glue, paint, and tape. Additional items include markers, ruler, and Velcro for fastening. These basics help create a durable, colorful costume with ease. Using recycled cardboard is eco-friendly and budget-conscious.
How Do I Make A Cardboard Transformer Costume Fit?
Measure the child's height and width carefully before cutting. Create adjustable straps or use Velcro for easy wearing. Ensure armholes and head openings are comfortable. This approach guarantees a snug, safe fit that allows free movement.
Can Kids Safely Wear Cardboard Transformer Costumes?
Yes, if made with non-toxic paint and smooth edges. Avoid sharp tools during construction. Lightweight cardboard prevents discomfort. Supervise young kids while wearing to ensure safety during play or events.
How To Add Color And Details To The Costume?
Use acrylic paints or markers for vibrant colors. Add details like logos, lines, and shapes with stencils or freehand. Seal with clear spray for durability. Detailed painting makes the costume visually striking and authentic.
Conclusion
Creating a cardboard toy transformer costume is fun and simple. You can make it with things around the house. This project helps you be creative and save money. Kids and adults enjoy building and wearing it. Take your time and follow the steps carefully.
Soon, you will have a cool costume to show. Try adding your own colors and designs too. Crafting this costume brings joy and pride. Give it a try and enjoy the experience fully.