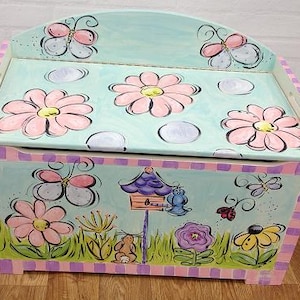
Are you looking to give your wooden toy box a fresh, new look? Painting it yourself is easier than you might think, and it’s a great way to add a personal touch to your child’s space.
Whether you want bright colors, fun patterns, or a smooth finish, this guide will help you get it right from start to finish. You’ll learn simple steps that save you time and effort while making your toy box stand out.
Ready to transform your wooden toy box into something special? Let’s dive in!
Credit: www.etsy.com
Choosing The Right Paint
Painting a wooden toy box is a fun way to make it look nice. Picking the right paint is very important. It helps protect the wood and keeps the paint safe for children.
There are many paint types to choose from. Some paints are safer than others. Color choice also changes how the toy box looks.
Types Of Paint For Wood
Wood paint comes in different kinds. Each type has its own use and look. Some dry fast, some last longer.
- Latex Paint:Water-based and easy to clean. Good for indoor use.
- Acrylic Paint:Water-based and durable. It sticks well to wood.
- Oil-Based Paint:Strong and smooth finish. Takes longer to dry.
- Chalk Paint:Matte look and easy to distress. Good for vintage style.
Selecting Non-toxic Options
Since children will use the toy box, choose paints that are safe. Non-toxic paints have no harmful chemicals. They keep kids safe from bad fumes and poisons.
Look for labels that say “non-toxic” or “child-safe.” Water-based paints are usually safer. Avoid paints with strong smells or lead.
- Check for non-toxic certification
- Pick water-based paints
- Avoid paint with lead or heavy metals
- Use low or no VOC paints
Color Choices And Effects
Colors change how the toy box looks and feels. Bright colors can make it fun and cheerful. Soft colors give a calm and cozy feel.
You can use paint effects to add texture or shine. Matte paint looks flat, while glossy paint shines. You can also mix colors for a unique style.
- Bright colors like red, blue, or yellow are playful
- Pastel colors create a gentle look
- Glossy finish makes colors pop
- Matte finish gives a smooth, soft feel
- Use stencils or patterns for fun designs
Preparing The Toy Box
Before painting a wooden toy box, it is important to prepare its surface well. Proper preparation helps the paint stick better and last longer.
Take your time with each step. A clean, smooth, and repaired surface makes the toy box look great and protects the wood.
Cleaning The Surface
Start by removing dust and dirt from the toy box. Use a soft cloth or brush to clean all areas.
If there are sticky spots or grease, use mild soap and water. Dry the box completely before moving on.
Sanding For Smoothness
Sanding the wood makes the surface smooth and ready for paint. Use fine-grit sandpaper for best results.
Sand along the grain of the wood. Wipe off dust with a clean cloth after sanding.
Repairing Imperfections
Check the toy box for cracks, holes, or dents. Fill these with wood filler or putty.
Let the filler dry fully, then sand the repaired areas smooth. This makes the surface even and ready for painting.
Priming The Wood
Painting a wooden toy box starts with priming the wood. Priming helps the paint stick better and last longer.
Taking time to apply primer correctly improves the final look and protects the wood underneath.
Benefits Of Priming
Primer seals the wood surface and prevents paint from soaking in unevenly. It also stops stains and knots from showing through the paint.
- Improves paint adhesion
- Protects wood from moisture
- Prevents paint peeling and cracking
- Makes colors look brighter and smoother
Applying Primer Evenly
Use a clean brush or roller to spread primer evenly. Avoid thick or thin spots. Sand lightly between coats if needed.
| Tool | Recommended Use |
| Brush | Edges and corners |
| Roller | Flat surfaces for smooth coverage |
| Sanding Block | Between primer layers for smooth finish |
Drying Time Tips
Allow primer to dry fully before painting. Drying times vary by temperature and humidity.
- Check the primer can for drying time instructions
- Keep the toy box in a dry, well-ventilated area
- Avoid touching or moving the box until dry
- Sand lightly if the surface feels rough before painting
Credit: www.etsy.com
Painting Techniques
Painting a wooden toy box can be fun and rewarding. Using the right techniques helps you get smooth, bright colors.
This guide covers how to pick brushes and tools, apply base coats, and blend colors for a great finish.
Choosing Brushes And Tools
Selecting the right brush makes painting easier. Brushes come in different shapes and sizes for many uses.
- Flat brushes cover large areas quickly.
- Round brushes are good for details and edges.
- Foam brushes create smooth, even coats.
- Use painter’s tape for clean edges.
- Have a small container to hold your paint.
Applying Base Coats
Base coats protect the wood and give a strong color base. Thin, even layers work best.
| Tip | Why It Helps |
| Sand the surface first | Makes paint stick better |
| Use primer or white paint | Blocks wood stains and evens color |
| Apply thin coats | Prevents drips and runs |
| Let each coat dry fully | Ensures smooth finish |
Layering And Blending Colors
Layering adds depth. Blending softens lines between colors for a nice look.
- Apply the first color and let it dry.
- Add the second color next to it while still wet.
- Use a dry brush to gently mix the edges.
- Repeat layering for richer color.
- Let the paint dry between layers to avoid smudges.
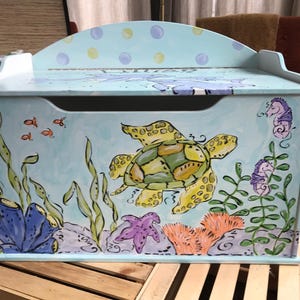
Adding Decorative Details
Painting a wooden toy box is fun and creative. Adding details makes it special and unique. You can use different methods to decorate the box.
Decorative details can match the room or the child's favorite themes. Choose a method that fits your skill and style.
Stencils And Patterns
Stencils help create clear shapes and designs on the toy box. You can buy stencils or make your own with paper or plastic sheets.
- Choose stencil shapes that fit the toy box size.
- Secure the stencil firmly to avoid paint bleeding.
- Use a sponge or brush to apply paint gently.
- Let the paint dry before removing the stencil.
- Add multiple colors for a bright look.
Hand-painted Designs
Hand-painting lets you add personal and creative touches. Use small brushes for details and bigger ones for background colors.
| Brush Type | Use |
| Flat Brush | Background colors |
| Round Brush | Lines and edges |
| Detail Brush | Small designs and accents |
Practice designs on paper before painting the box. Keep a steady hand and paint in thin layers for best results.
Using Stickers And Decals
Stickers and decals add quick and easy decoration. They come in many themes and colors to fit any style.
- Clean the surface before applying stickers.
- Place stickers gently to avoid air bubbles.
- Seal with clear varnish to protect stickers.
- Use stickers on dry, smooth areas only.

Credit: www.amazon.com
Sealing And Protecting
Painting a wooden toy box is a fun project. Sealing and protecting it ensures longevity. This guide will help you choose the right sealants and protective finishes.
Proper sealing guards against wear and tear. It's essential for keeping the toy box looking new.
Types Of Sealants
Sealants prevent moisture from damaging the wood. Choosing the right type is crucial for your project.
| Sealant Type | Best For |
| Polyurethane | High durability |
| Lacquer | Quick drying |
| Shellac | Natural finish |
Applying A Protective Finish
A protective finish adds an extra layer of defense. It enhances the toy box's appearance and strength.
- Choose a finish suitable for wood.
- Apply with a brush for even coverage.
- Let it dry completely before use.
Curing And Maintenance
Proper curing ensures the finish lasts longer. Regular maintenance keeps the toy box in top condition.
Tips For A Professional Look
Painting a wooden toy box can be a fun project. Achieving a professional finish requires some planning and attention to detail. Here are some tips to help you get started.
With the right approach, your toy box can look like it was painted by a pro. Follow these guidelines for the best results.
Avoiding Common Mistakes
Common mistakes can ruin the look of your painted toy box. It is important to know what to avoid for a smooth finish.
- Do not rush the drying process.
- Avoid using cheap brushes.
- Do not skip the primer.
Work Area Setup
Setting up your work area is key to achieving a neat paint job. A well-organized space helps you focus and work efficiently.
| Item | Purpose |
| Drop Cloth | Protects floor from paint spills |
| Good Lighting | Ensures visibility of painting details |
| Sanding Blocks | Smooths out surfaces before painting |
Clean-up And Storage
Proper clean-up and storage of materials extend their life and keep your space tidy. It also makes future projects easier to start.
Frequently Asked Questions
How Do I Prepare A Wooden Toy Box For Painting?
Start by sanding the surface to remove rough spots. Clean the dust with a damp cloth. Apply a primer to seal the wood. This helps the paint adhere better and last longer.
What Type Of Paint Is Best For Wooden Toy Boxes?
Use non-toxic, water-based acrylic paint. It is safe for children and easy to clean. Acrylic paint also dries quickly and provides vibrant colors.
How Many Coats Of Paint Should I Apply?
Apply two to three thin coats for even coverage. Let each coat dry completely before adding the next. Thin layers prevent drips and ensure a smooth finish.
Should I Seal The Painted Toy Box?
Yes, apply a clear, non-toxic sealer after painting. This protects the paint from scratches and moisture. It also extends the toy box's durability and appearance.
Conclusion
Painting a wooden toy box can be fun and simple. Choose the right paint and tools first. Prepare the surface well for a smooth finish. Take your time and apply paint evenly. Let each coat dry before adding the next.
Small details make a big difference in the end. A painted toy box brightens any room and lasts longer. Enjoy the process and the colorful result. Now, your wooden toy box looks fresh and new!