Imagine giving your child a toy that sparks creativity, encourages learning, and lasts for years—all made by you. A DIY toy kitchen from wood is more than just a playset; it’s a chance to build something special with your own hands.
You’ll see how easy it is to create a safe, sturdy kitchen that your little one will love. Ready to turn simple wood into hours of imaginative fun? Let’s dive into the step-by-step process that will bring your vision to life.

Credit: www.diythought.com
Choosing The Right Wood
Building a DIY toy kitchen from wood is a fun project. Picking the right wood is very important. The wood must be safe and strong for kids.
Good wood makes the kitchen last longer and look nice. It also keeps the toy safe for children to play with every day.
Types Of Wood For Durability
Durable wood can handle rough play and last for years. Hardwoods are usually stronger than softwoods. They resist dents and scratches well.
- Oak: Very strong and wears well over time
- Maple: Hard and smooth, good for painting
- Birch: Tough and has a nice finish
- Pine: Softer but easy to work with and affordable
Sustainable Wood Options
Choosing sustainable wood helps protect the environment. These woods come from forests that are cared for and replanted.
- Bamboo: Fast-growing and very strong
- Cedar: Naturally resistant to insects and decay
- Reclaimed Wood: Wood reused from old furniture or buildings
- FSC Certified Wood: Comes from responsibly managed forests
Tools Needed For Cutting
To cut wood safely and accurately, use the right tools. Sharp tools make smooth cuts and reduce splinters.
- Hand Saw: Good for small, simple cuts
- Jigsaw: Cuts curves and shapes easily
- Table Saw: Best for straight, long cuts
- Measuring Tape and Pencil: For precise measurements
Designing Your Toy Kitchen
Building a toy kitchen from wood is a fun project for kids. It helps their imagination and skills grow.
Good design makes the kitchen safe and easy to use. Planning the layout and features is important.
Simple Layout Ideas
Keep the kitchen layout clear and easy to understand. Use simple shapes and enough space to play.
Place the stove, sink, and counter in a line or L shape. This helps kids reach everything easily.
- Use straight lines or corners for easy access
- Keep counters at child height for comfort
- Leave open space for movement and pretend play
Incorporating Storage Spaces
Storage is key to keep toy kitchen items tidy. Add shelves, hooks, or small cabinets for toys.
Use bins or baskets inside cabinets. These make it easy for kids to organize and clean up.
- Include open shelves for easy reach
- Add hooks for hanging utensils or towels
- Use cabinets with doors to hide clutter
Child-friendly Features
Make sure edges and corners are rounded to avoid injuries. Use smooth wood and safe paint.
Choose knobs and handles that are easy to grip. Keep the height low for small children to play.
- Round all sharp edges and corners
- Use non-toxic, child-safe finishes
- Install easy-to-turn knobs and handles
- Keep all parts sturdy and secure
Cutting And Preparing Wood Pieces
Cutting and preparing wood pieces is an important part of making a toy kitchen. You need to work carefully to get the right shapes and sizes. This helps the kitchen fit well and look nice.
Using the right tools and methods keeps you safe and makes the work easier. It also helps to have smooth edges on all wood parts.
Measuring And Marking
Measure the wood pieces carefully before cutting. Use a ruler or tape measure to get exact lengths. Mark the cut lines clearly with a pencil or chalk.
- Double-check all measurements before marking.
- Use a square tool to make straight lines.
- Mark each piece with a label to avoid confusion.
Safe Cutting Techniques
Wear safety glasses and gloves before cutting. Use a sharp saw to make clean cuts. Cut slowly and follow the marked lines to avoid mistakes.
| Tool | Safety Tip |
|---|---|
| Hand Saw | Cut away from your body |
| Jigsaw | Hold firmly and keep fingers clear |
| Circular Saw | Use a guide and keep hands behind the blade |
Sanding For Smooth Edges
Sand each wood piece after cutting to remove rough spots. Use medium-grit sandpaper first. Then finish with fine-grit paper for a smooth feel.
- Sand along the grain of the wood.
- Wear a dust mask to avoid breathing sawdust.
- Wipe dust off wood before painting or assembling.
Credit: www.littlehouseoflight.com
Assembling The Kitchen Frame
Building a DIY toy kitchen from wood starts with creating a strong frame. The frame holds all parts together and supports the kitchen.
Careful assembly ensures the kitchen is safe and lasts long during playtime. Use the right tools and materials for the frame.
Joining Techniques
Joining techniques connect wood pieces to form the kitchen frame. Choose methods that fit your tools and skills.
Common techniques include butt joints, lap joints, and dado joints. Each type offers different strength and look.
- Butt joints are simple and fast to make
- Lap joints add more surface area for glue
- Dado joints fit pieces into grooves for extra support
Using Screws And Glue
Screws and glue help hold the kitchen frame parts firmly together. Both add strength and prevent wobbling.
Apply wood glue on the joint surfaces before screwing them. Use screws sized right for the wood thickness.
- Glue bonds wood tightly when dry
- Screws keep parts from shifting during drying
- Pre-drill holes to stop wood from splitting
Ensuring Stability
Stability keeps the toy kitchen safe and strong. Check that all corners are square and joints are tight.
Add braces or corner blocks if needed. Test the frame by gently pressing on all sides to find weak spots.
- Use a carpenter’s square to check angles
- Tighten screws if parts feel loose
- Add extra support pieces for large frames
Adding Functional Elements
Building a DIY toy kitchen from wood is fun and creative. Adding functional parts makes playtime more real.
Simple features like doors, drawers, and knobs help children interact with the kitchen. These parts make the kitchen feel like a real one.
Attaching Doors And Drawers
Start by cutting wooden panels for the doors and drawers. Use smooth edges to keep the kitchen safe for kids.
Attach doors with small hinges. Make sure they open and close easily. Drawers need tracks or rails to slide smoothly.
- Use child-safe hinges for doors
- Check that drawers slide without sticking
- Secure all screws tightly
Creating Countertops
Choose sturdy wood for the countertop. Sand it down to make the surface smooth and safe to touch.
Attach the countertop to the base securely. You can paint or varnish it to look like a real kitchen counter.
- Use plywood or hardwood for strength
- Sand all edges carefully
- Fix the countertop with screws from underneath
Installing Knobs And Handles
Knobs and handles make doors and drawers easy to open. Choose sizes that are safe for small hands.
Drill holes where you want to place knobs or handles. Use screws to fix them firmly in place.
- Pick round knobs for safety
- Place handles at child-friendly heights
- Check that all knobs are tight and secure

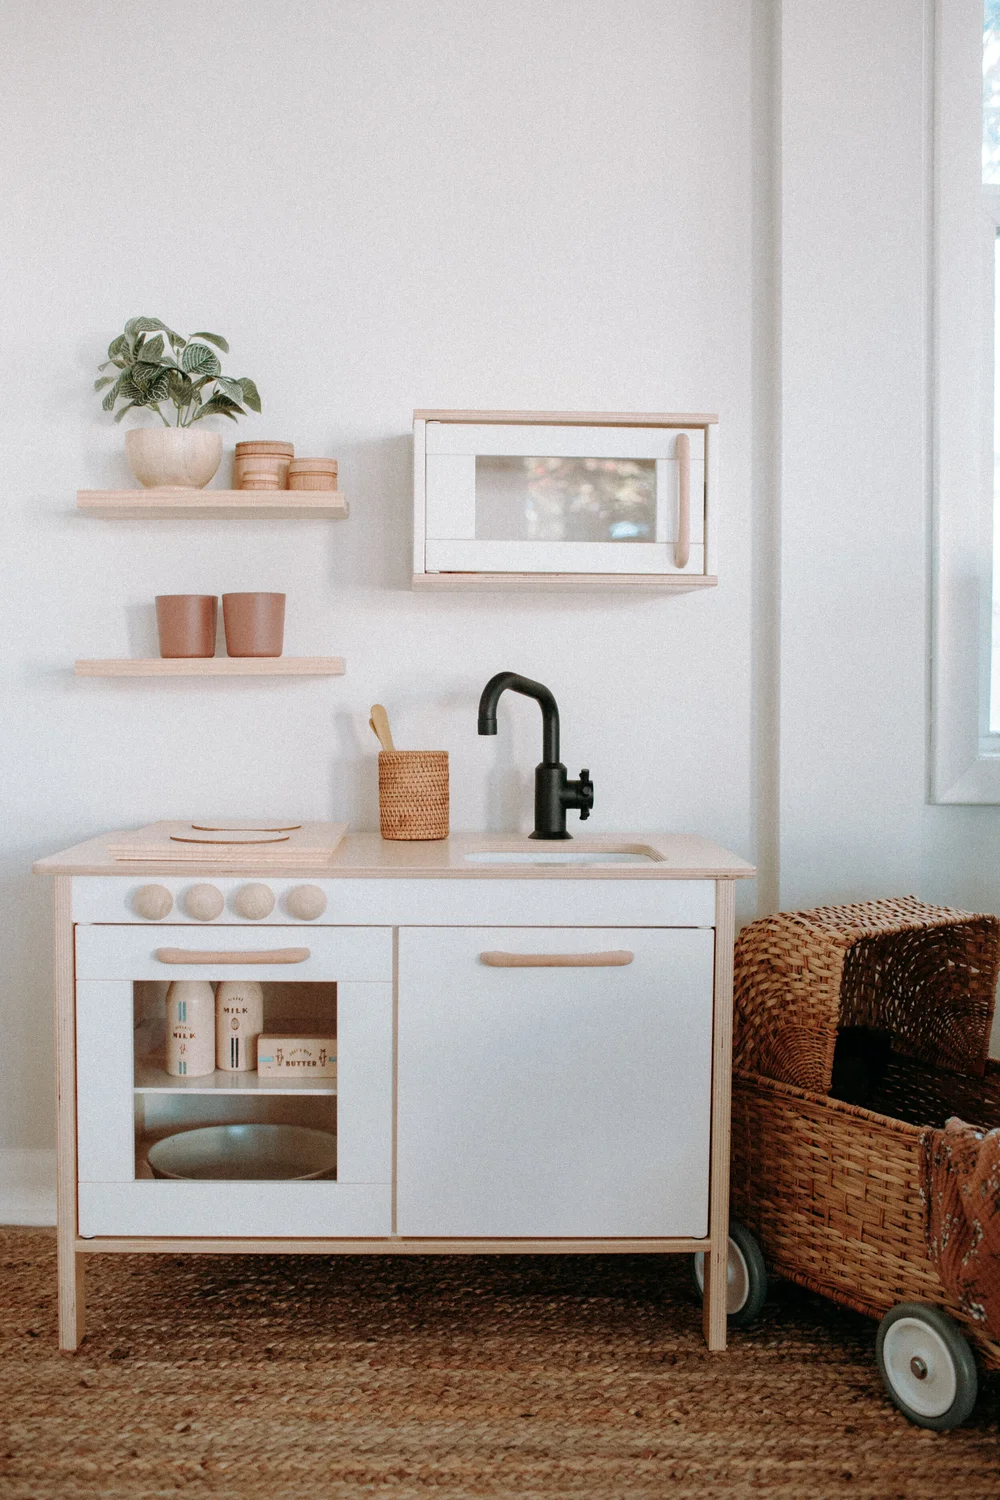
Credit: hanashappyhome.com
Painting And Finishing Touches
Building a toy kitchen from wood can be a fun project. Painting and finishing are important steps. They make the toy safe and beautiful.
These final touches add character and charm. It's also a chance to ensure safety and durability. Let's explore some key aspects.
Choosing Child-safe Paints
Safety is crucial when selecting paint for a toy kitchen. Kids often touch and play with toys, so choose wisely.
Look for paints that are non-toxic and water-based. These are safer for children and better for the environment.
- Check for labels that say "child-safe" or "non-toxic"
- Avoid paints with strong odors
- Choose easy-to-clean finishes
Adding Decorative Details
Decorative details make the toy kitchen unique. These can be simple or detailed, depending on your creativity.
Consider adding knobs, handles, or even stickers. These small touches can make the toy more engaging.
- Use stencils for precise patterns
- Try decals for easy decoration
- Paint fun shapes like stars or hearts
Sealing For Protection
Sealing the wood is essential for durability. It protects the paint and wood from wear and tear.
Choose a clear, non-toxic sealant to keep the toy safe. This will help the toy last longer.
- Apply sealant after painting is fully dry
- Use a brush for even application
- Let it dry completely before play
Safety Tips For A Kid-friendly Kitchen
Building a DIY toy kitchen from wood can be a fun project. It's important to focus on safety when making it for kids. A safe kitchen keeps playtime fun and worry-free.
Here are some tips to ensure your wooden toy kitchen is safe for children. These guidelines will help you create a kid-friendly play area.
Avoiding Sharp Edges
Sharp edges on toys can cause injuries. Sand all edges of the wooden kitchen. Make sure there are no splinters or rough spots.
Round the corners of shelves and counters. This reduces the risk of cuts and bruises. Safety should be a top priority.
- Use sandpaper to smoothen surfaces
- Check all corners for sharpness
- Consider using edge protectors
Non-toxic Materials
Kids often put toys in their mouths. Use non-toxic paints and finishes on your toy kitchen. This ensures it's safe if chewed or licked.
Check labels for child-safe certifications. Avoid materials with harmful chemicals. Safety in materials is essential for peace of mind.
- Choose water-based paints
- Use food-grade varnishes
- Avoid lead-based products
Regular Maintenance
Inspect the toy kitchen regularly. Check for loose parts or wear and tear. Fix any issues promptly to keep it safe.
Keep the kitchen clean to prevent bacteria build-up. Regular maintenance ensures the kitchen remains safe and enjoyable for play.
- Tighten screws and bolts
- Repair damaged parts immediately
- Clean with child-safe products
Customizing With Accessories
Building a DIY toy kitchen from wood is fun, but adding accessories makes it special. Accessories add play value and creativity.
Customizing your wooden kitchen lets kids enjoy cooking games more. Accessories make the kitchen feel real and exciting.
Diy Play Food Ideas
Making play food from simple materials is a great way to add fun. Use felt, foam, or clay to create fruits and veggies.
Paint wooden blocks to look like bread, cheese, or pizza slices. Kids love colorful, safe food items to use in play.
- Cut felt into shapes like apples or carrots
- Use foam sheets for sandwiches or cookies
- Mold clay into eggs, cupcakes, or burgers
- Paint wooden pieces with bright food colors
Adding Kitchen Utensils
Wooden spoons, pots, and pans fit perfectly with a DIY kitchen. Use small real utensils or make your own from wood.
Adding utensils encourages kids to pretend cook and serve meals. Keep utensils lightweight and child-friendly for easy use.
- Include wooden spoons and spatulas
- Add small pots and pans with lids
- Use bowls and plates for serving
- Consider a child-safe rolling pin or whisk
Personalizing With Stickers And Decals
Stickers and decals add color and personality to the kitchen. Use themed stickers like fruits, kitchen tools, or cute animals.
Apply stickers carefully to smooth surfaces like doors or shelves. Decals make the kitchen look lively and unique for each child.
- Choose waterproof stickers for durability
- Use decals that match play food themes
- Add name labels for a personal touch
- Change stickers over time to refresh the look
Frequently Asked Questions
What Materials Are Needed For A Diy Wooden Toy Kitchen?
You need plywood, wood glue, screws, paint, handles, and basic tools. Choose non-toxic paint for child safety. Quality plywood ensures durability and smooth finish for your toy kitchen.
How Long Does It Take To Build A Wooden Toy Kitchen?
Building time varies by design and skill. Simple kitchens take 4-6 hours. Complex ones may require 1-2 days. Planning and preparation speed up the process.
What Are The Benefits Of A Wooden Toy Kitchen?
Wooden kitchens are durable, eco-friendly, and safe. They encourage creativity, role play, and fine motor skills. They also offer a timeless, classic look compared to plastic sets.
Can I Customize The Design Of My Wooden Toy Kitchen?
Yes, customization is easy with DIY projects. You can choose size, color, and features. Adding personal touches makes the kitchen unique and tailored to your child’s preferences.
Conclusion
Building a wooden toy kitchen can bring joy to any child. It encourages creativity and helps develop skills. You control the design and materials, making it safe and unique. This project saves money and adds a personal touch. Kids love playing with something made just for them.
Start simple, and enjoy the process step by step. A DIY toy kitchen offers fun and learning in one place. It’s a great way to spend time together, too. Give your child a special gift they will cherish.