Looking for a fun and creative project that adds a warm glow to your space? A DIY wooden toy lantern is just what you need.
It’s simple to make, uses basic materials, and brings a charming touch to any room. Imagine holding a handcrafted lantern that lights up your evenings and sparks joy every time you see it. Ready to create something unique with your own hands?
Keep reading, and you’ll discover easy steps to build your very own wooden toy lantern that’s perfect for gifts, decoration, or just a cozy night in.

Credit: www.amazon.com
Materials Needed
Making a DIY wooden toy lantern is fun and simple. You need some basic materials to build it safely.
Gather all supplies before you start. This helps keep your work smooth and organized.
Wood Pieces
Wood is the main material for the toy lantern. Use smooth, light wood for easy handling.
- Pine or basswood works well
- Pieces should be cut into small shapes
- Make sure the wood is sanded smooth
Wood Glue
Wood glue joins the pieces tightly. Choose a strong, non-toxic glue safe for kids.
Apply the glue carefully to avoid mess. It dries clear and holds parts firmly.
Sandpaper
Sandpaper smooths rough edges and surfaces. Use fine grit to avoid splinters.
- Start with medium grit (around 120)
- Finish with fine grit (220 or higher)
- Sand all edges and surfaces gently
Paint Or Wood Finish
Paint or finish adds color and protects the wood. Use water-based, non-toxic paints for safety.
Choose bright colors to make the lantern attractive. Let each coat dry before adding the next.
Small Led Light Or Tea Light
A small LED light or battery-operated tea light fits inside the lantern. It makes the toy glow safely.
Avoid real candles to keep the toy safe for children. LED lights are cool and long-lasting.
Tools
You need some basic tools to assemble the toy lantern. Use child-safe or supervised tools.
- Small handsaw or craft knife
- Ruler and pencil for measurements
- Paintbrushes for finishing
- Clamps or rubber bands to hold glued parts
Choosing The Right Wood
Choosing the right wood is important for making a wooden toy lantern. The wood affects how the lantern looks and how long it lasts. It also impacts how safe the toy is for children.
Wood types vary in hardness, weight, and finish. Picking the best one helps you build a strong and beautiful lantern that lasts.
Types Of Wood Suitable For Toy Lanterns
Softwoods and hardwoods can both work for making toy lanterns. Each has its own benefits. Softwoods are easier to cut. Hardwoods are stronger and last longer.
- Pine: A softwood that is light and easy to shape.
- Maple: A hardwood that is strong and smooth.
- Birch: A hardwood with fine grain and good durability.
- Cedar: A softwood that is lightweight and has a nice scent.
- Beech: A hardwood that resists dents and scratches.
Consider Wood Safety And Finish
Wood safety is key for kids’ toys. Avoid woods that can cause allergies or have harmful chemicals. Choose wood that finishes well with child-safe paints or oils.
| Wood Type | Safety | Finish Options |
| Pine | Safe, non-toxic | Child-safe paint, oil |
| Maple | Safe, smooth surface | Natural oil, varnish |
| Birch | Safe, low resin | Water-based paint |
| Cedar | May cause allergies | Natural oil only |
| Beech | Safe, strong | Non-toxic paint, oil |
Wood Hardness And Durability
Harder woods last longer and resist damage better. Softwoods are easier to carve but may dent or scratch easily. Think about how the toy will be used.
- Choose hardwood for a long-lasting toy.
- Use softwood for detailed carving work.
- Seal wood to protect it from moisture and wear.
Tools For The Project
Building a DIY wooden toy lantern needs the right tools. These tools help you cut, shape, and assemble wood safely and accurately.
Using proper tools makes the project easier and gives better results. Here are the essential tools you will need.
Measuring Tape
A measuring tape helps you measure wood pieces correctly. Accurate measurements are important for the lantern parts to fit well.
Choose a tape with clear markings in inches and centimeters. This tool is simple but very useful.
Pencil And Square
Use a pencil to mark cutting lines on the wood. A square helps you draw straight and right-angle lines.
Marking your wood before cutting keeps your work precise and clean.
Hand Saw Or Jigsaw
A hand saw or jigsaw cuts the wood pieces to size. A jigsaw is good for curved cuts, while a hand saw works well for straight cuts.
Pick the saw you feel most comfortable using and that fits your project needs.
Sandpaper
Sandpaper smooths rough edges and surfaces on your wooden lantern. This makes the toy safe and nice to touch.
Use fine-grit sandpaper for a smooth finish after cutting.
Wood Glue
Wood glue holds the lantern parts together firmly. It dries clear and creates a strong bond between wood pieces.
Apply glue carefully and clamp the pieces until dry for best results.
Clamps
Clamps keep the wood pieces in place while the glue dries. They prevent movement and ensure tight joints.
Use small clamps that fit your lantern size for easy handling.
Drill
A drill makes holes for screws or decoration. It helps join parts firmly or add details.
Use a drill bit that matches the size of your screws or pegs.
Preparing The Wood Pieces
Preparing the wood pieces is the first important step in making a wooden toy lantern. It sets the base for a safe and beautiful finished product.
Careful measuring and cutting help the pieces fit well. Sanding smooths the edges and keeps the wood safe for children.
Selecting The Wood
Choose wood that is soft and easy to cut, like pine or basswood. Avoid wood with many knots or cracks to ensure strength and safety.
Measuring And Marking
Measure each piece carefully using a ruler or tape measure. Mark the wood clearly with a pencil to guide your cuts.
- Measure twice to avoid mistakes
- Mark straight lines for clean cuts
- Label each piece to keep track
Cutting The Pieces
Use a saw that fits your skill level, like a handsaw or small jigsaw. Cut along the marked lines slowly and steadily.
Sanding And Smoothing
Sand all edges and surfaces until smooth. This step prevents splinters and makes the toy safe for children.
| Wood Piece | Length (inches) | Width (inches) | Thickness (inches) |
| Base | 6 | 6 | 0.5 |
| Side Panels | 6 | 4 | 0.5 |
| Top Frame | 6 | 2 | 0.5 |
| Handle | 5 | 0.5 | 0.5 |
Cutting And Shaping
Cutting and shaping wood are key steps in making a wooden toy lantern. These tasks help form the parts that fit together to build the lantern. Careful cutting ensures the pieces are safe and smooth for children.
Using the right tools and techniques is important. It makes the process easier and helps create a sturdy toy lantern that looks nice and lasts a long time.
Selecting Tools For Cutting
Choose tools that match the size and type of wood. A small saw or craft knife works well for detailed parts. Sandpaper helps smooth rough edges after cutting. Always keep tools sharp for clean cuts.
- Use a fine-tooth saw for straight cuts
- Try a coping saw for curves and shapes
- Sand edges with medium then fine grit sandpaper
- Wear safety glasses and gloves while cutting
Marking And Measuring Wood
Marking lines guide your cuts. Use a ruler and pencil to measure each piece carefully. Double-check measurements before cutting to avoid mistakes. Clear marks make shaping easier and more accurate.
| Tool | Purpose |
| Ruler | Measure length and width |
| Pencil | Mark cutting lines |
| Square | Check right angles |
| Compass | Draw circles or curves |
Shaping The Wooden Pieces
After cutting, shape the pieces to fit the design. Use files or carving tools for small details. Sand each piece until smooth to remove splinters. The shaped pieces will join well and look neat.
Tips for shaping:
- Work slowly on curved parts to keep control
- Use light pressure when sanding to avoid damage
- Test fit parts before final sanding
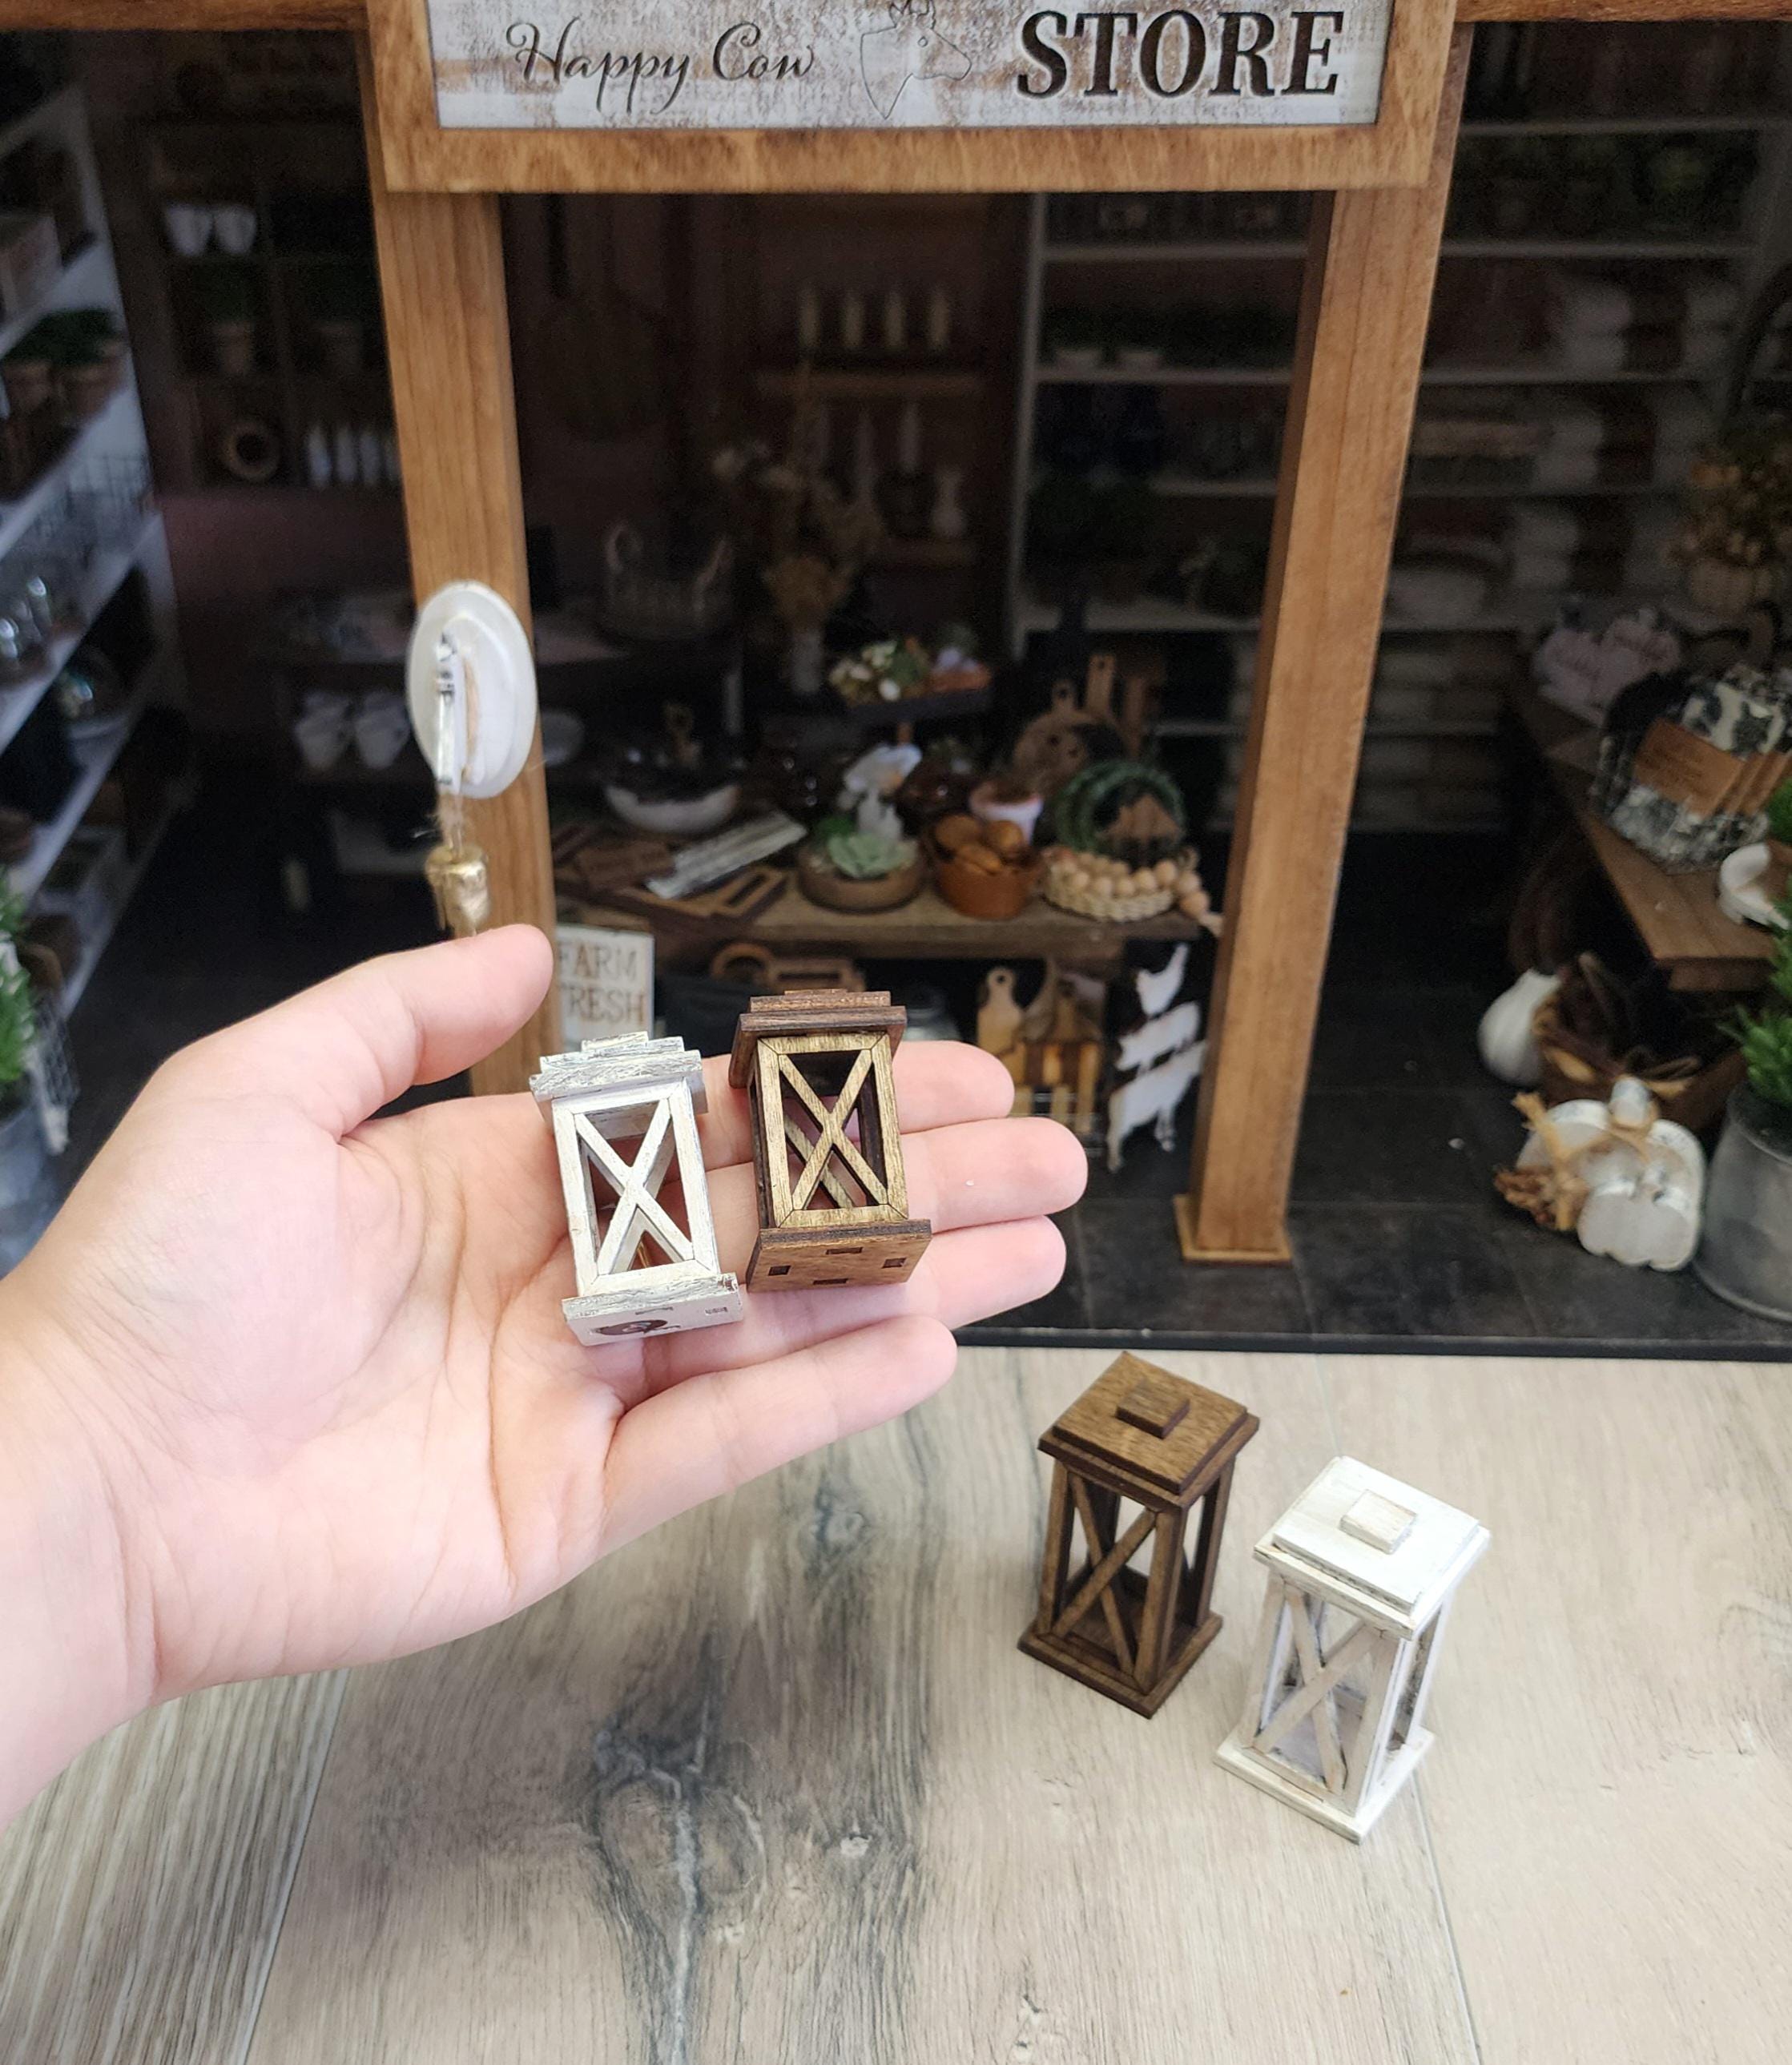
Credit: www.etsy.com
Assembling The Lantern
Building a wooden toy lantern can be a fun activity for kids and adults. Follow these simple steps to assemble the lantern with ease.
Each part of the lantern is vital for a sturdy structure. Let's look at how to attach the base, build the frame, and secure the top.
Attaching The Base
The base is the foundation of your lantern. Make sure it is strong and stable.
- Gather the base pieces and align them properly.
- Secure the corners with small nails or screws.
- Check that the base is level before moving on.
Building The Frame
The frame holds the structure together. It is important to build it carefully.
Use wood glue to attach the frame pieces. This ensures they stay connected.
Securing The Top
The top of your lantern completes the structure. It should fit snugly and look neat.
| Material | Tools Needed |
| Wooden panel | Hammer, nails |
| Decorative trim | Wood glue |
| Sandpaper | Hand sander |
After attaching the top, sand the edges for a smooth finish.
Sanding And Finishing Touches
Sanding and finishing are important steps in making a DIY wooden toy lantern. These steps ensure the lantern looks good and is safe to use.
Proper sanding removes rough edges, while finishing adds a protective layer. Let's explore how to do these steps effectively.
Sanding The Wooden Toy Lantern
Sanding smoothens the wooden surface. It prevents splinters and prepares the wood for finishing. Start with rough sandpaper and move to finer grit.
- Begin with 80-grit sandpaper to remove large imperfections.
- Switch to 120-grit for a smoother finish.
- Finish with 220-grit for a very smooth surface.
Applying The Finish
Finishing protects the wood and enhances its appearance. Choose a non-toxic finish, especially for toys used by children.
Choosing The Right Finish
Selecting the right finish is crucial. It affects the durability and look of the wooden toy lantern.
| Finish Type | Features |
| Water-based | Quick drying, less odor |
| Oil-based | Durable, rich color |
| Wax | Easy to apply, natural look |
Painting And Decorating
Painting and decorating your DIY wooden toy lantern makes it unique and fun. It also protects the wood from damage.
Use safe and bright colors to bring your lantern to life. Simple decorations can make a big difference.
Preparing The Surface
Start by sanding the lantern to make the surface smooth. Remove any dust with a dry cloth before painting.
Choosing Paint Types
Pick paints that are safe for children and suitable for wood. Water-based acrylic paints dry quickly and clean easily.
- Acrylic paint: bright colors, easy to use
- Non-toxic paint: safe for kids
- Spray paint: smooth finish, use outdoors
- Wood stain: shows natural wood grain
Applying Paint And Decorations
Use thin layers of paint to avoid drips. Let each layer dry before adding the next one.
| Decoration Type | Tips |
| Stencils | Hold steady and paint gently |
| Glitter | Apply glue first, then sprinkle glitter |
| Decals | Press firmly and smooth out air bubbles |
| Wood burning | Use carefully with adult supervision |
Sealing And Finishing
Seal your painted lantern to protect the design. Use a clear varnish or sealant suitable for wood toys.
Safety Tip:Always work in a well-ventilated area when painting or sealing your lantern.
Adding A Safe Light Source
Adding a light source to your DIY wooden toy lantern makes it more fun to use. Safety is very important when choosing the light.
Use light sources that do not get hot or cause harm. This keeps children safe while playing with the lantern.
Use Led Lights
LED lights are cool to the touch and use little power. They are safe for kids and last a long time.
Small LED bulbs fit well inside wooden lanterns. Choose battery-operated LED lights to avoid wires.
- Do not heat up
- Energy efficient
- Bright and colorful options
- Long battery life
Use Battery-powered Tea Lights
Battery-powered tea lights look like real candles but are safe. They turn on and off easily and do not burn.
These lights are small and fit inside the lantern. They add a warm glow without risk of fire.
- No open flame
- Safe for children
- Easy to replace batteries
- Soft light for playtime
Secure The Light Inside The Lantern
Fix the light source so it does not move inside the wooden lantern. This prevents damage and keeps it safe.
Use glue or small clips to hold the light in place. Make sure it is easy to remove for battery changes.
- Prevent light from falling out
- Keep wires hidden if any
- Allow easy battery access
- Use child-safe fasteners
Avoid Using Real Candles Or Incandescent Bulbs
Real candles and old bulbs get hot and can cause fires. Do not use them in wooden toys.
Choose modern, safe light options designed for children’s toys instead. This prevents accidents.

Credit: rees52.com
Safety Tips For Kids
Building a DIY wooden toy lantern can be fun for kids. Safety is very important during the process.
Parents and teachers should guide children to avoid accidents and injuries while making and using the toy lantern.
Choose Safe Materials
Use non-toxic, child-friendly wood and paints. Avoid small parts that can cause choking.
Supervise Tool Use
Children should use tools like sandpaper and small saws only with adult help. Keep sharp tools out of reach.
Check For Smooth Edges
Make sure all wooden pieces are sanded smooth to avoid splinters and scratches on the skin.
Use Safe Lighting Options
Instead of candles, use LED lights or battery-operated lamps inside the lantern. This prevents fire hazards.
- Never leave a lit lantern unattended
- Do not use real flames near wood
- Keep lantern away from flammable materials
- Check batteries regularly for leaks
Store And Handle With Care
| Storage Tip | Reason |
|---|---|
| Keep lantern in a dry place | Prevents wood damage and mold |
| Store out of children’s reach when not in use | Avoid accidental breakage or injury |
| Handle gently to protect the structure | Maintains toy durability |
Creative Variations
Making a wooden toy lantern can be fun and creative. You can change its design to fit different styles and uses.
Try these ideas to make your wooden toy lantern unique and special.
Shape And Size Variations
You can create wooden lanterns in many shapes like square, round, or hexagon. Each shape gives a different look.
Changing the size makes the lantern fit small or big spaces. Small lanterns are great for kids’ rooms.
- Square lanterns for a classic look
- Round lanterns for a soft, smooth style
- Hexagon shapes for a modern feel
- Small sizes for table decoration
- Large sizes for floor or outdoor use
Paint And Finish Choices
Use paint or natural finishes to change how the lantern looks. Bright colors make it playful and fun.
Wood stain or varnish keeps the natural wood look and protects it from damage. You can also add patterns.
- Bright paints for a cheerful toy
- Natural stains for a rustic style
- Matte finish for a soft look
- Glossy finish for shine and protection
- Hand-painted patterns for unique design
Lighting Options
Wooden toy lanterns can hold different types of lights. Use LED lights or small candles for effect.
Battery-powered lights are safe for children. Candles give a warm glow but need adult supervision.
- Battery LED lights for safety
- Small candles for a cozy glow
- Glow sticks for a fun, colorful light
- Solar lights for outdoor use
Decorative Add-ons
Add decorations like small wooden shapes or cut-out designs. These details make the lantern more interesting.
You can attach small handles, beads, or ribbons to make it easy to carry or hang.
- Wooden stars or hearts glued on
- Cut-out windows in fun shapes
- Handles made from rope or wood
- Colorful ribbons tied around the frame
Functional Features
Make your lantern more useful by adding features like a door or a removable top. It helps to change the light.
Adding a hook or stand lets you hang or place the lantern easily. These small changes improve usability.
- Hinged door for easy light access
- Removable top for quick cleaning
- Hooks for hanging on walls or trees
- Stand base for stable placement
Frequently Asked Questions
What Materials Are Needed For A Diy Wooden Toy Lantern?
You need wood pieces, non-toxic paint, glue, sandpaper, and a small LED light. These materials ensure safety and durability for children’s toys.
How Long Does It Take To Make A Wooden Toy Lantern?
Making a wooden toy lantern typically takes 2 to 4 hours. Time varies based on skill level and drying time for paint or glue.
Is A Wooden Toy Lantern Safe For Toddlers?
Yes, if made with non-toxic paint and smooth edges. Avoid small parts that could be choking hazards for toddlers.
Can I Customize The Design Of The Wooden Toy Lantern?
Absolutely! You can paint, carve, or add decorations to personalize the lantern. Custom designs make the toy unique and engaging.
Conclusion
Building a wooden toy lantern is fun and rewarding. It teaches patience and simple woodworking skills. You create something useful and charming with your own hands. This project fits well for kids and adults alike. Enjoy the soft glow it brings to any room.
Try different designs to make each lantern unique. Keep practicing to improve your craft every time. Simple steps lead to great results in DIY projects. Start your wooden toy lantern today and light up your space.