Have you ever wondered how stuffed animals are made? Those soft, cuddly toys you love hold a special kind of magic.
Imagine creating one yourself, step by step, turning simple materials into a lovable friend. You’ll discover exactly how to make stuffed animals that are soft, safe, and full of personality. Whether you want to craft a gift or start a fun new hobby, this guide will show you how easy and rewarding it can be.
Ready to bring your own stuffed animal to life? Let’s dive in!
Choosing Materials
Choosing the right materials is key to making great stuffed animals. The materials affect the look, feel, and durability of the toy. Quality materials make your stuffed animals soft and safe for kids. This section covers fabrics, stuffing, and essential tools.
Selecting Fabrics
Pick soft and durable fabrics for stuffed animals. Fleece, cotton, and minky fabric work well. These fabrics feel nice and are easy to sew. Avoid rough or thin fabrics that tear easily. Choose colors and patterns that fit your design.
Picking Stuffing Types
Stuffing gives shape and softness to your stuffed animals. Polyester fiberfill is popular because it is light and fluffy. Cotton stuffing is natural but can be firmer. Foam pieces add extra support for certain parts. Make sure stuffing is clean and safe for children.
Gathering Tools
Good tools make the sewing process easier. You need sharp scissors for cutting fabric accurately. Use sewing needles or a sewing machine to join pieces. Pins hold fabric in place before sewing. Measuring tape helps keep sizes correct. A fabric marker or chalk is useful for outlines.
Creating A Design
Creating a design is the first step in making a stuffed animal. It helps to shape your idea into something real. A clear design makes sewing easier and the final toy look better. This stage includes sketching, making a pattern, and deciding the right size.
Sketching Your Toy
Start by drawing your stuffed animal on paper. Use simple shapes to form the body and limbs. Focus on the main features like eyes, ears, and nose. Keep your lines light so you can change them easily. Sketch different views to understand the toy’s shape better.
Making A Pattern
Turn your sketch into a pattern. Patterns are shapes you cut out from fabric. Draw each part of the animal on paper, like arms, legs, and body. Add extra space around edges for sewing. Label each piece to avoid confusion later.
Sizing And Scaling
Decide how big your stuffed animal will be. Measure the parts in your pattern to check the size. Use a ruler or grid paper for accuracy. You can make the pattern bigger or smaller by copying it on new paper. Keep the parts in proportion for a balanced look.
Cutting Fabric
Cutting fabric is a key step in making stuffed animals. It shapes the pieces that come together to form the toy. Careful cutting ensures the animal looks neat and fits well when sewn. This step needs patience and focus to get perfect results.
Tracing Patterns
Start by placing the paper pattern on the fabric. Use a fabric pencil or chalk for clear lines. Trace carefully around the edges without moving the pattern. Mark any notches or points to help with sewing later. Keep your hand steady for smooth lines.
Precision Cutting Tips
Use sharp fabric scissors for clean cuts. Cut slowly to avoid jagged edges or mistakes. Keep the fabric flat on a table to prevent stretching. Follow the traced lines closely but leave a small seam allowance. Check your work often to stay on track.

Credit: www.youtube.com
Sewing Pieces Together
Sewing pieces together is a key step in making stuffed animals. It shapes the toy and holds all parts firmly. This process needs care and patience to create a neat and strong finish. Both hand sewing and using a sewing machine are good options. Each method has its own benefits and suits different needs.
Hand Sewing Techniques
Hand sewing lets you control every stitch. It is perfect for small or detailed parts. Use a needle and strong thread. Choose a thread color that matches the fabric. Start by tying a knot at the thread’s end. Align the pieces carefully before stitching.
Try the ladder stitch to close seams invisibly. Insert the needle inside the fabric edges. Pull the thread tight but not too tight. Keep stitches small and close to each other. This makes the seam strong and neat. Hand sewing works well for stuffing and finishing touches.
Using A Sewing Machine
A sewing machine speeds up sewing large parts. It gives even, strong stitches that last long. Select a straight stitch for most seams. Use a medium stitch length for soft fabric. Pin pieces together before sewing to avoid shifting.
Start sewing from one edge slowly. Guide the fabric gently without pulling. Backstitch at the beginning and end to lock stitches. Leave an opening for stuffing the animal. A sewing machine is great for simple shapes and quick work.
Stuffing The Animal
Stuffing the animal is a key step in making a soft toy. It gives the toy shape and makes it cuddly. The right stuffing makes the toy look good and feel nice to hold. Too little stuffing makes the toy floppy. Too much stuffing can stretch the fabric and seams. Careful stuffing helps the toy keep its shape for a long time.
Choosing The Right Stuffing Amount
Start by choosing the right amount of stuffing. Fill the toy slowly. Add small amounts at a time. Check the toy’s shape as you go. The toy should feel firm but soft. Avoid stuffing too tightly. Tight stuffing can cause the fabric to tear. Too loose stuffing makes the toy limp. Find a balance for a perfect feel.
Shaping The Toy
Use your fingers to shape the toy while stuffing. Press the stuffing into corners and curves. This helps the toy keep its form. Smooth out lumps and bumps. Make sure the head, arms, and legs look natural. Keep the toy’s body round and even. Take your time. Good shaping makes the toy look better and last longer.
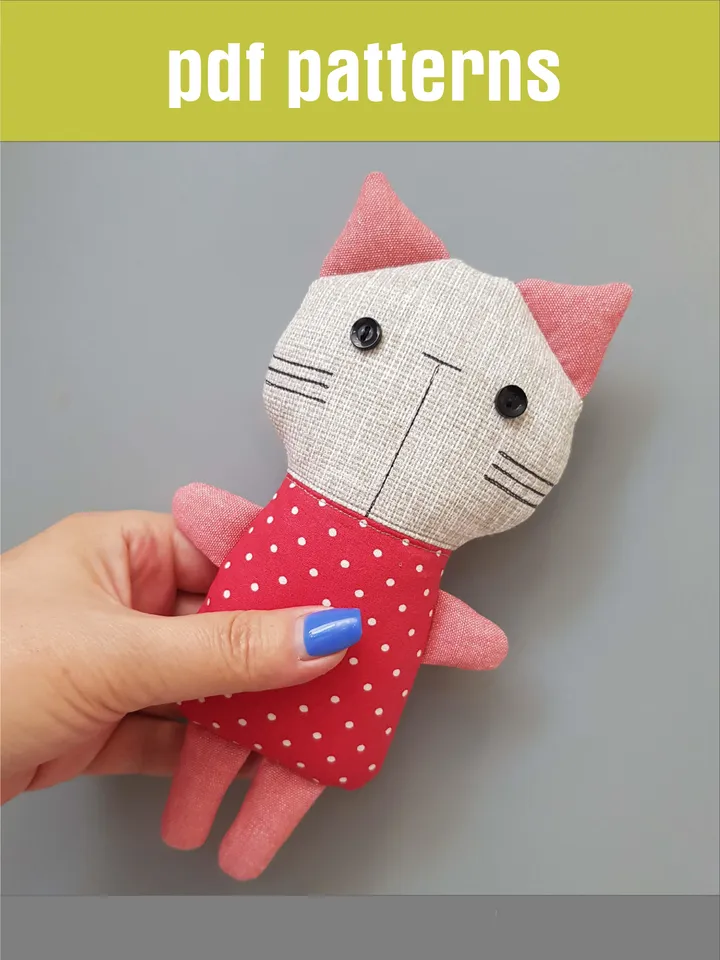
Adding Details
Adding details to stuffed animals brings them to life. These small touches give personality and charm. Careful work here makes your creation special. Each part adds to the overall look and feel.
Focus on neatness and accuracy. Use the right tools and materials. Take your time to create a lovely toy.
Sewing Eyes And Nose
Sewing eyes and nose is key for expression. Use buttons, beads, or embroidery thread. Secure each piece tightly to avoid loose parts. Place them evenly for a balanced face. Small stitches keep the look clean and safe.
Attaching Ears And Limbs
Attach ears and limbs carefully for good shape. Use strong thread and tight stitches. Position parts symmetrically to keep balance. Padding helps limbs hold their form. Check for comfort and safety, especially for kids.
Decorative Features
Decorative features add fun and style. Use ribbons, bows, or fabric patches. Try embroidery or felt shapes for extra detail. Keep decorations simple and soft. Avoid sharp or hard pieces for safety.
Finishing Touches
Finishing touches bring your stuffed animal to life. This step makes sure your toy looks neat and feels soft. It involves careful work on seams, shaping, and checking quality. These small details create a charming and durable stuffed animal.
Closing Seams
Close the seams carefully to keep stuffing inside. Use small, tight stitches to make seams strong. Sew by hand or with a machine, but keep stitches even. Hide the thread ends to make the look clean. A well-closed seam stops stuffing from falling out.
Final Shaping
Shape the stuffed animal by adjusting the stuffing inside. Push the stuffing gently to form arms, legs, and head. Make sure the shape is smooth and round where needed. Add more stuffing if parts feel flat or loose. Good shaping gives your toy a soft, cuddly look.
Quality Check
Check your stuffed animal carefully for mistakes or weak spots. Look at all seams and shapes to find problems. Test if the toy feels soft and safe to hold. Fix any loose threads or uneven parts. A final quality check ensures your stuffed animal lasts long and looks great.

Credit: www.amazon.com
Care Tips For Stuffed Animals
Stuffed animals bring joy and comfort to many people. Taking care of them helps keep them soft and clean. Proper care also makes them last longer. Here are some simple tips to keep your stuffed animals in great shape.
Cleaning And Maintenance
Regular cleaning keeps stuffed animals fresh and safe. Spot clean small stains with a damp cloth and mild soap. For deeper cleaning, use a gentle cycle in the washing machine inside a pillowcase. Air dry completely to avoid mold and bad smells. Brush the fur lightly to keep it soft and fluffy.
Repairing Wear And Tear
Check stuffed animals often for loose threads or small holes. Use a needle and thread to sew small tears quickly. Replace missing eyes or noses with craft supplies or buttons. Tighten any loose parts to prevent further damage. Simple repairs help stuffed animals stay cuddly for years.

Credit: www.youtube.com
Frequently Asked Questions
How Do You Start Making A Stuffed Animal?
Begin by selecting a pattern and fabric. Cut the fabric pieces according to the pattern. Sew pieces together, leaving a gap to stuff.
What Materials Are Needed For Stuffed Animals?
You need fabric, stuffing, sewing needles, thread, scissors, and optional embellishments like buttons or embroidery.
How Do You Stuff A Stuffed Animal Properly?
Use polyester fiberfill or cotton stuffing. Fill evenly to avoid lumps. Stuff firmly but not too tight for softness.
Can Beginners Easily Make Stuffed Animals?
Yes, beginners can start with simple patterns and basic sewing skills. Practice improves precision and results.
Conclusion
Making stuffed animals can be fun and simple for everyone. Choose soft fabric and safe stuffing first. Cut shapes carefully and sew them with care. Add eyes, nose, and other details to bring them alive. Stuff gently to keep the shape nice.
Enjoy the process and share your creations with friends. Practice helps improve your skills quickly. Try different designs to keep things exciting. Making stuffed animals brings joy and creativity together. Give it a try today!