Imagine giving your child a magical place to play, learn, and explore—all built by your own hands. Building a wooden toy treehouse is more than just a project; it’s a chance to create lasting memories and spark your child’s imagination.
You might think it’s complicated, but with the right steps, you can build a safe, sturdy, and beautiful toy treehouse that your little ones will love. Keep reading, and you’ll discover simple tips and tricks that make the process easy and fun, even if you’re new to woodworking.
Ready to turn your vision into reality? Let’s get started!
Choosing The Right Wood
Choosing the right wood is important for building a wooden toy treehouse. The wood should be safe, strong, and easy to work with.
Good wood helps the treehouse last longer and keeps children safe while playing.
Types Of Wood For Toy Treehouses
Some woods are better for toy treehouses because they are strong and safe. Softwoods and hardwoods both work well.
- Pine:Pine is easy to cut and shape. It is also affordable and widely available.
- Cedar:Cedar resists rot and insects. It smells nice and lasts a long time outside.
- Redwood:Redwood is strong and does not warp easily. It is good for outdoor use.
- Maple:Maple is a hardwood that is tough and smooth. It is good for small parts and details.
- Birch:Birch is hard and looks nice. It sands well for a smooth finish.
Safety Considerations
Wood used for toy treehouses must be safe for children. Avoid woods that splinter easily or cause allergies.
Use untreated wood or wood treated with child-safe finishes. Avoid toxic paints and stains.
- Check for knots that can fall out and cause injuries.
- Sand wood surfaces to remove rough spots and splinters.
- Choose wood that does not rot quickly to keep the treehouse strong.
- Use non-toxic, water-based sealants for protection.
- Inspect wood regularly for cracks or damage.

Credit: myplayroom.com.au
Gathering Tools And Materials
Building a wooden toy treehouse starts with gathering the right tools and materials. This ensures your project goes smoothly.
Choosing quality items saves time and helps you create a safe and sturdy toy treehouse for children.
Essential Tools List
Use these tools to cut, shape, and assemble the wooden parts of the toy treehouse.
- Measuring tape – for accurate dimensions
- Hand saw or jigsaw – to cut wood pieces
- Hammer – to drive nails safely
- Screwdriver – to fasten screws securely
- Sandpaper – to smooth rough edges
- Wood glue – for extra bonding strength
- Clamps – to hold parts while glue dries
- Pencil – for marking measurements
- Safety goggles – to protect your eyes
Materials Checklist
Select these materials before you start building. They form the structure and look of the treehouse.
| Material | Purpose | Recommended Type |
| Wood boards | Walls and floor | Pine or cedar, smooth finish |
| Wooden dowels | Support beams | Solid, straight grain |
| Nails and screws | Fastening parts | Rust-resistant steel |
| Wood glue | Extra hold | Strong, waterproof |
| Paint or wood stain | Finishing and protection | Non-toxic, child-safe |
| Sandpaper | Smoothing surfaces | Medium and fine grit |
Designing The Treehouse
Designing a wooden toy treehouse starts with a good plan. A clear design makes building easier and fun.
Think about the shape, size, and features your treehouse will have before you start building.
Simple Sketch Ideas
Sketching your treehouse helps you see how it will look. Use simple shapes like squares and triangles.
Draw the front, side, and top views. This shows all parts clearly and helps spot problems early.
- Start with a square base for the floor
- Add a triangle for the roof
- Draw windows and a door as rectangles
- Include a ladder or stairs for access
Sizing For Kids
Make the treehouse size safe and comfortable for children. Keep heights and openings child-friendly.
Use these size tips to fit most kids:
- Floor space around 3 feet by 3 feet
- Door height about 3 feet tall
- Window openings 1.5 feet wide
- Low railings about 2 feet high for safety
Credit: toydha.com
Cutting And Preparing Wood
Cutting and preparing wood is an important part of building a wooden toy treehouse. You need to measure carefully and use safe cutting methods. This helps make sure the pieces fit well and are safe for play.
Using the right tools and techniques also helps avoid mistakes and injuries. Let’s look at how to measure and mark wood and how to cut it safely.
Measuring And Marking
Accurate measuring and marking guide your cuts. Use a tape measure and a pencil to mark the wood. Mark the lines clearly so you can cut on the right spot.
- Measure twice to avoid mistakes.
- Use a square tool for straight lines.
- Mark all cut lines clearly with a sharp pencil.
- Check measurements against your plan before cutting.
Safe Cutting Techniques
Safety is very important when cutting wood. Wear safety glasses and keep fingers away from the blade. Use clamps to hold the wood steady while cutting.
| Tool | Safety Tip |
| Handsaw | Cut slowly and keep hands clear of the blade |
| Jigsaw | Use a guide and wear eye protection |
| Circular saw | Secure wood firmly and follow the cut line |
| Sanding block | Sand edges smooth to avoid splinters |
Assembling The Base And Walls
Building a wooden toy treehouse is fun and creative. This guide helps you assemble the base and walls securely.
We will cover important steps to ensure stability. Let's begin with building the base and attaching the walls.
Building A Stable Base
A stable base is key to a strong treehouse. It supports the entire structure above it.
Start by choosing a flat area to work on. Use wooden planks that are even and sturdy.
- Lay the planks in a square shape
- Secure the corners with screws
- Check for any wobbling
Attaching Walls Securely
Walls need to be attached firmly to the base. This keeps the treehouse safe for play.
Use wooden panels for the walls. Make sure they fit the base properly.
- Align each wall with the base edges
- Fasten them using nails or screws
- Check that each wall is upright

Credit: www.bellalunatoys.com
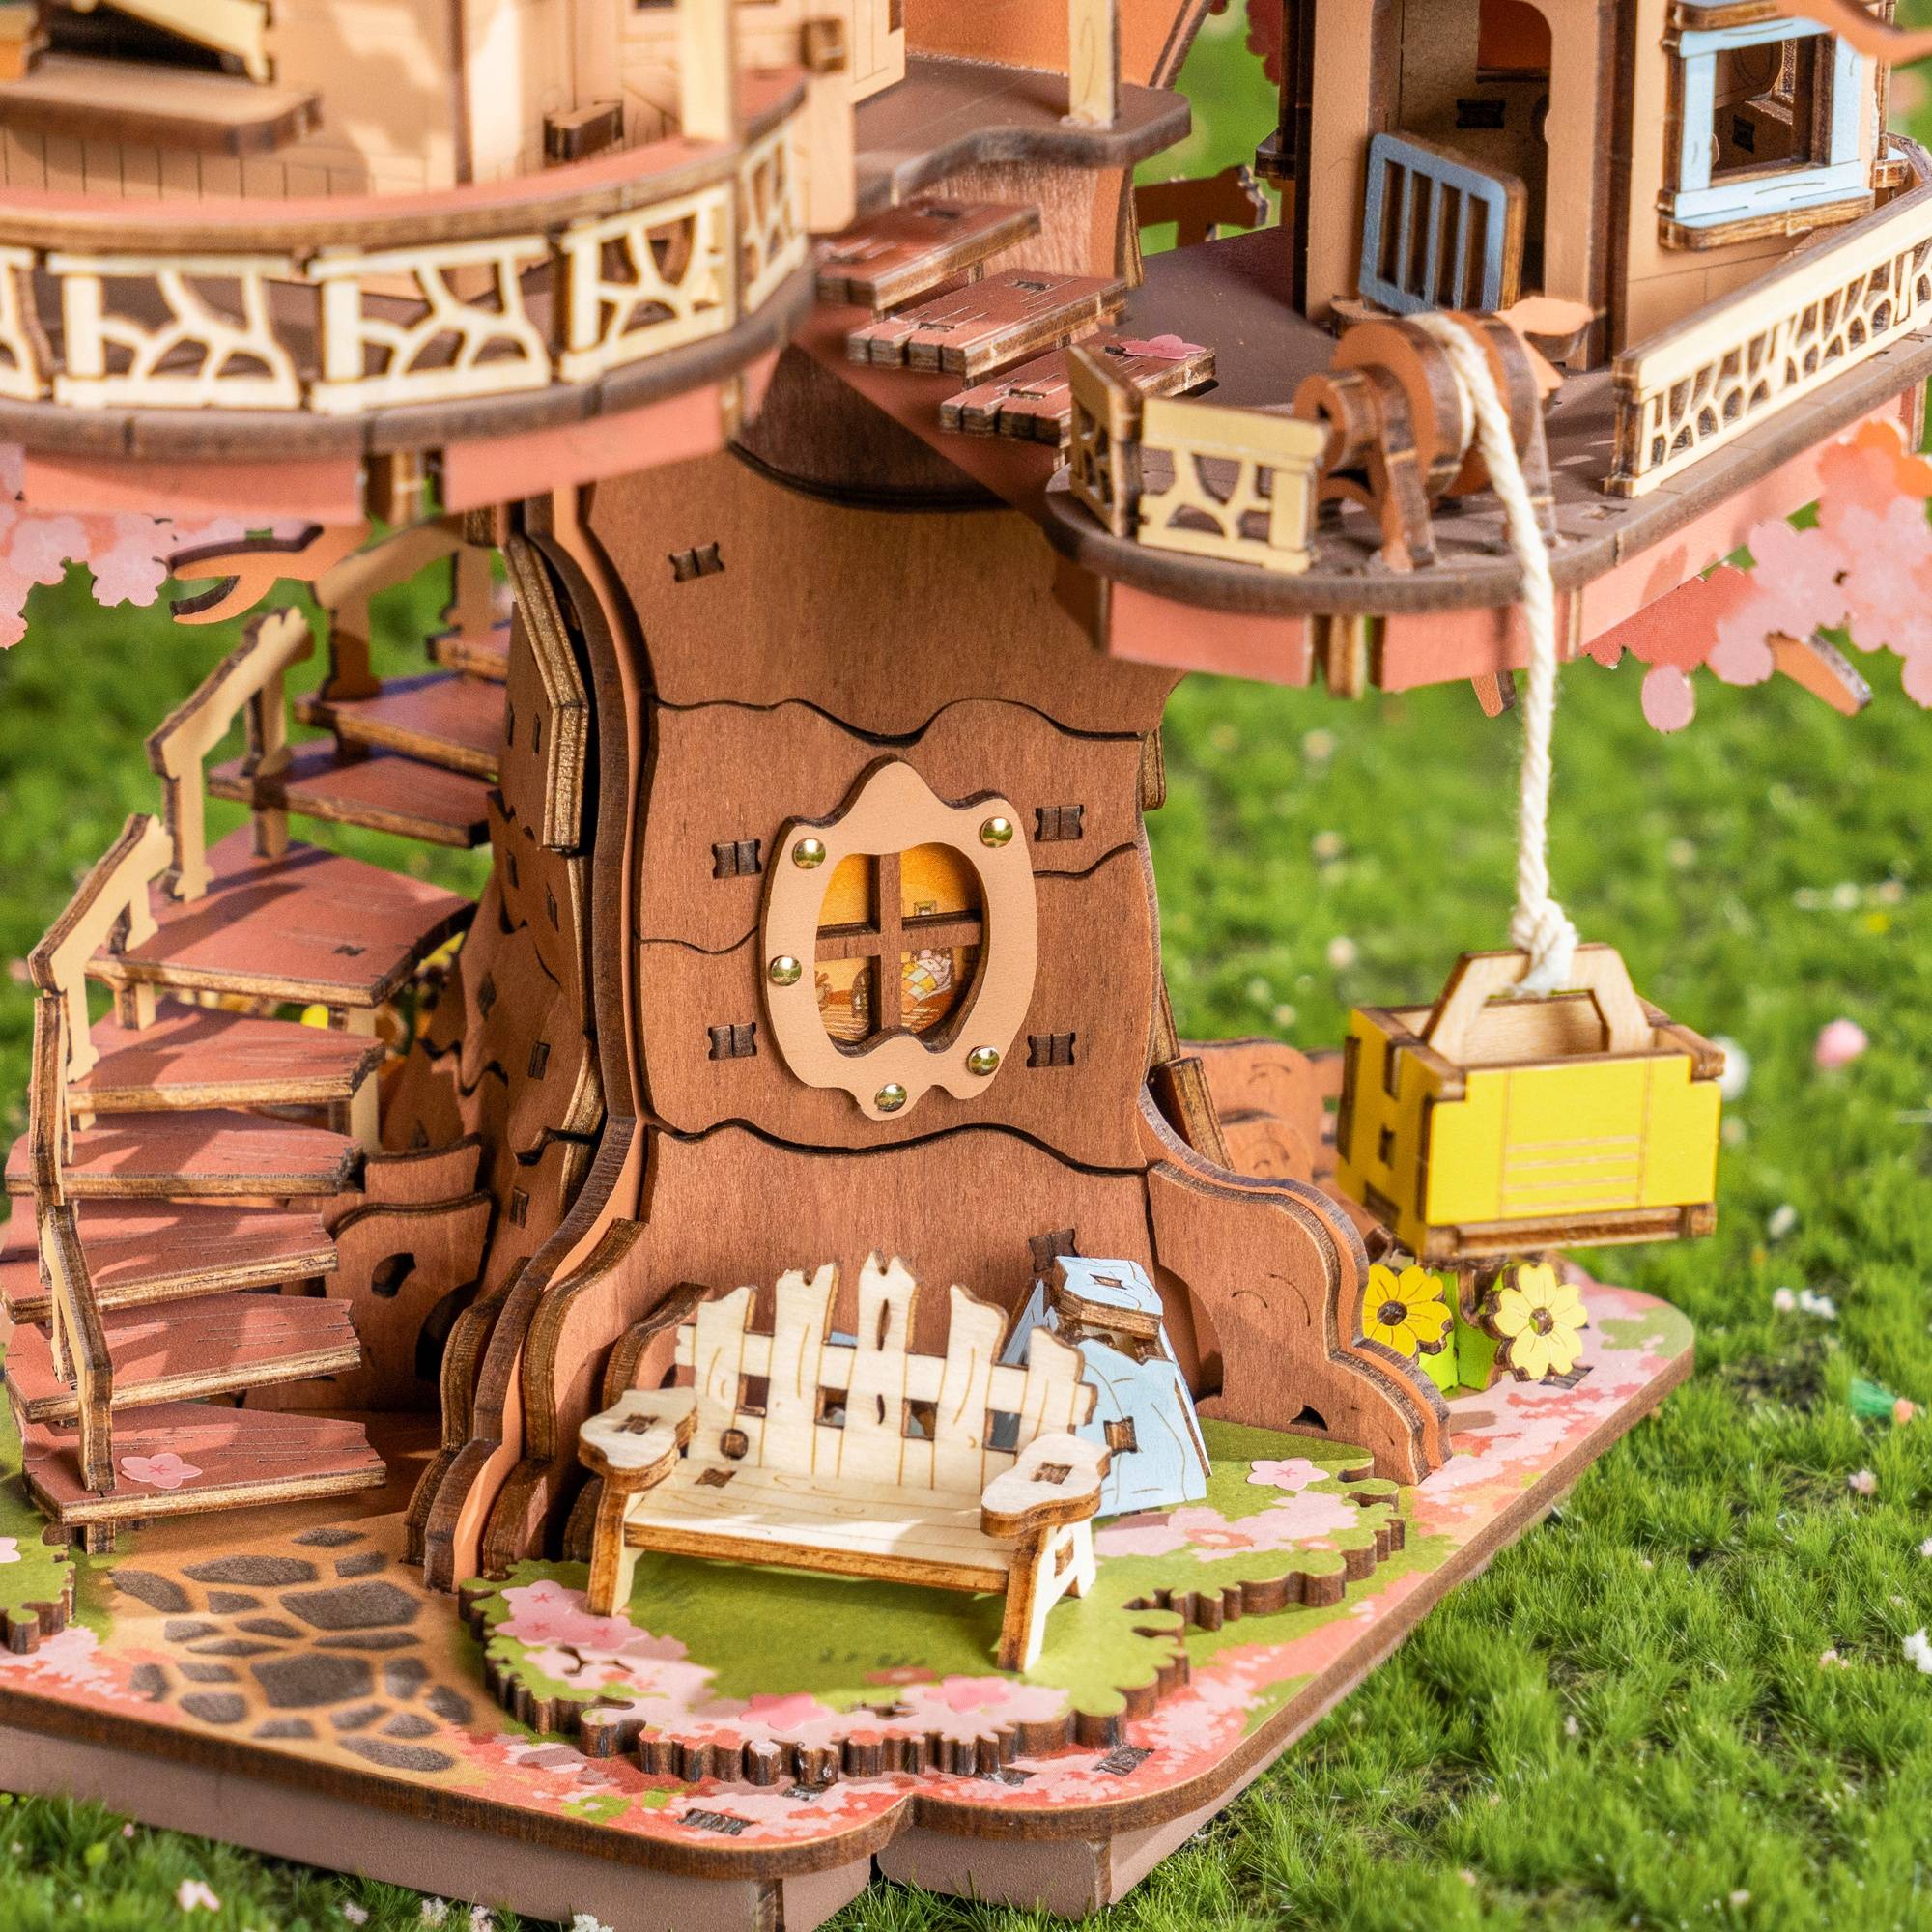
Adding Roof And Details
Adding a roof and details makes the wooden toy treehouse look complete. These parts protect the house and add charm. You can make the roof sturdy and decorate it with fun touches.
This guide covers how to create a roof structure and add decorative elements. Follow the steps to build a roof that fits well and looks great.
Creating A Roof Structure
Start by measuring the top of the treehouse base. Cut wooden pieces to form the roof frame. You can choose a flat or sloped roof.
- Cut two long wooden planks for the roof sides.
- Cut shorter planks for the front and back edges.
- Attach the planks to form a rectangle or triangle shape.
- Secure the frame with small nails or wood glue.
- Add thin wooden slats on top for the roof cover.
Make sure the roof fits snugly over the treehouse walls. Sand the edges to avoid splinters.
Decorative Elements
Decorations add personality to your toy treehouse. You can paint, add windows, or small furniture pieces. Choose simple shapes and bright colors.
| Decoration | Materials Needed | Tips |
| Window Frames | Thin wood strips, paint | Glue on sides, paint white or bright colors |
| Door | Small wood piece, hinge or glue | Make it openable or fixed |
| Roof Shingles | Small wood pieces or cardboard | Layer from bottom to top for texture |
| Flower Boxes | Small boxes, fake flowers | Attach under windows for charm |
Sanding And Finishing Touches
Building a wooden toy treehouse needs careful sanding and finishing. These steps make the toy safe and look nice. Sanding removes rough spots and prepares the wood for paint or sealant.
Finishing touches protect the wood and add color. Use only child-safe materials to keep the toy safe for kids.
Smoothing Rough Edges
Sand all parts of the treehouse to remove splinters and sharp edges. Use medium grit sandpaper first, then fine grit for a smooth finish. Pay close attention to corners and cut ends.
- Start with 80-120 grit sandpaper to smooth rough areas.
- Use 220 grit sandpaper for a final smooth surface.
- Sand in the direction of the wood grain to avoid scratches.
- Check all edges by running your hand over them carefully.
- Remove dust with a dry cloth before painting or sealing.
Applying Child-safe Paint Or Sealant
Choose paint or sealant labeled as safe for children. These products are non-toxic and free from harmful chemicals. They protect the wood and keep the treehouse looking good for a long time.
| Type | Benefits | Application Tips |
| Water-based paint | Non-toxic, easy to clean | Apply thin coats, let dry fully |
| Natural oil finish | Safe, enhances wood grain | Use a cloth to rub in, dry well |
| Child-safe sealant | Protects from moisture | Apply with brush, avoid thick layers |
Safety Tips For Playtime
Building a wooden toy treehouse is fun and rewarding. Ensuring safety during playtime is crucial. Here are some helpful tips to keep playtime safe.
Regular Maintenance
Check the treehouse regularly for wear and tear. Make sure all parts are secure and stable. This helps prevent accidents and keeps the structure safe.
Inspect the wood for any signs of rot or damage. Replace any broken or weak parts immediately to maintain safety.
- Look for loose nails or screws
- Ensure the ladder is sturdy
- Check for splinters on wooden surfaces
Supervision Guidelines
Always supervise children while they play in the treehouse. This ensures they are safe and following the rules. Supervision helps prevent accidents and injuries.
Set clear rules for playtime. Explain the importance of safety to children. Make sure they understand not to push or jump inside the treehouse.
- Limit the number of children playing at once
- Establish a no-climbing-on-the-roof rule
- Encourage gentle play and sharing
Frequently Asked Questions
What Materials Are Needed To Build A Wooden Toy Treehouse?
You need wood panels, nails, screws, wood glue, paint, sandpaper, a saw, and a hammer. Choose safe, non-toxic paints for finishing.
How Long Does It Take To Build A Wooden Toy Treehouse?
Building a wooden toy treehouse typically takes 4 to 6 hours. Time depends on design complexity and your skill level.
What Safety Tips Should I Follow While Building?
Always wear protective gear like gloves and goggles. Use tools carefully and keep children supervised during construction.
Can I Customize The Wooden Toy Treehouse Design?
Yes, you can customize size, color, and features. Personalize with windows, doors, or ladders for added fun and creativity.
Conclusion
Building a wooden toy treehouse can be a fun and rewarding project. It brings joy to kids and encourages outdoor play. Using simple tools and steps makes the process easy. Take your time to measure and cut carefully. Choose safe, strong wood for lasting results.
Enjoy the creative process and watch the treehouse come alive. This project creates special memories for the whole family. Start building and let imagination grow alongside your wooden toy treehouse.