Looking for a fun and creative project that turns ordinary cardboard into an exciting toy parking garage? You’re in the right place.
Imagine building a cool, multi-level garage where your toy cars can park, race, and play—all made from simple materials you already have at home. This isn’t just a craft; it’s a chance to bring your ideas to life and create hours of entertainment.
Ready to learn how you can make your own toy parking garage out of cardboard? Keep reading, and I’ll guide you step-by-step to make it easy and fun.
Materials Needed
Making a toy parking garage from cardboard is a fun and creative project. You will need some basic materials to start building.
Gathering the right materials helps you create a strong and safe toy garage for playtime.
Choosing The Right Cardboard
Cardboard is the main material for your toy parking garage. Pick cardboard that is sturdy and thick enough to hold weight.
Look for clean cardboard with no tears or holes. Corrugated cardboard works best because it is strong and easy to cut.
- Use double-wall corrugated cardboard for extra strength
- Avoid thin or flimsy cardboard that bends easily
- Recycle boxes from appliances or furniture for large pieces
Essential Tools And Supplies
Besides cardboard, you need some tools to cut, shape, and join the pieces. These tools make the building process easier and safer.
Having the right supplies also helps you decorate and finish your toy parking garage.
- Box cutter or craft knife for cutting cardboard
- Metal ruler or straight edge for precise cuts
- Cutting mat to protect surfaces
- Strong glue or hot glue gun for sticking parts together
- Masking tape or packing tape for extra hold
- Markers, paint, or colored paper for decoration
- Pencil and eraser for drawing outlines

Credit: www.youtube.com
Planning Your Design
Planning is the first step to make a toy parking garage from cardboard. It helps you build a strong and fun structure.
Good planning saves time and materials. It guides you through the building process.
Sketching The Layout
Start by drawing a simple sketch of your parking garage. This shows where each part will go.
Include ramps, parking spots, and entrances in your sketch. This helps you see the full design.
- Draw top view to plan parking spaces
- Sketch side view for ramps and levels
- Mark where cars will enter and exit
- Use pencil for easy changes
Deciding On Size And Levels
Think about how big your toy cars are. This helps decide the size of each parking spot.
Choose how many levels your garage will have. More levels mean more parking space but more work.
- Measure toy car length and width
- Allow extra space for easy parking
- Start with two or three levels
- Keep levels easy to reach and play with
Cutting The Cardboard
Cutting cardboard is an important step to create your toy parking garage. You need to cut the pieces carefully for the garage to fit together well.
Use the right tools and work on a safe surface. This helps you cut clean shapes without hurting yourself.
Measuring And Marking
Measure the cardboard pieces before cutting. Use a ruler or measuring tape to get exact sizes.
Mark the lines clearly with a pencil. Straight lines help you cut better and keep the garage parts neat.
- Use a ruler to draw straight lines
- Mark all sides that need cutting
- Double-check measurements for accuracy
- Keep marks light for easy erasing
Safe Cutting Techniques
Always cut on a flat, hard surface like a cutting mat. This protects your table and helps control the blade.
Use a sharp craft knife or box cutter. Cut slowly along the marked lines to avoid mistakes or injury.
- Keep fingers away from the blade
- Cut away from your body
- Use multiple light cuts instead of one deep cut
- Store knives safely when not in use

Credit: propper.it
Assembling The Garage
Building a toy parking garage from cardboard is fun and simple. You will need to carefully put together the parts to make it strong.
This guide will help you assemble the base, floors, ramps, and walls step by step.
Building The Base And Floors
Start by cutting a large, flat piece of cardboard for the base. This will hold the whole garage steady.
Next, cut smaller pieces for each floor. Make sure each floor fits well on top of the base or the floor below it.
- Cut the base larger than the floors for stability.
- Use strong tape or glue to attach floors to the base.
- Leave enough space between floors for toy cars to fit.
Creating Ramps And Walls
Cut long strips of cardboard for ramps. These ramps connect floors so cars can move up and down easily.
For walls, cut tall pieces that match the edges of floors and base. Attach them to keep the cars inside the garage.
- Make ramps slant gently for smooth movement.
- Secure ramps with tape or glue on both ends.
- Attach walls firmly to floors and base for support.
- Decorate walls with markers or stickers if you like.
Adding Details
Creating a toy parking garage from cardboard is fun. Adding details makes it special.
Small touches make your garage look real and engaging for kids.
Painting And Decorating
Use paint to brighten your cardboard garage. Choose colors that stand out.
- Blue for the parking lot
- Yellow for the ramps
- Red for the entrance
Adding Parking Lines And Signs
Parking lines guide toy cars where to go. Add signs for a realistic touch.
| Sign | Purpose |
| Stop | Control traffic |
| Exit | Show way out |
| Handicap | Reserved space |
Cut strips of white paper to make parking lines.
Glue them on the garage floor for neat rows.
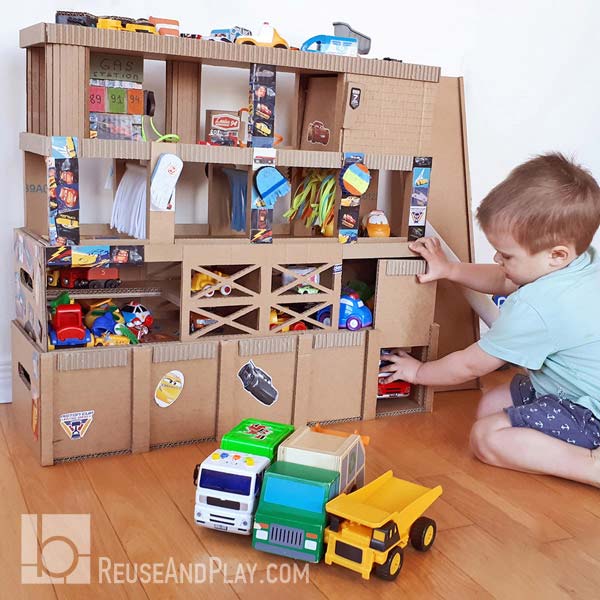
Credit: reuseandplay.com
Tips For Durability
Making a toy parking garage from cardboard can be fun and creative. To keep it strong, you need to focus on durability. This guide gives simple tips to make your garage last longer.
Two key ways to improve strength are reinforcing weak spots and protecting with sealants. Both help your garage stand up to play and time.
Reinforcing Weak Spots
Cardboard can bend or tear at thin or joint areas. You should add extra support to these weak spots to stop damage.
- Use extra layers of cardboard on edges and corners.
- Glue small strips of cardboard along joints inside the garage.
- Attach wooden sticks or skewers in parts that hold weight.
- Apply strong tape around openings and moving parts.
- Check weak spots often and fix any cracks quickly.
Protecting With Sealants
Sealants keep cardboard safe from moisture and dirt. They make the surface tougher and easier to clean.
| Sealant Type | Use | Drying Time |
| White Glue (Diluted) | Brush on surface | 1-2 hours |
| Clear Acrylic Spray | Spray evenly | 30 minutes |
| Mod Podge | Brush or sponge | 1 hour |
| Varnish (Water-based) | Apply with brush | 2-3 hours |
Creative Variations
Making a toy parking garage from cardboard can be fun and creative. You can try different styles and materials to make it unique.
Explore various designs to create an exciting toy parking garage. Use items you already have at home.
Multi-level Designs
Building a multi-level garage adds more fun. You can create ramps and parking spots on each level.
Stack cardboard layers to make different floors. You can use glue or tape to keep them together.
- Use strong cardboard for the base
- Create ramps with folded cardboard
- Add windows and doors with markers
Incorporating Other Materials
You can use more than just cardboard. Add other materials to make your garage more interesting.
Try using plastic bottles or cans for tunnels. Paint them for a colorful look.
- Use paper tubes for columns
- Decorate with stickers or paint
- Include small cars and figures
Frequently Asked Questions
What Materials Are Needed For A Cardboard Parking Garage?
You need sturdy cardboard, scissors, glue, ruler, pencil, and paint. These basic materials help create a durable and colorful toy parking garage.
How Long Does It Take To Build A Cardboard Garage?
Building a cardboard parking garage typically takes 1 to 2 hours. Time varies depending on design complexity and drying time for glue or paint.
Can Kids Safely Build A Cardboard Parking Garage?
Yes, with adult supervision, kids can safely build this project. It’s a fun, creative activity that helps develop fine motor skills and imagination.
How To Make Parking Levels In A Cardboard Garage?
Use cut cardboard pieces as ramps or platforms. Attach them securely inside the main structure to create multiple parking levels.
Conclusion
Making a toy parking garage from cardboard is fun and easy. You only need simple materials and a little time. Kids can help, making it a great family project. This craft sparks creativity and saves money. Your homemade garage will bring hours of play and joy.
Try different designs and colors to make it unique. Enjoy building and watching your toy cars park inside!