Have you ever wondered how gears work together to create motion? Imagine building your very own wooden toy gear mechanism that moves smoothly and teaches you the basics of engineering.
This project is not only fun but also a great way to understand how simple machines make our lives easier. By the end of this article, you’ll have all the steps and tips to create a wooden gear toy that can impress your friends and spark your curiosity.
Ready to get your hands working and your mind thinking? Let’s dive in!
Choosing The Right Wood
Choosing the right wood is important for building a wooden toy gear mechanism. The wood must be strong and safe for children to use.
Different types of wood offer various benefits. Knowing these helps you pick the best one for your project.
Types Of Wood For Toy Gears
Hardwoods and softwoods are common choices. Hardwoods are dense and last longer. Softwoods are easier to shape but may wear out faster.
- Maple: A hard, strong wood with a smooth finish.
- Birch: Light color and fine grain, easy to work with.
- Beech: Durable and resistant to wear.
- Pine: Softwood, lightweight, and easy to carve.
- Cedar: Light and fragrant, but softer than hardwoods.
Safety And Durability Considerations
| Factor | What to Check | Reason |
|---|---|---|
| Toxicity | Use non-toxic, child-safe wood | Prevents health risks from harmful chemicals |
| Splintering | Choose wood with tight grain | Reduces risk of splinters |
| Strength | Pick hard, dense wood | Ensures gears last longer |
| Finish | Sand smooth and seal with safe finish | Protects wood and keeps toy safe |
Essential Tools And Materials
Building a wooden toy gear mechanism requires the right tools and materials. These help you cut, shape, and assemble the parts accurately.
This guide covers the essential cutting and shaping tools along with the supplies needed for assembly.
Cutting And Shaping Tools
You need tools that can cut and shape wood precisely. These tools make sure the gear parts fit together smoothly.
- Hand saw or jigsaw for cutting wood pieces
- Sandpaper or sanding block to smooth edges
- Drill with small bits to make holes for axles
- Files to refine gear teeth shapes
- Ruler and pencil for measuring and marking
Assembly Supplies
After cutting and shaping, you need materials to put the parts together securely.
| Supply | Purpose |
| Wood glue | Bonds wooden parts firmly |
| Wooden dowels or small axles | Connect gears and allow rotation |
| Clamps | Hold pieces while glue dries |
| Sandpaper | Smooth glued joints and surfaces |
| Paint or finish (optional) | Protects wood and adds color |
Basic Gear Mechanism Concepts
Gears are wheels with teeth that fit together. They help machines move by turning each other. Using wooden toy gears is a fun way to learn how gears work.
Gears change the speed, direction, and force of motion. They make simple tasks easier by working together in a system.
Gear Types And Functions
There are different gear types. Each type has a special job in a gear system. Knowing these helps you build better gear projects.
- Spur gears:These have straight teeth and are the most common. They connect parallel shafts and transfer motion smoothly.
- Bevel gears:These have teeth cut on a cone shape. They change motion direction at a right angle.
- Worm gears:These look like screws and mesh with spur gears. They reduce speed and increase force.
- Rack and pinion:This system turns rotary motion into linear motion using a gear (pinion) and a straight toothed bar (rack).
How Gears Transfer Motion
Gears transfer motion by their teeth locking together. When one gear turns, it moves the gear next to it. This changes how fast or strong the motion is.
Gear size affects motion. A small gear turning a big gear slows down speed but increases force. A big gear turning a small gear does the opposite.
- Gears change direction of motion
- Gears change speed of rotation
- Gears increase or decrease force
- Multiple gears can work together for complex tasks

Credit: www.youtube.com
Designing Your Toy Gear Project
Building a wooden toy gear project is fun and educational. Good design helps your gears work smoothly and last longer.
Start by planning how your gears will fit together. This makes sure your toy runs well and looks great.
Sketching Gear Layouts
Draw your gear layout on paper before cutting any wood. This helps you see how the gears will connect and move.
Use circles to show each gear’s size and position. Check if the gears touch correctly and spin without hitting each other.
- Draw each gear as a circle with teeth marks
- Place gears so their edges just touch
- Leave space for axles and supports
- Make sure all gears mesh smoothly
Calculating Gear Ratios
Gear ratios tell you how fast or slow one gear turns compared to another. This controls the toy’s speed and power.
To find the gear ratio, divide the number of teeth on the driven gear by the number of teeth on the driver gear.
| Driver Gear Teeth | Driven Gear Teeth | Gear Ratio | Effect |
|---|---|---|---|
| 10 | 20 | 2:1 | Slower speed, more torque |
| 20 | 10 | 0.5:1 | Faster speed, less torque |
Cutting And Shaping Gears
Cutting and shaping gears is key to making wooden toy gear mechanisms work well. Gears must fit perfectly to turn smoothly and transfer motion.
Using the right tools and careful methods helps create precise and strong wooden gears. This guide covers templates and cutting techniques.
Templates And Patterns
Templates help keep gear shapes uniform and accurate. You can print or draw patterns on paper or thin wood.
Use templates to trace gear teeth and center holes before cutting. This ensures each gear matches the design size.
- Choose a gear template that fits your project size
- Trace the pattern onto the wood with a pencil
- Mark the center hole for the axle
- Double-check measurements before cutting
Precision Cutting Techniques
Cut gears carefully to keep teeth even and edges smooth. Small errors can stop gears from working properly.
Use fine saws or scroll saws for detailed cuts. Sand edges lightly to remove splinters without changing gear shape.
- Cut slowly following the traced lines
- Use clamps to hold wood steady
- Sand teeth edges with fine sandpaper
- Check gear fit by turning it on the axle
Assembling The Gear Mechanism
Assembling the gear mechanism is a crucial step in creating a functional wooden toy. It requires patience and attention to detail to ensure that all the gears are properly aligned and secured.
In this section, we will guide you through the process of assembling the gear mechanism, focusing on aligning the gears correctly and securing the moving parts.
Aligning Gears Correctly
Aligning the gears correctly is essential to ensure that the gear mechanism functions smoothly and efficiently. Here are some tips to help you align the gears:
- Make sure the teeth of the gears are properly meshed, with the teeth of one gear fitting snugly into the teeth of the other gear.
- Use a ruler or straightedge to ensure that the gears are perfectly aligned, with no gaps or overlaps.
- Check that the gears are rotating smoothly and freely, with no resistance or binding.
If you're having trouble aligning the gears, try using a gear alignment tool or consulting the manufacturer's instructions for guidance.
Securing Moving Parts
Securing the moving parts of the gear mechanism is critical to prevent damage or injury. Here are some tips to help you secure the moving parts:
| Material | Fastening Method |
|---|---|
| Wood | Screws or nails |
| Metal | Bolts or rivets |
| Plastic | Adhesives or snap-fit connectors |
Make sure to use the recommended fastening method for your specific material, and apply a small amount of lubricant to the moving parts to reduce friction and wear.
Adding Fun Features
Wooden toy gear mechanisms can become more exciting with fun features. Adding movement and sound can make these toys more engaging.
Decorating wooden toys adds a creative touch that captivates children's imaginations. Let's explore how to incorporate these features.
Incorporating Movement And Sound
Movement and sound in wooden toys offer endless fun. Simple gear systems can create fascinating motions and sounds.
- Use rubber bands for elastic movement.
- Add small bells for gentle sound effects.
- Install simple levers to trigger actions.
Decorating Wooden Toys
Decorating toys makes them visually appealing. Kids love colors and patterns on their toys.
Consider these decoration ideas:
| Material | Decoration Idea |
| Paint | Bright, non-toxic colors |
| Stickers | Animal or star shapes |
| Wood Burning | Intricate patterns |
These ideas can transform simple wooden toys into works of art that children will cherish.
Testing And Troubleshooting
Testing the wooden toy gear mechanism helps find problems early. Troubleshooting fixes these issues for better performance.
Careful checks ensure the gears move well and the toy works as planned. Follow simple steps to test and fix your project.
Identifying Common Issues
Look for parts that do not move smoothly or stop working. Common problems include stuck gears and uneven movement.
Check for loose pieces or rough edges that can block gear motion. Noise or wobbling shows parts may not fit well.
- Gears that jam or slip
- Uneven or shaky rotation
- Loose or missing screws
- Wood pieces rubbing too hard
- Noise from friction or bad fit
Adjusting For Smooth Operation
Fix rough spots by sanding edges gently. Tighten screws to hold parts firmly but do not overtighten.
Apply a small amount of wax or oil on gear teeth. This reduces friction and helps the gears turn easily.
- Sand rough or tight-fitting parts
- Tighten but do not overtighten screws
- Use wax or light oil on gear teeth
- Check alignment of all gears
- Test movement after each adjustment
Safety Tips For Wooden Toys
Wooden toys are fun and last a long time. Safety is very important when making or buying them.
Following safety tips helps keep children safe while they play with wooden toys.
Non-toxic Finishes
Wooden toys should use safe, non-toxic finishes. These finishes protect the wood and keep kids safe.
Check that paints and varnishes do not have harmful chemicals. Choose water-based or natural oils instead.
- Use water-based paints and stains
- Avoid finishes with lead or heavy metals
- Try natural oils like linseed or beeswax
- Test finishes on a small piece first
Avoiding Small Parts Hazards
Small parts can be dangerous. Children might swallow or choke on tiny pieces.
Make sure all parts are big enough and well attached. Check toys often for loose pieces.
- Use large gears and parts that fit tightly
- Secure all pieces with strong glue or screws
- Do not give wooden toys with small parts to kids under 3
- Inspect toys regularly for damage or loose parts
Credit: medium.com
Project Ideas To Try
Wooden toy gear projects are fun and teach basic mechanics. Kids and adults can learn how gears work together.
Below are some easy project ideas to help you build and explore wooden gear mechanisms.
Simple Gear Cars
Simple gear cars use wooden gears to move wheels. You can build a car that rolls by turning a gear.
These cars show how gears change speed and direction of motion. They are great for beginners.
- Use a large gear for the wheels
- Attach a smaller gear to the axle
- Turn the small gear to make the car move
- Experiment with gear sizes to change speed
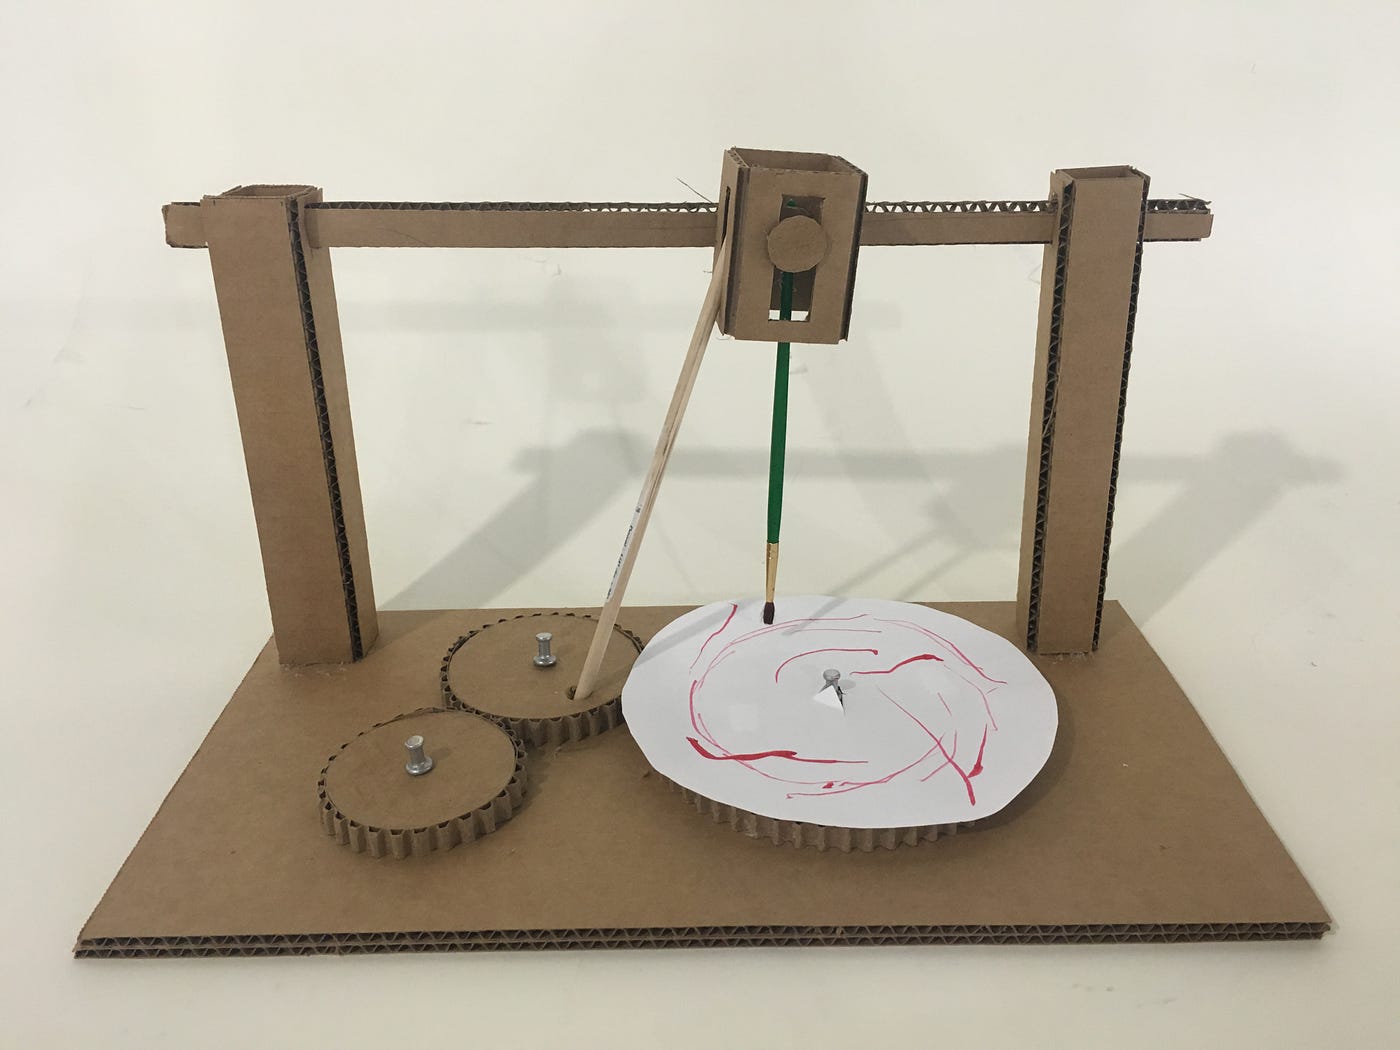
Interactive Gear Puzzles
Interactive gear puzzles let you connect many gears in a pattern. Turning one gear moves all the others.
These puzzles help you understand how gears work in machines. They are fun and challenge your thinking.
- Create a circle of connected gears
- Try adding gears of different sizes
- See how the direction of gears changes movement
- Build puzzles with multiple gear layers

Credit: www.amazon.ca
Frequently Asked Questions
What Materials Are Needed For A Wooden Toy Gear Mechanism?
You need plywood or hardwood, wooden dowels, glue, sandpaper, and non-toxic paint. These ensure durability and safety for the wooden toy gear mechanism project.
How Does A Gear Mechanism In Wooden Toys Work?
Wooden gears interlock and transfer motion by rotating together. This mechanism creates movement and demonstrates basic mechanical principles in a fun, educational way.
Can Kids Safely Build A Wooden Gear Mechanism?
Yes, with adult supervision, kids can safely build it. The project promotes learning about mechanics while using child-friendly, non-toxic materials and simple tools.
What Skills Are Developed By Making Wooden Gear Toys?
Building wooden gear toys enhances fine motor skills, problem-solving, creativity, and understanding of mechanical concepts. It also encourages patience and hands-on learning.
Conclusion
Building a wooden toy gear mechanism teaches how gears work simply. It helps develop problem-solving skills and creativity. This project brings fun and learning together in one activity. Kids and adults both enjoy making and playing with it. Try different gear sizes to see how movement changes.
It’s a great way to explore basic physics hands-on. Small steps lead to big understanding. Give it a try and watch the gears turn!